
How to Integrate Google Calendar API Into Your App
Published on
In this guide, we explain step by step how to integrate the Google Calendar API into your app. We cover the Google Cloud project setup, the scopes you need, common gotchas, and a real authorization flow example.
Prerequisites
This guide assumes that you have an email address, a domain you can use when setting up the Google Cloud project, some coding experience, and a fairly clear idea of what you want to build.
The guide is also useful if you have never worked with the Google Calendar API before and want to understand every step needed to add it to your app.
How to use and integrate the Google Calendar API into your app
1. Sign up for the Google Developer Console
If you don’t have a Google Developer Console account yet, create one at https://console.cloud.google.com/.
2. Create or choose from an existing Google Cloud Project
Google Cloud lets developers and organizations have multiple projects. Make sure you are in the right project before doing the steps below.
Click the projects dropdown on the top left of the screen. The name usually matches the name of your project.

Select an existing project, or create a new project by clicking "New Project" on the top right of the modal.

3. Enable the Google Calendar API services
Once you have an account and are in the right project, follow these steps to enable the Google Calendar API services:
- Go to Google Cloud Console
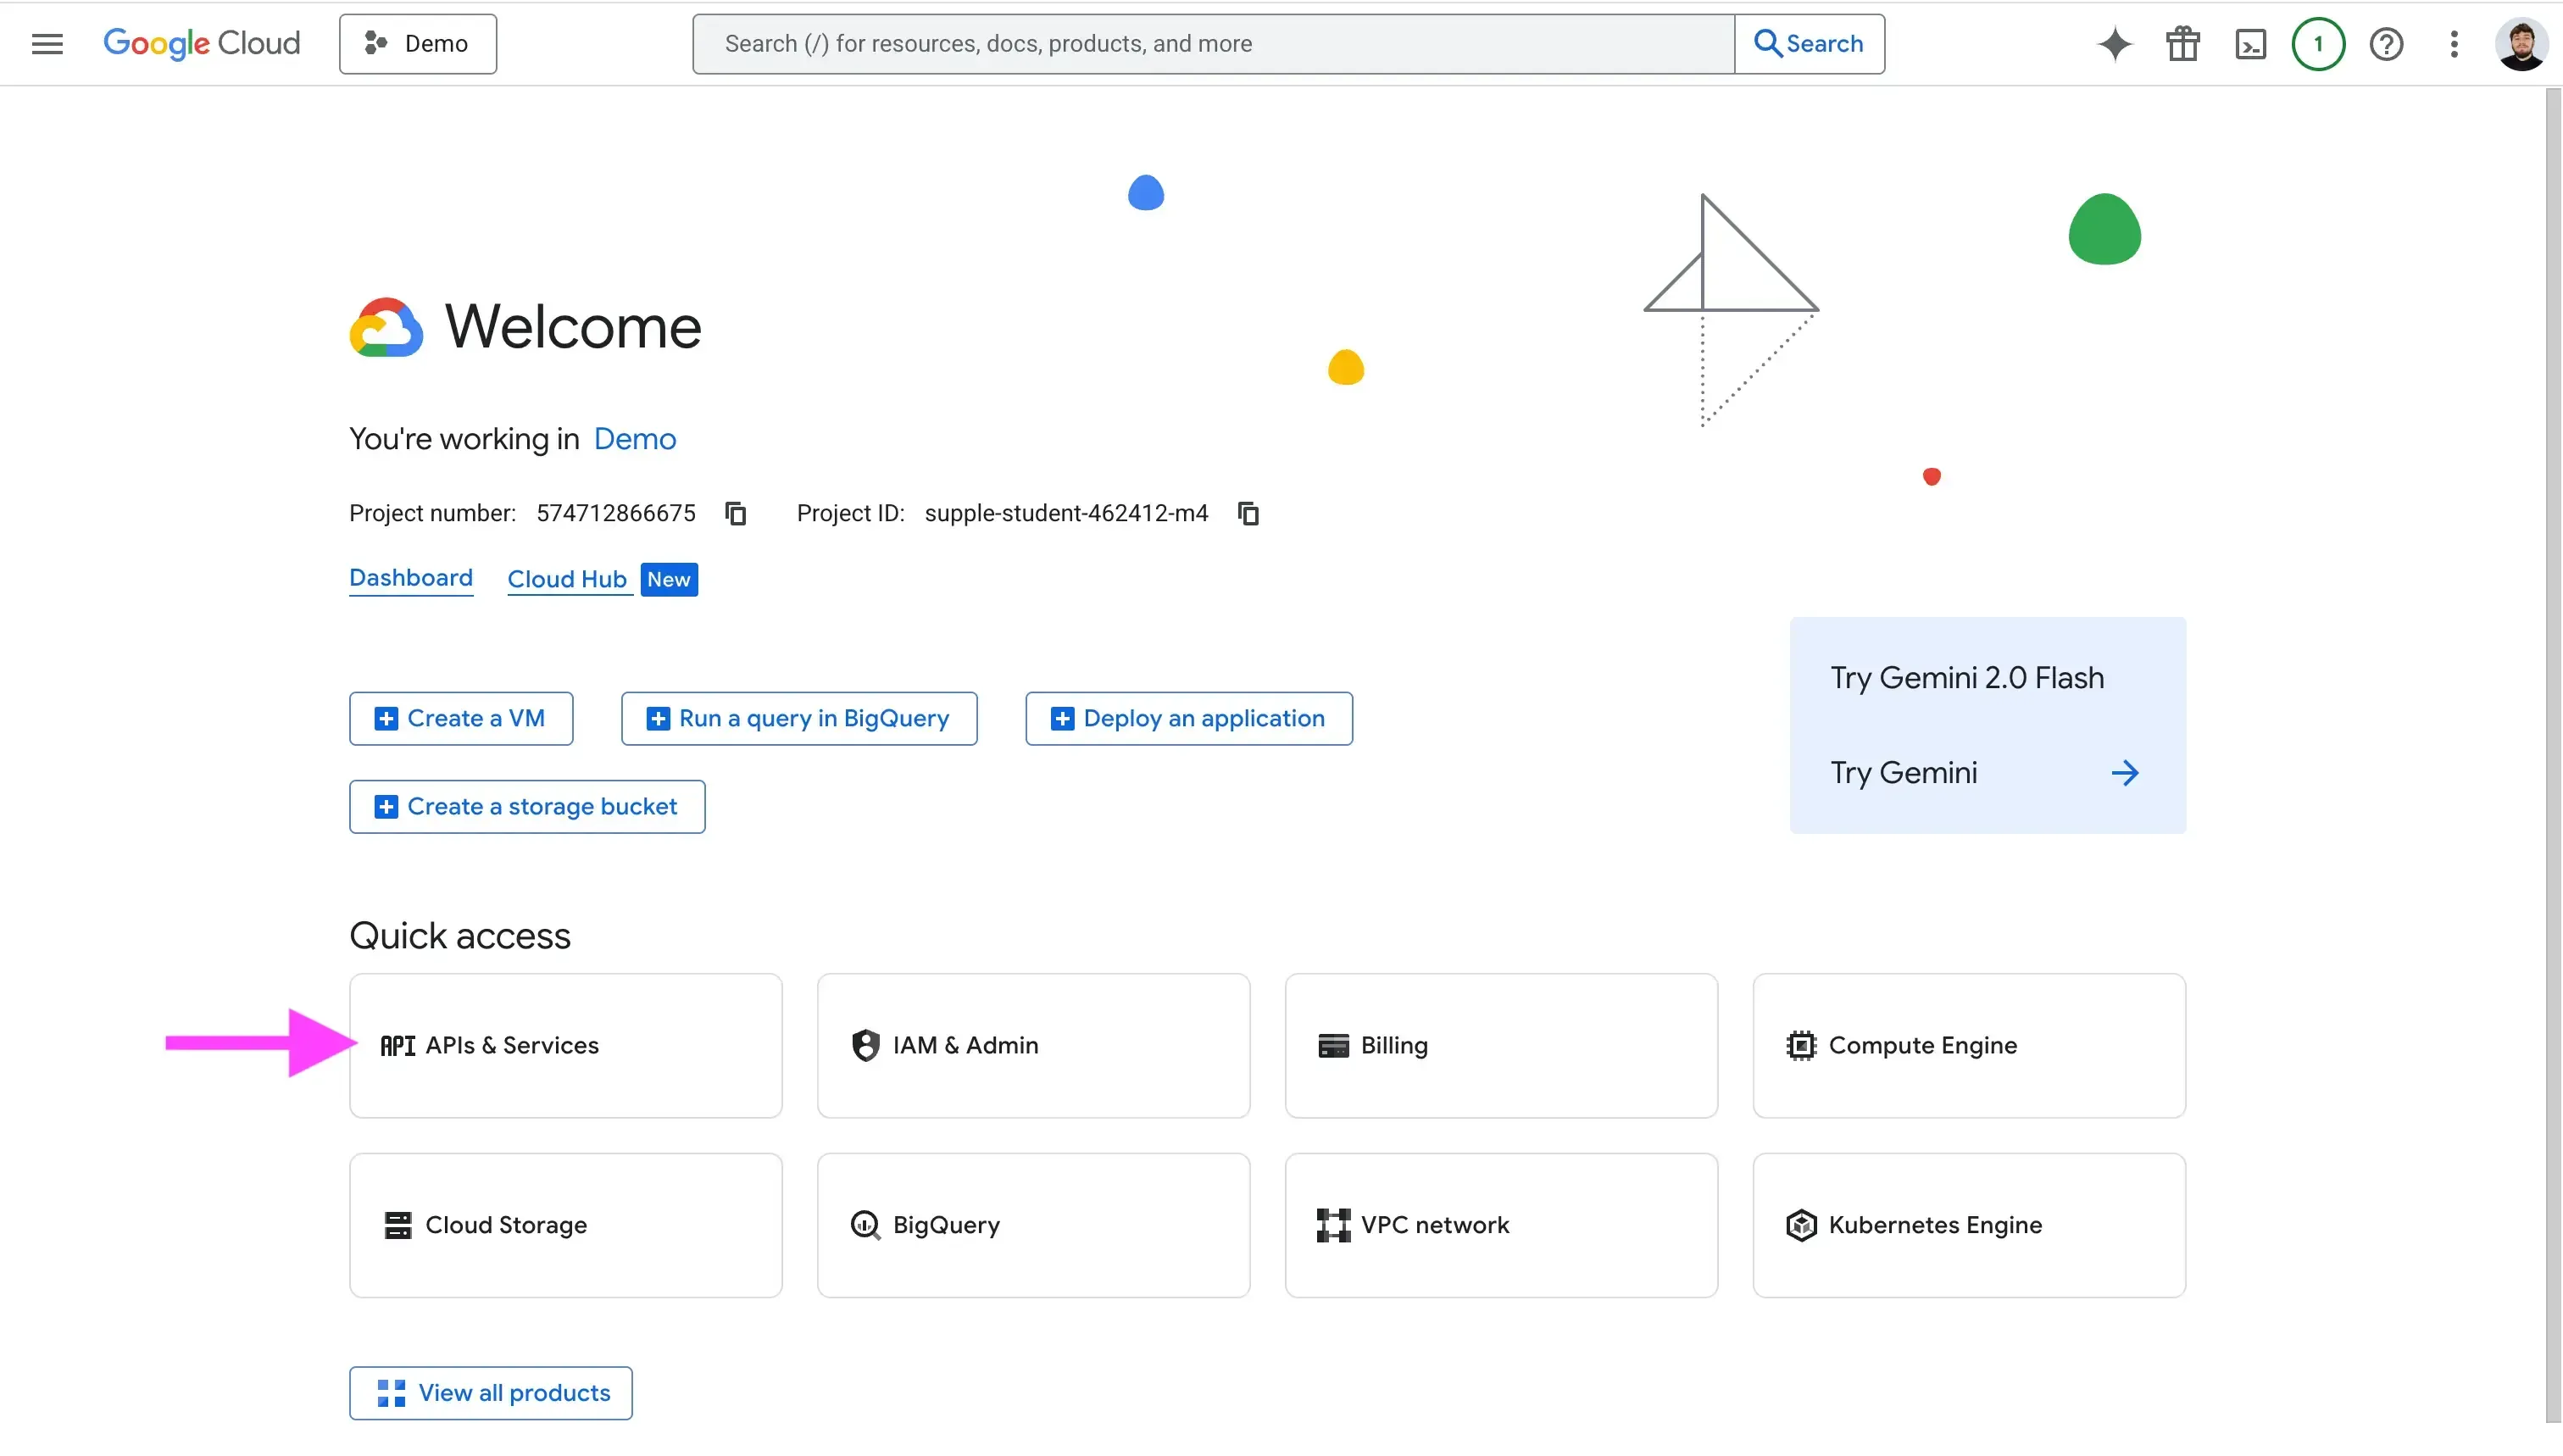
- Click “APIs & Services”
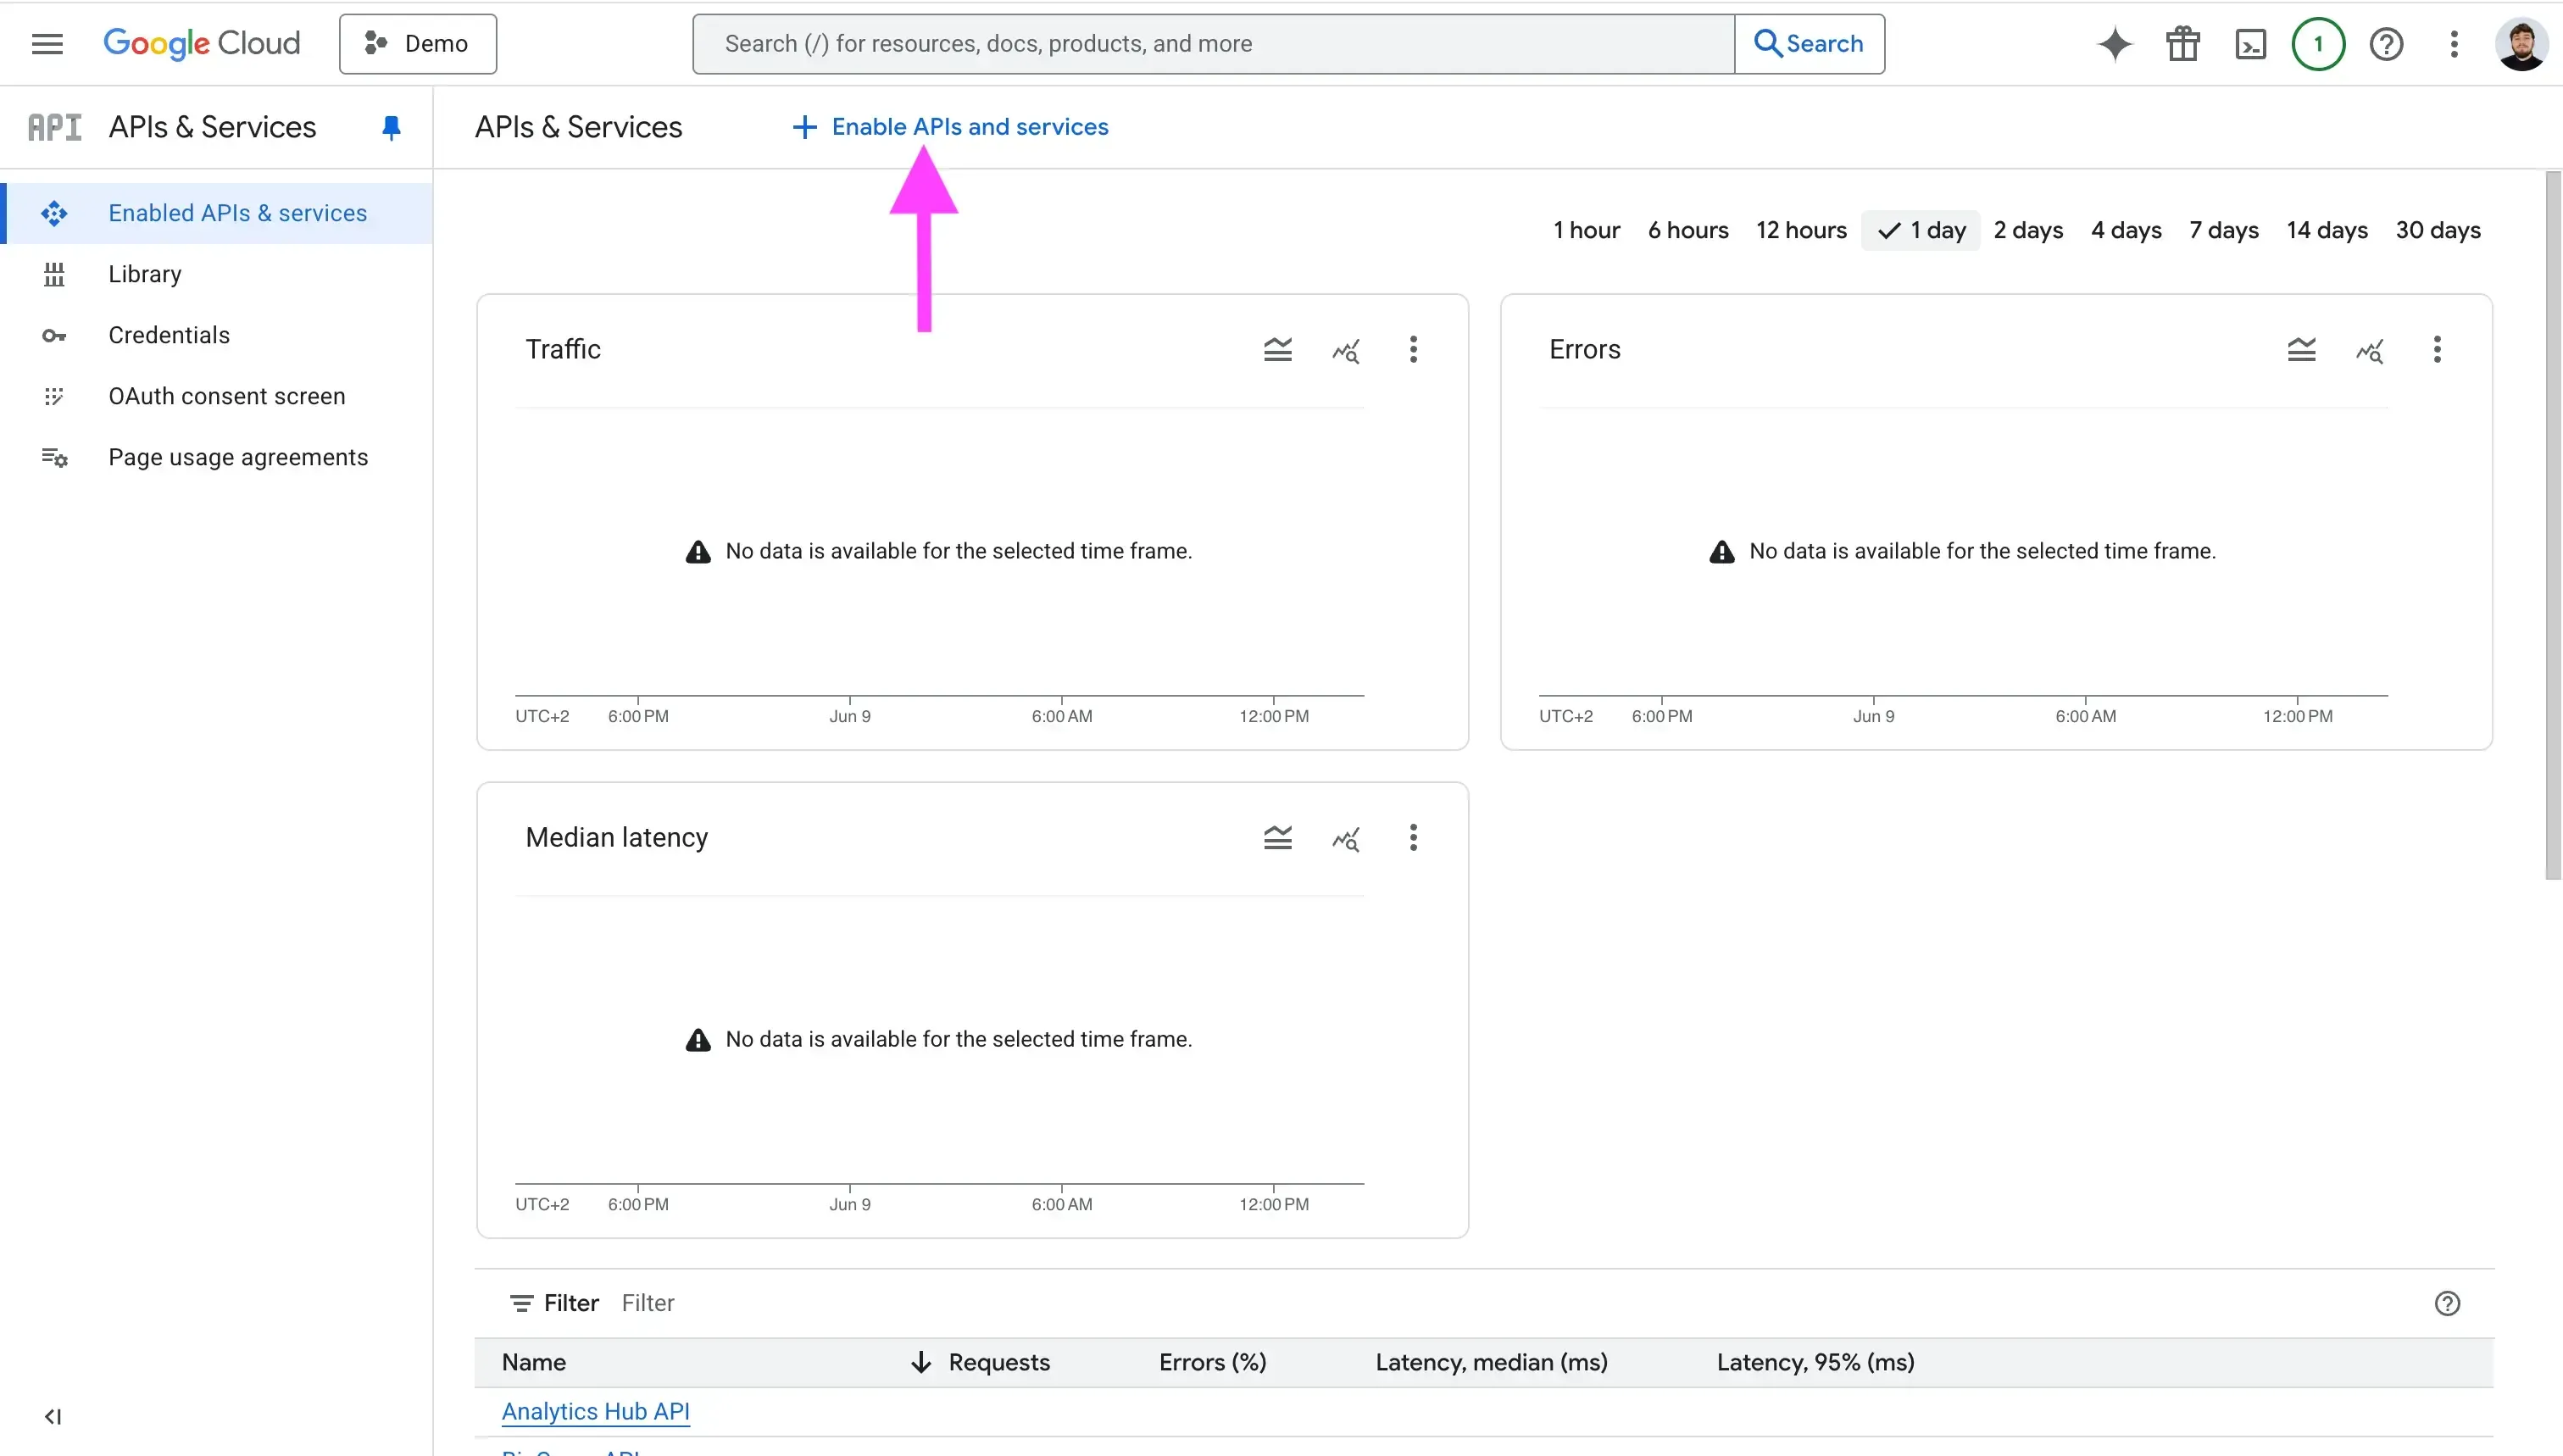
- Click “Enable APIs and services”
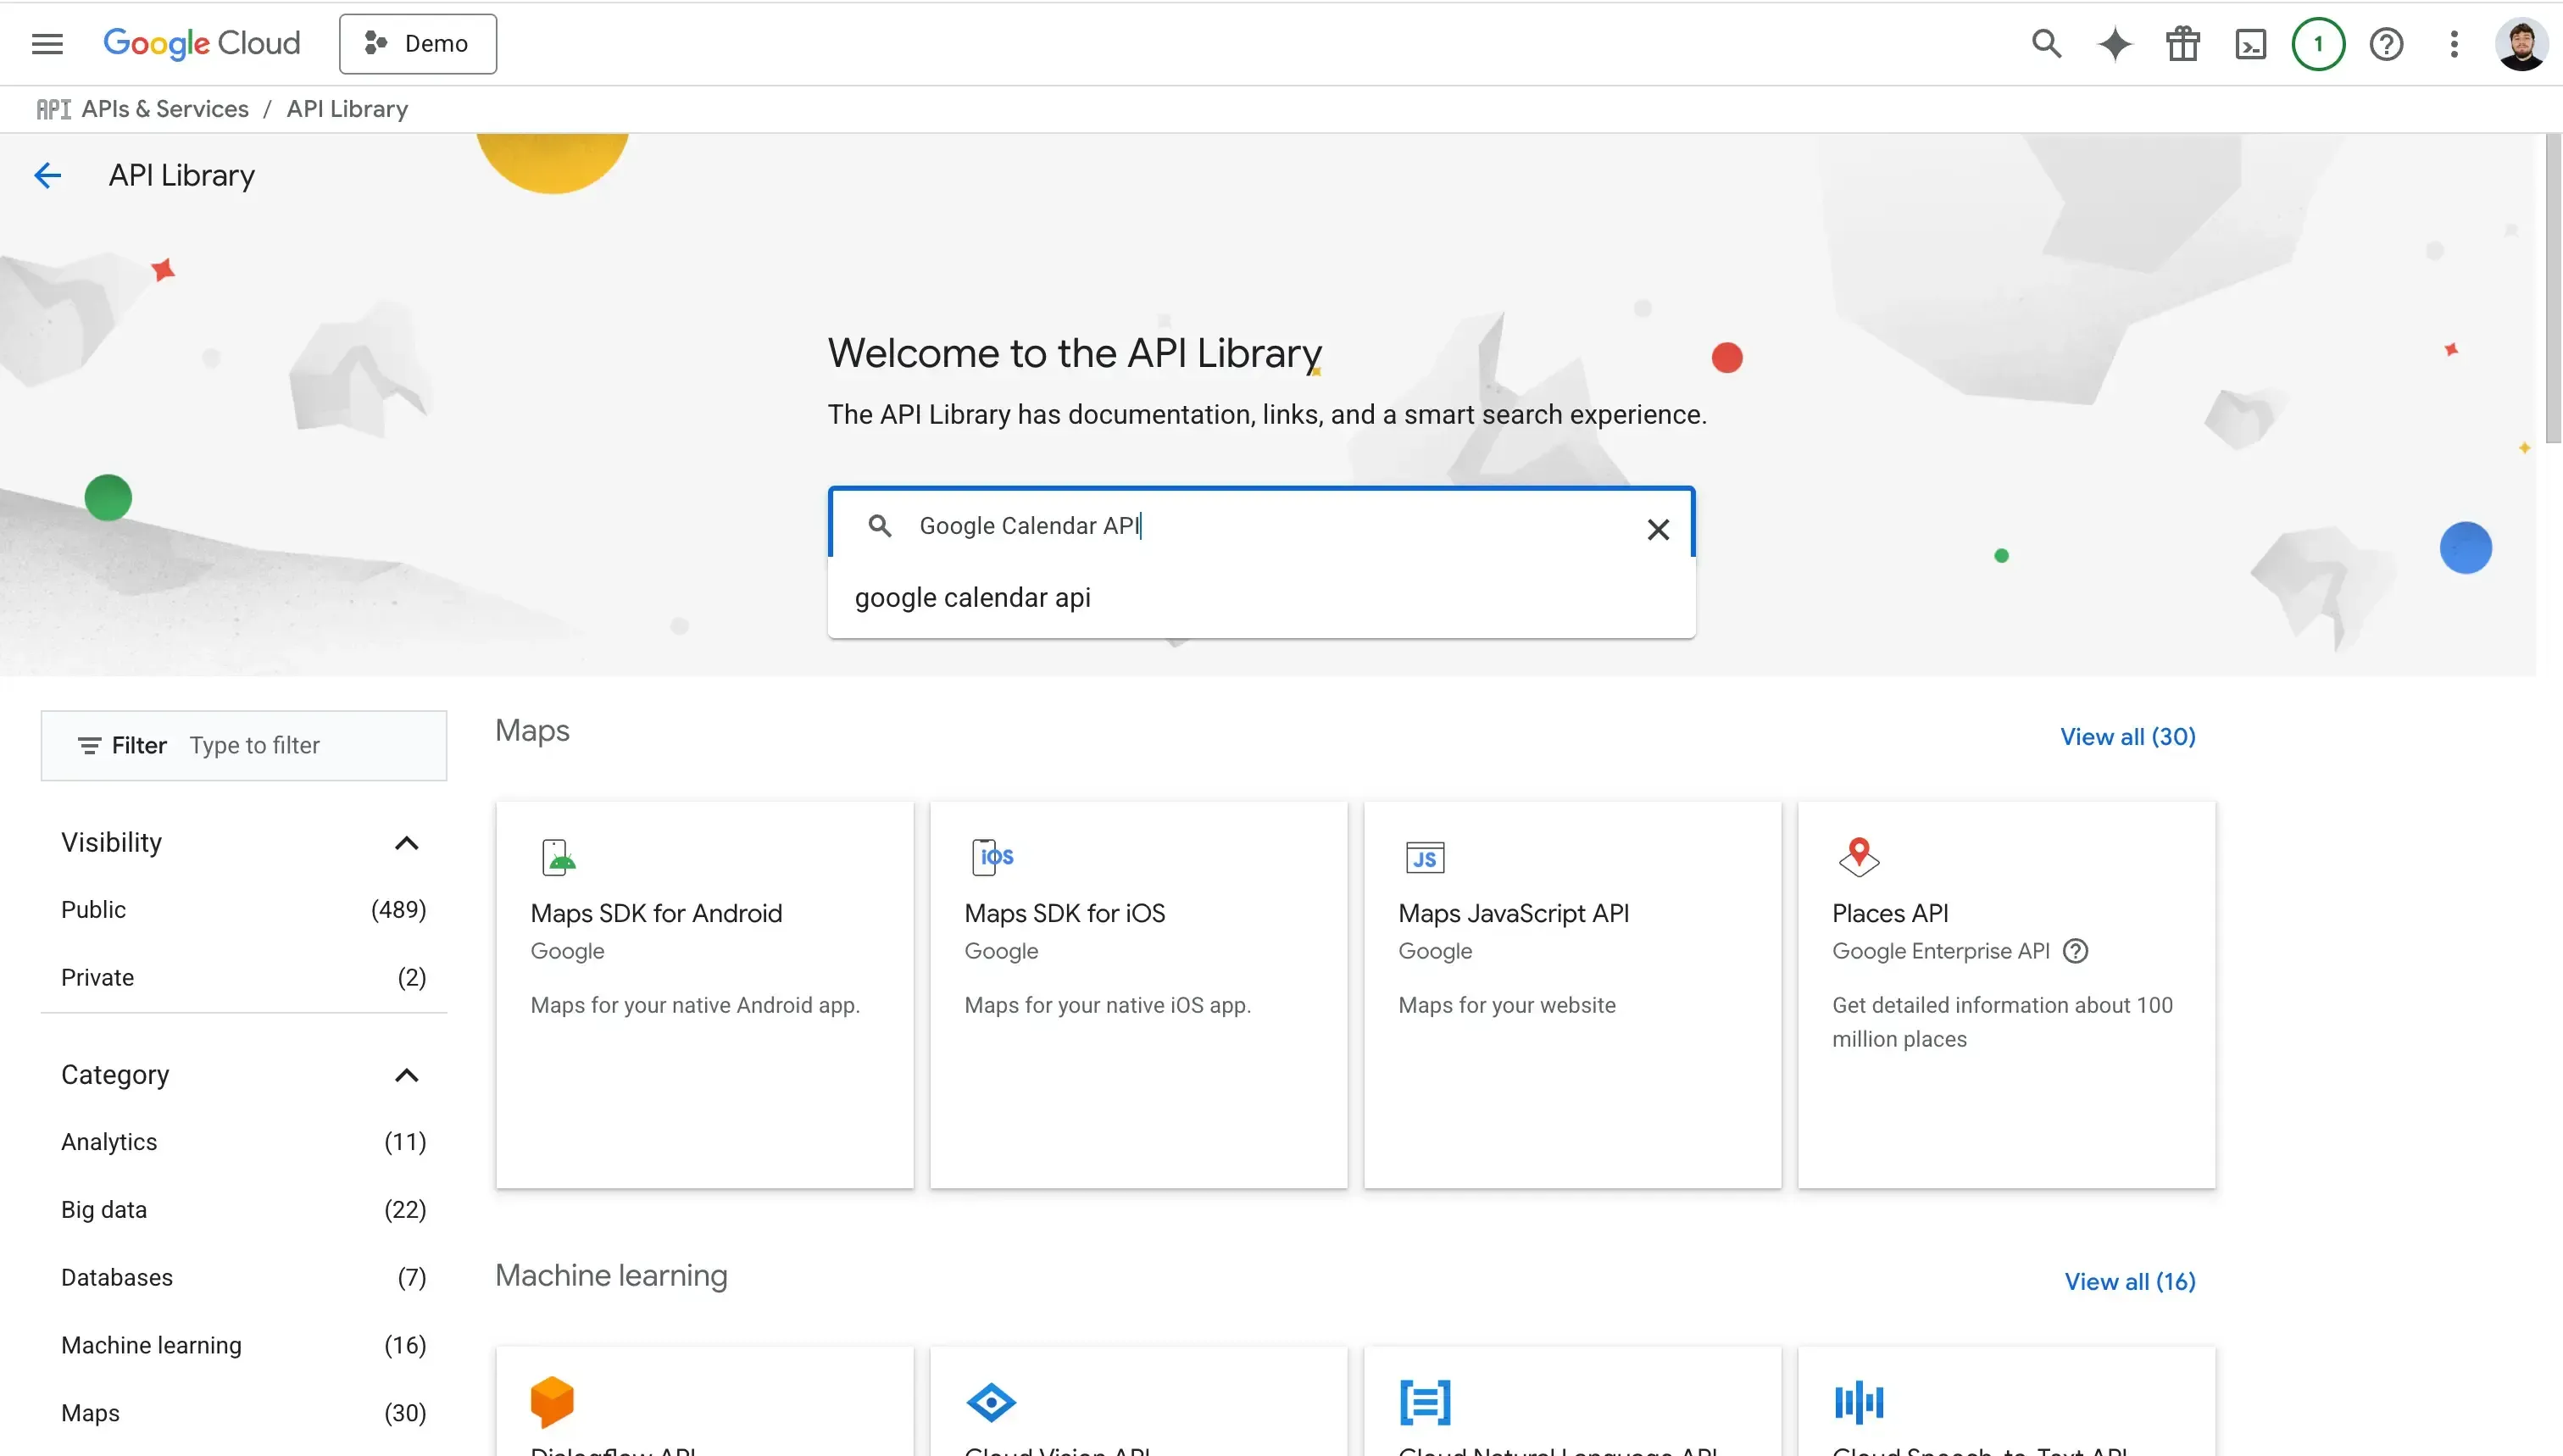
- Search for “Google Calendar API”
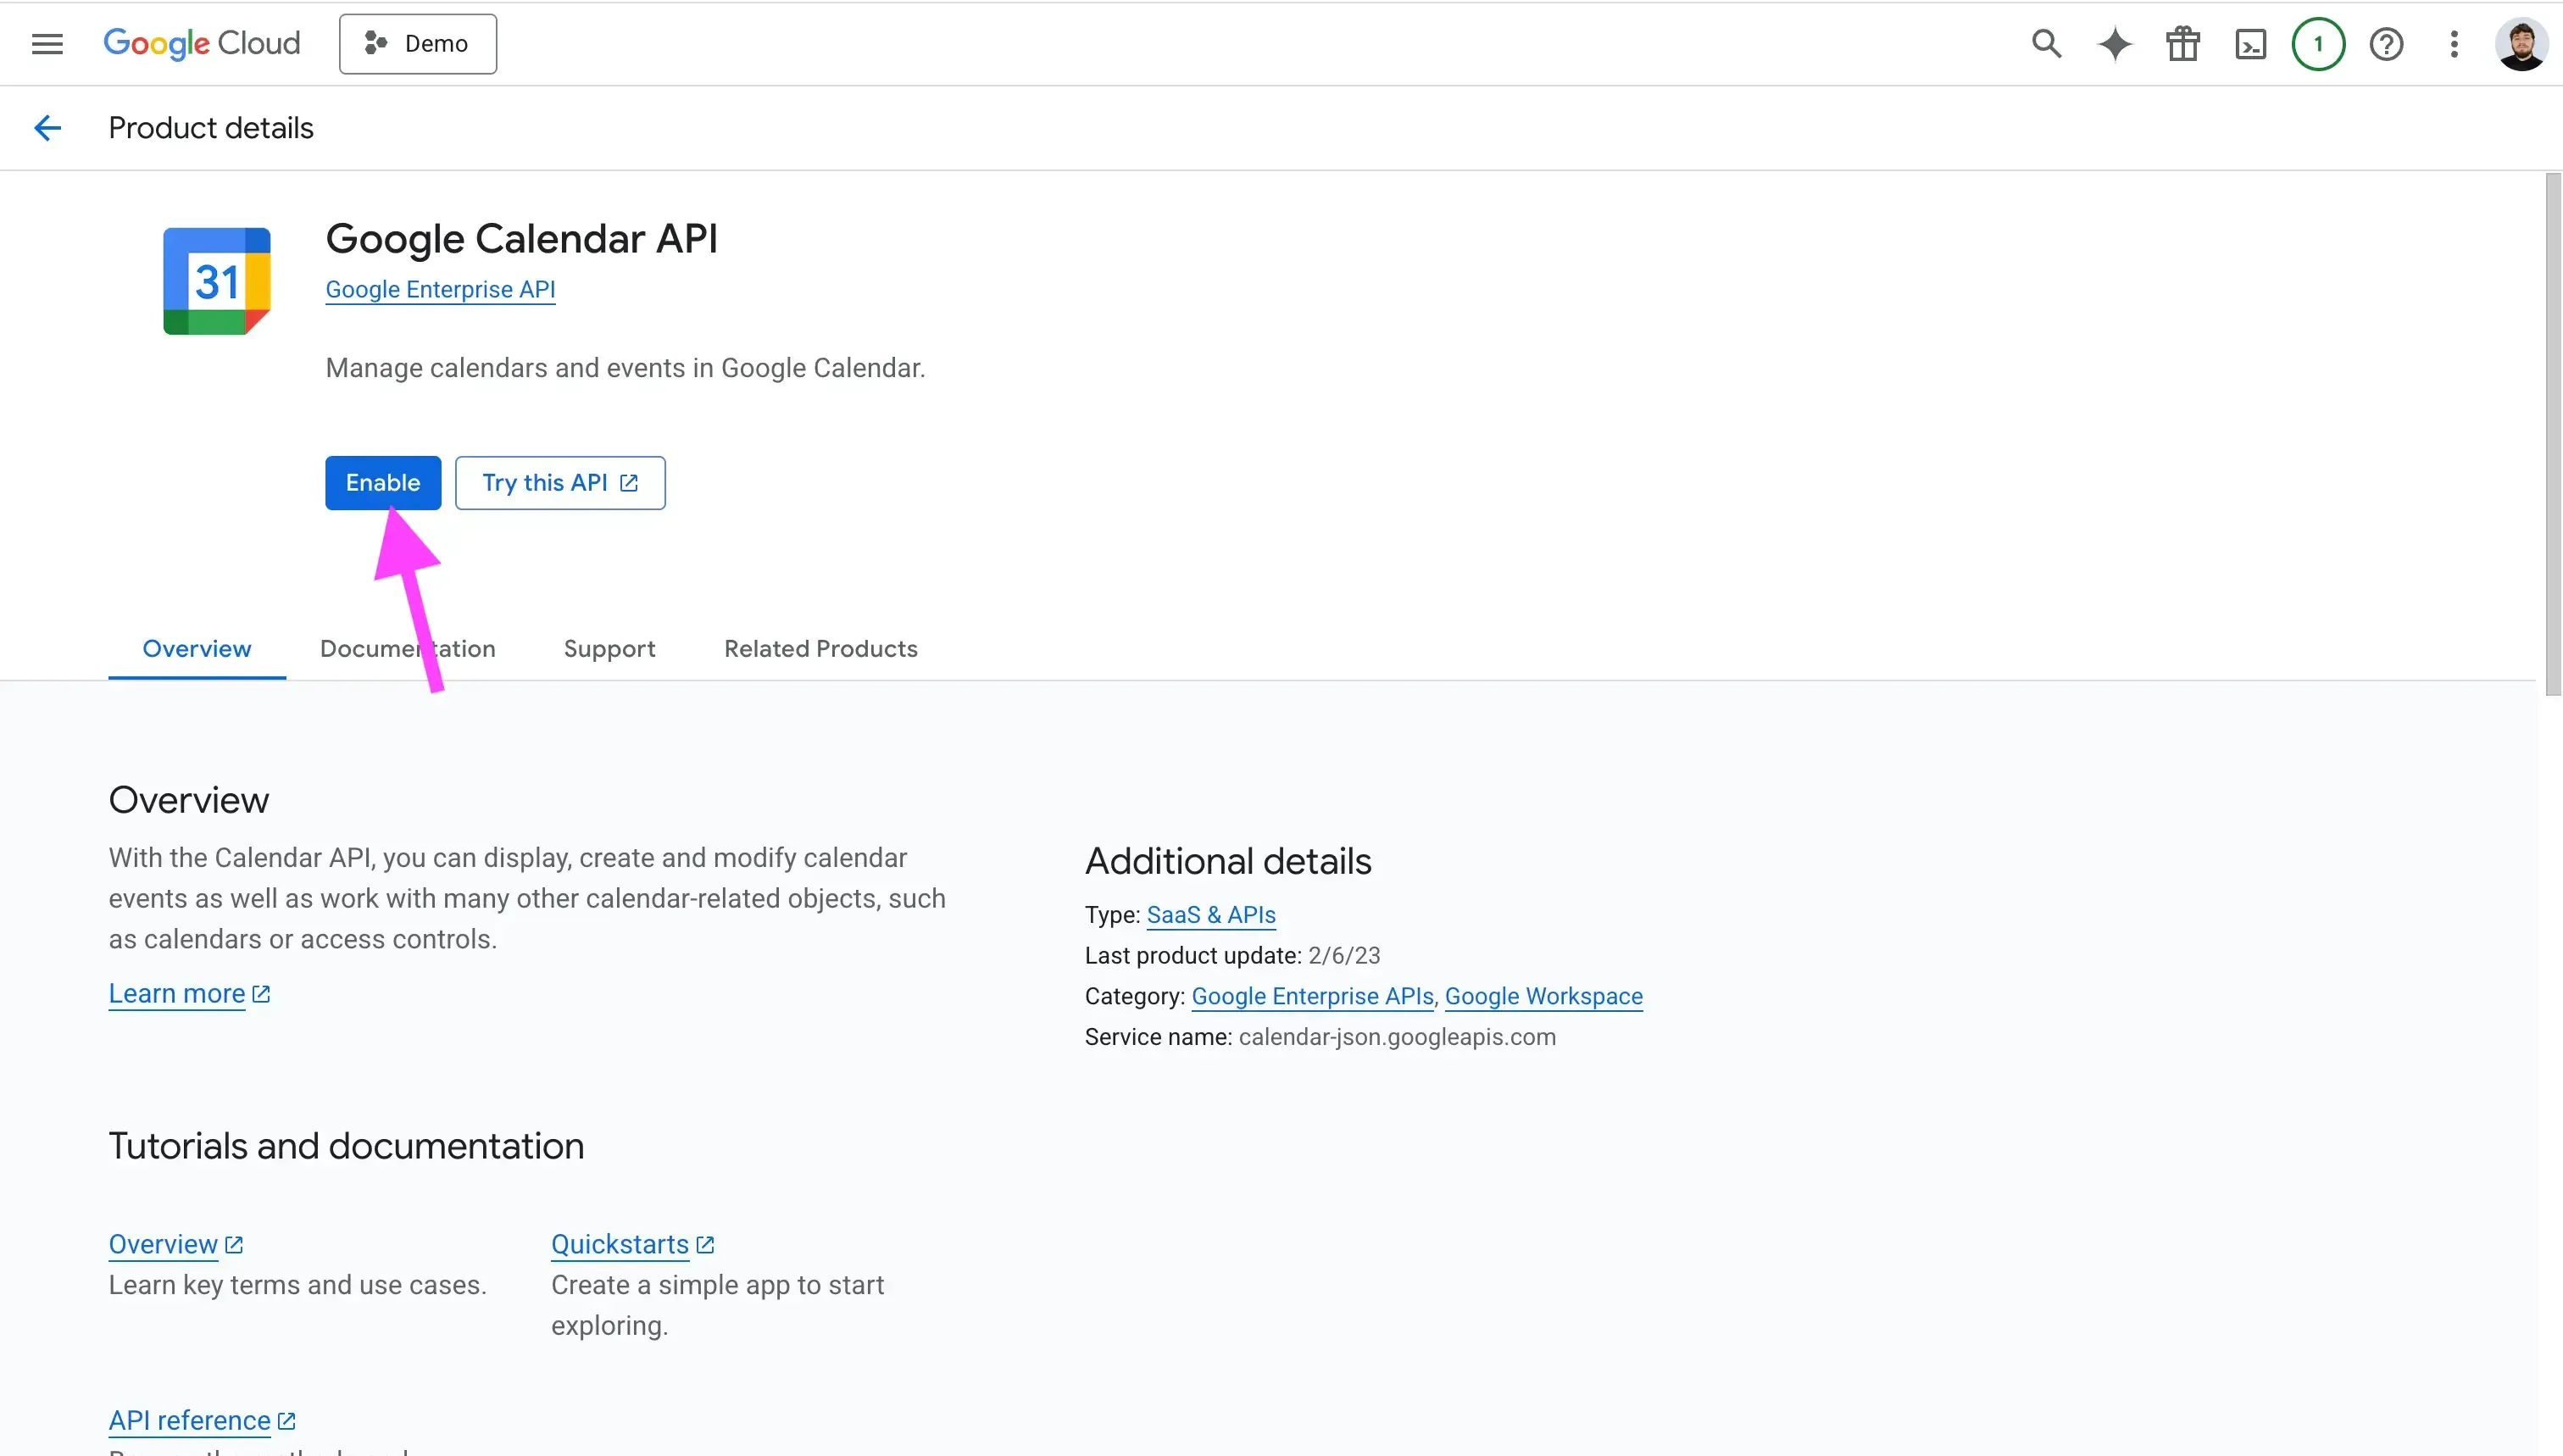
- Click "Enable" to enable the service.
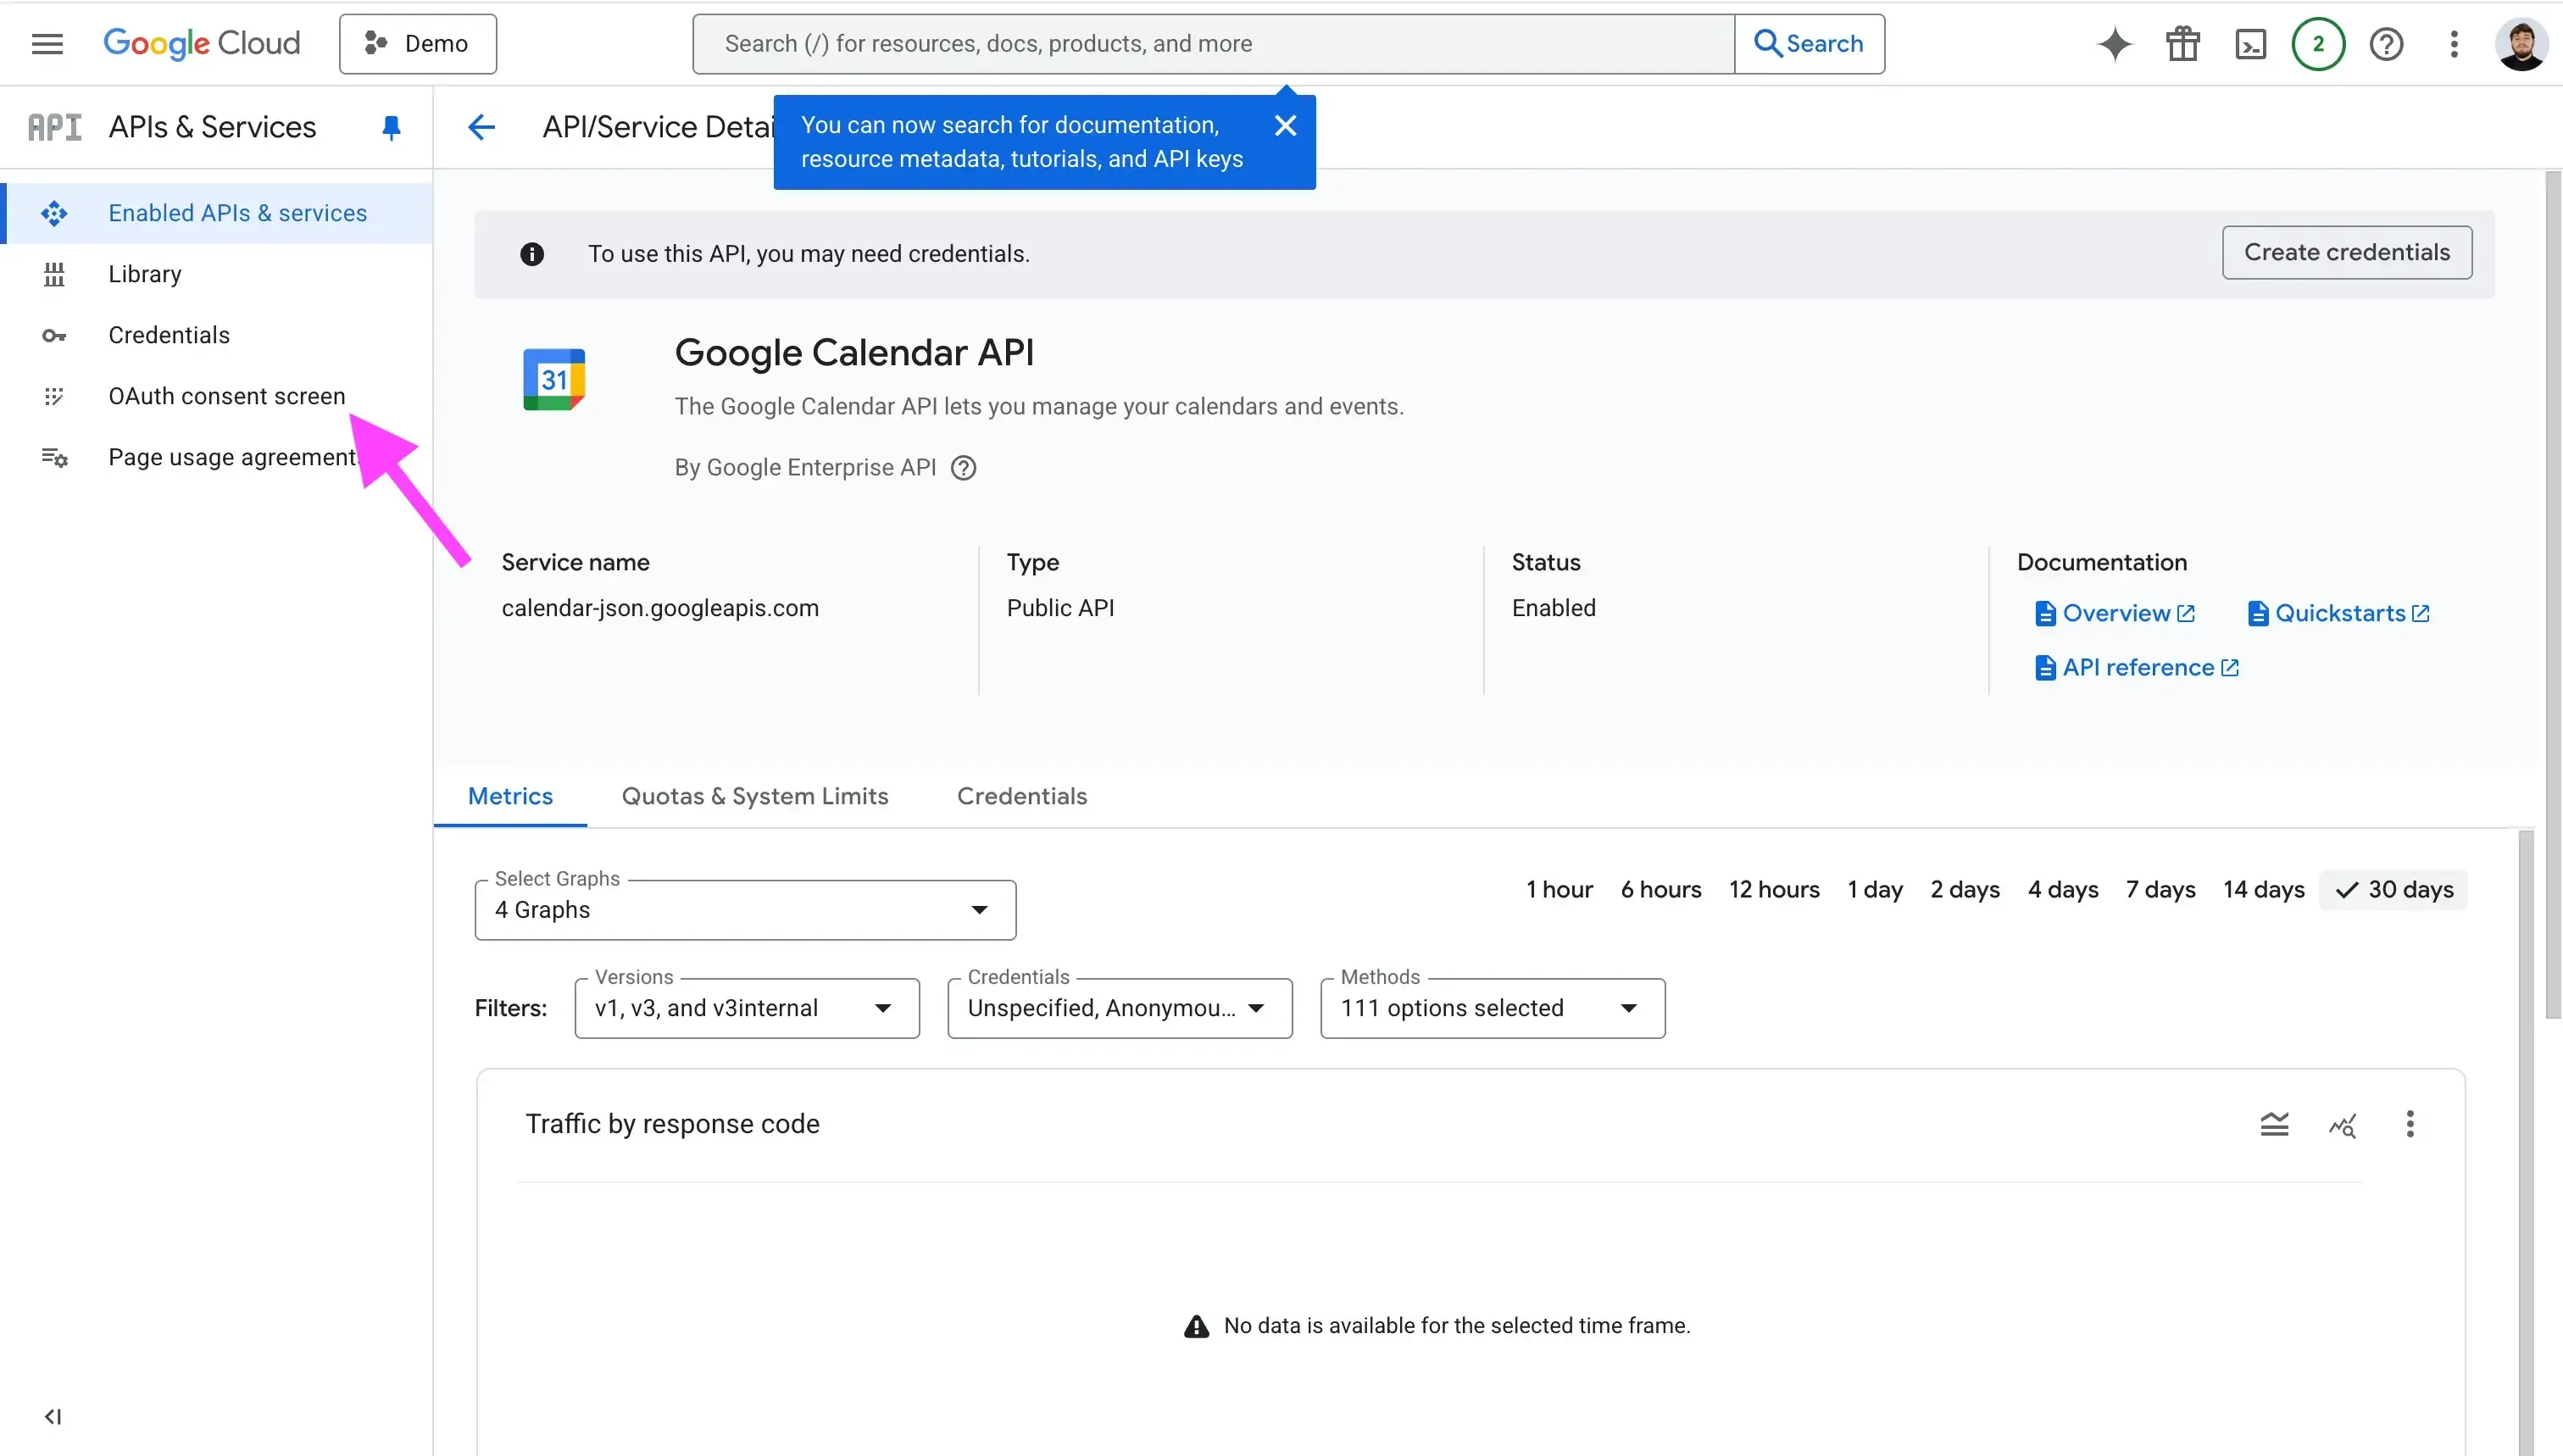
4. Set up the OAuth Consent Screen
After enabling the Google Calendar API services, the next step is to set up the OAuth Consent Screen. This is the screen end users see when they connect their calendar to your app. It usually shows your app logo, the app name, the permissions you ask for, and more.
- Click the "OAuth Consent Screen" tab.
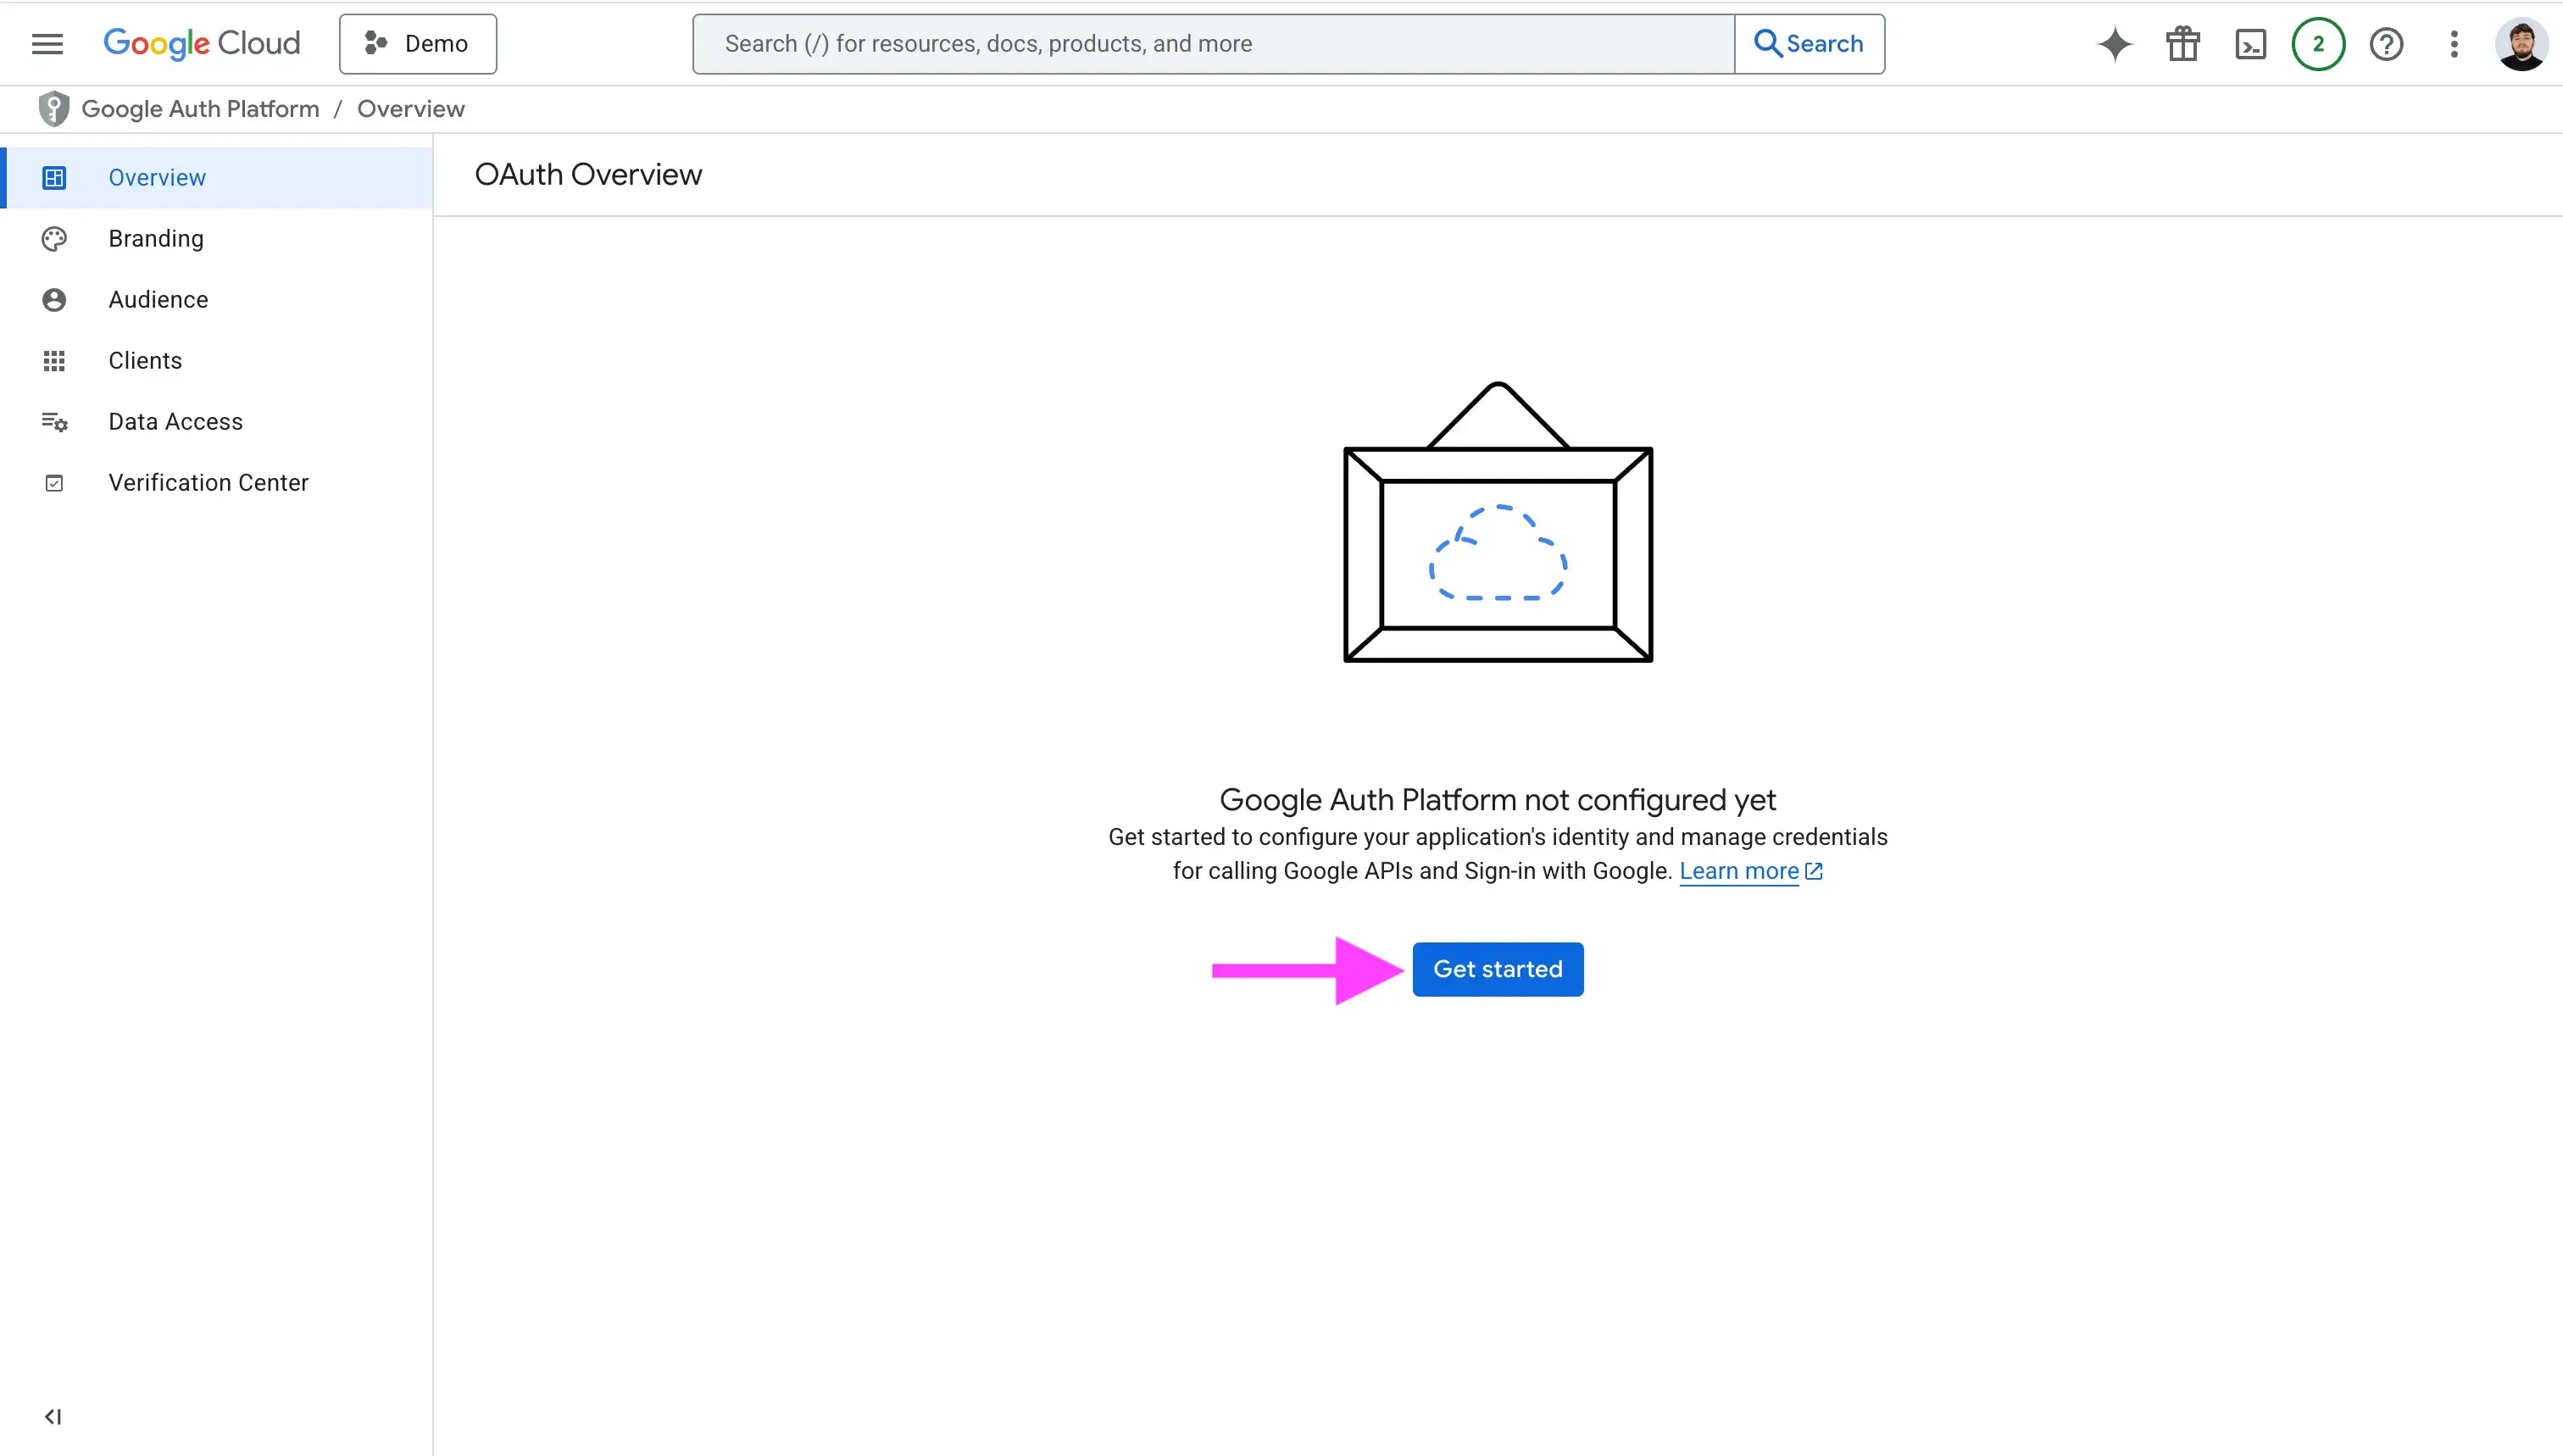
- Click "Get Started".
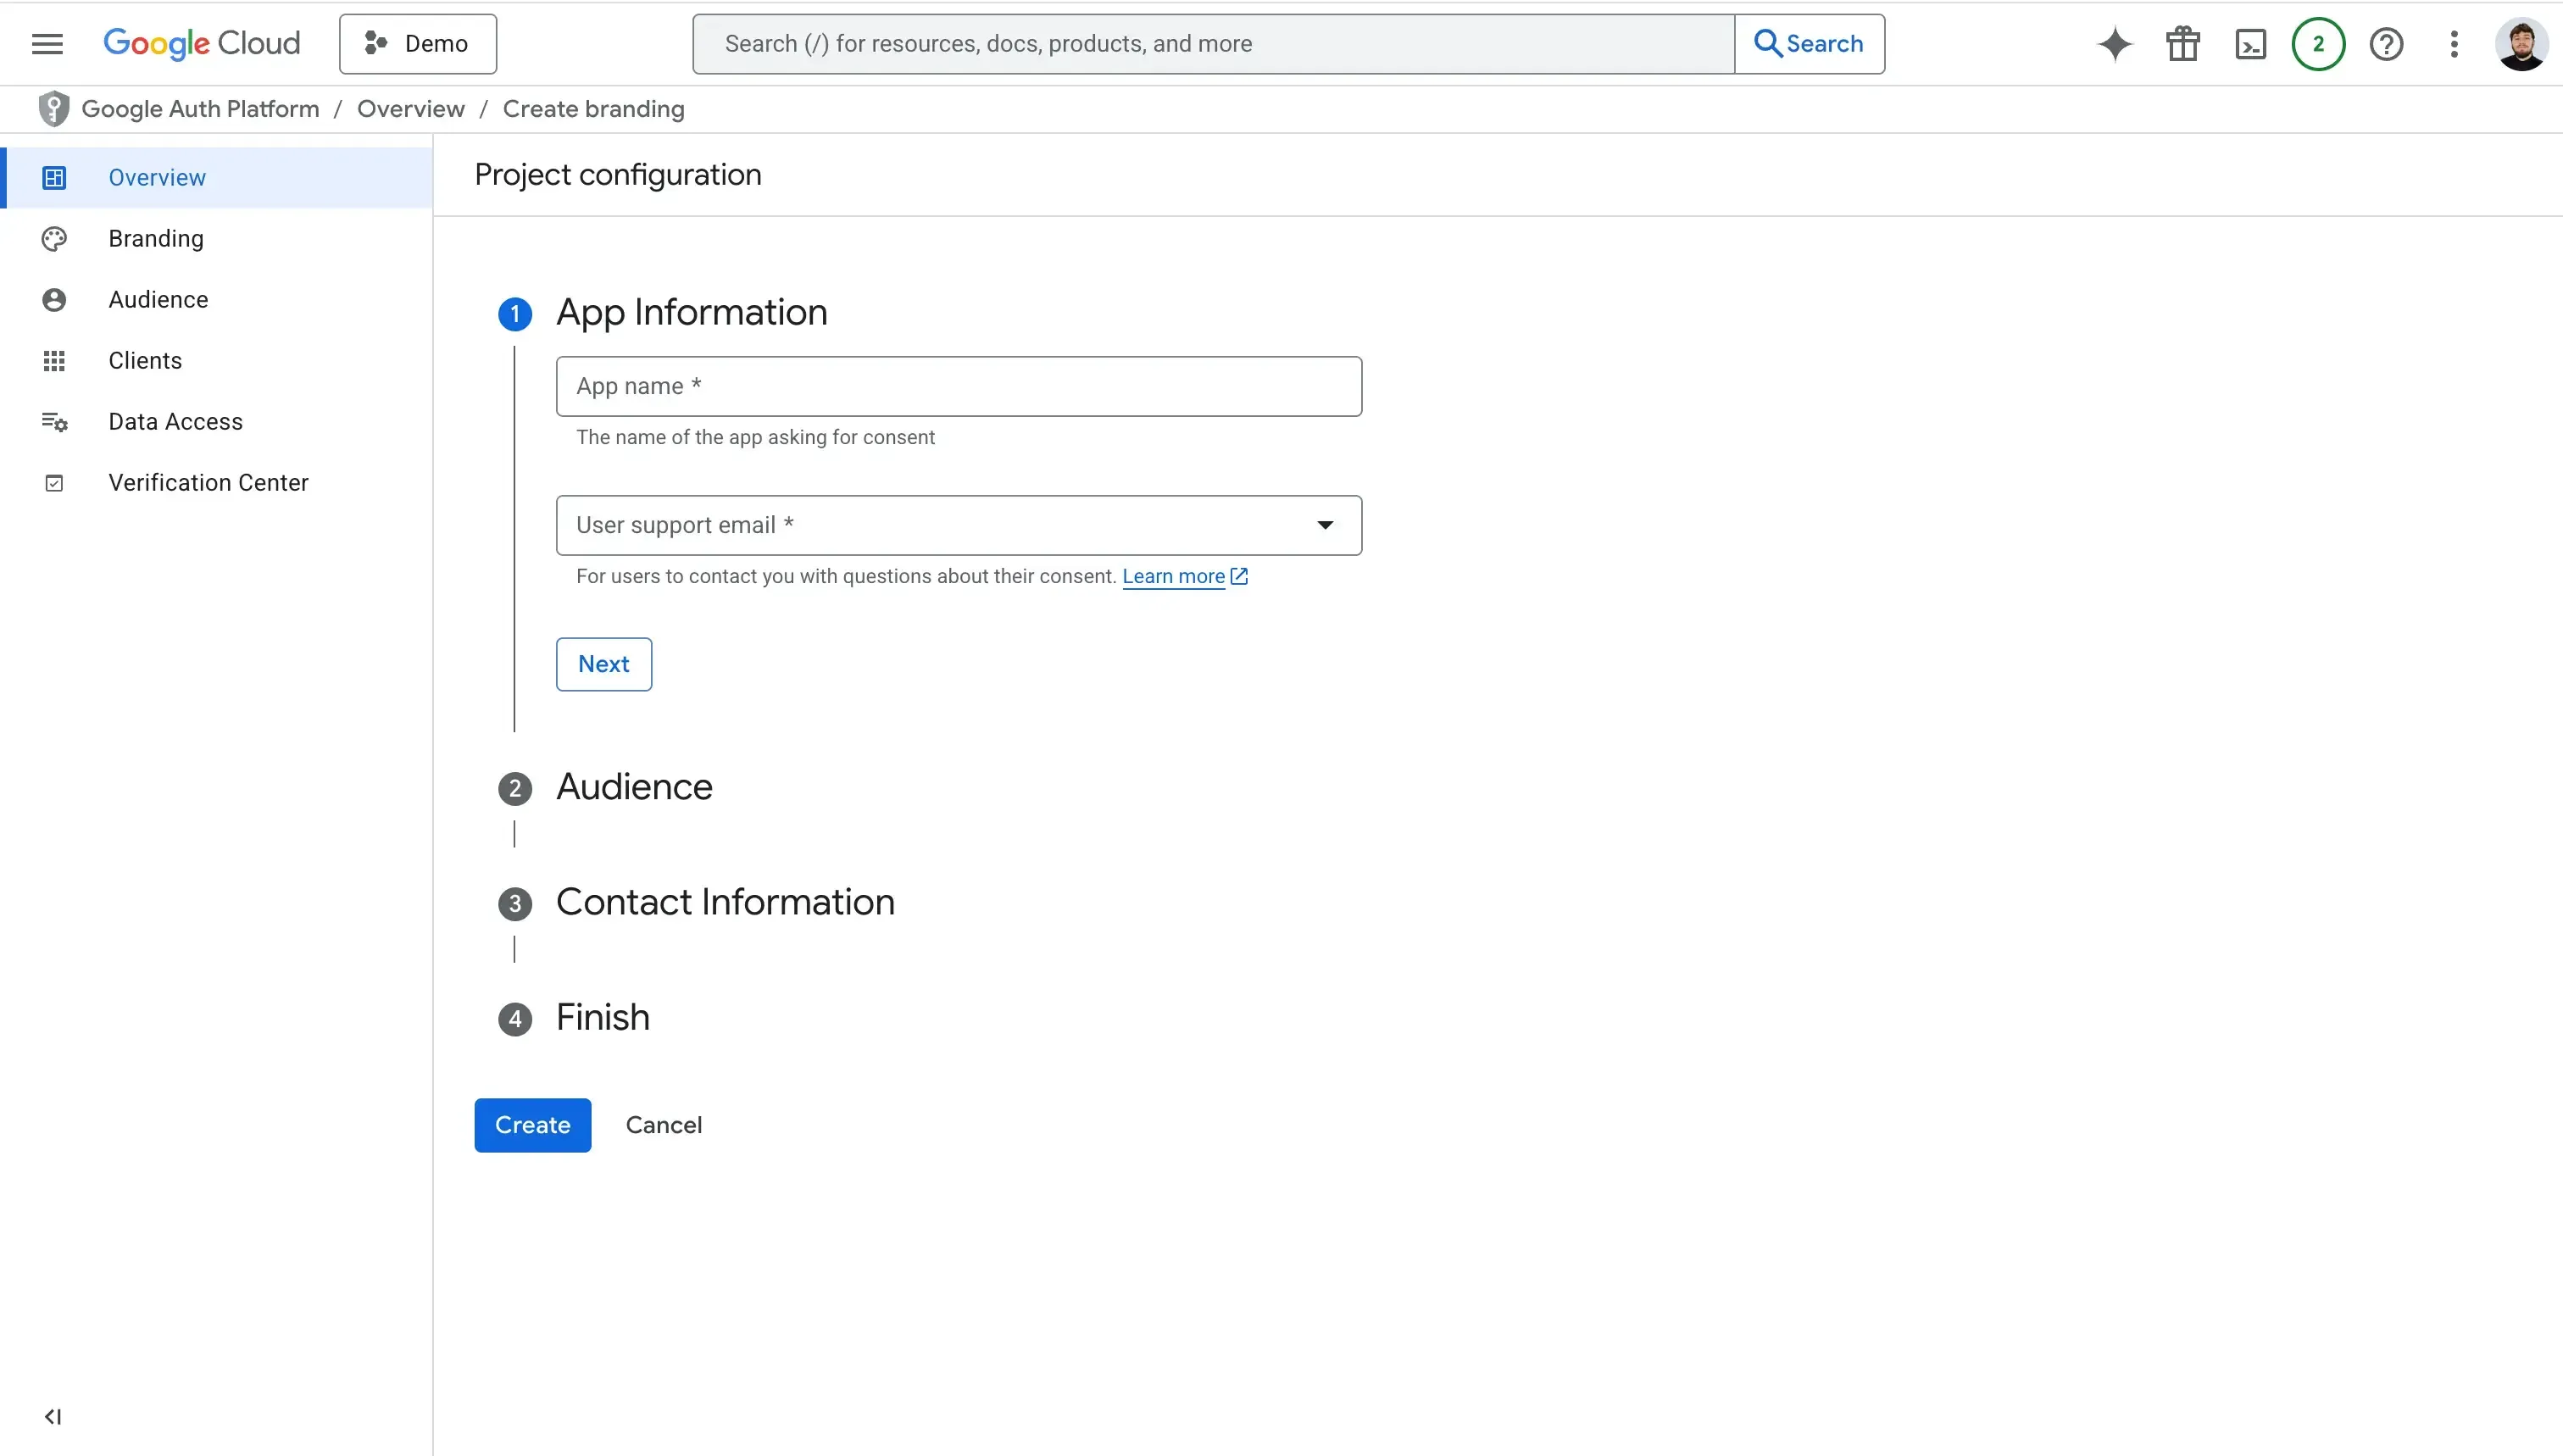
- Fill in the “ App Information” section . In this section, you should enter your app name and customer support email.
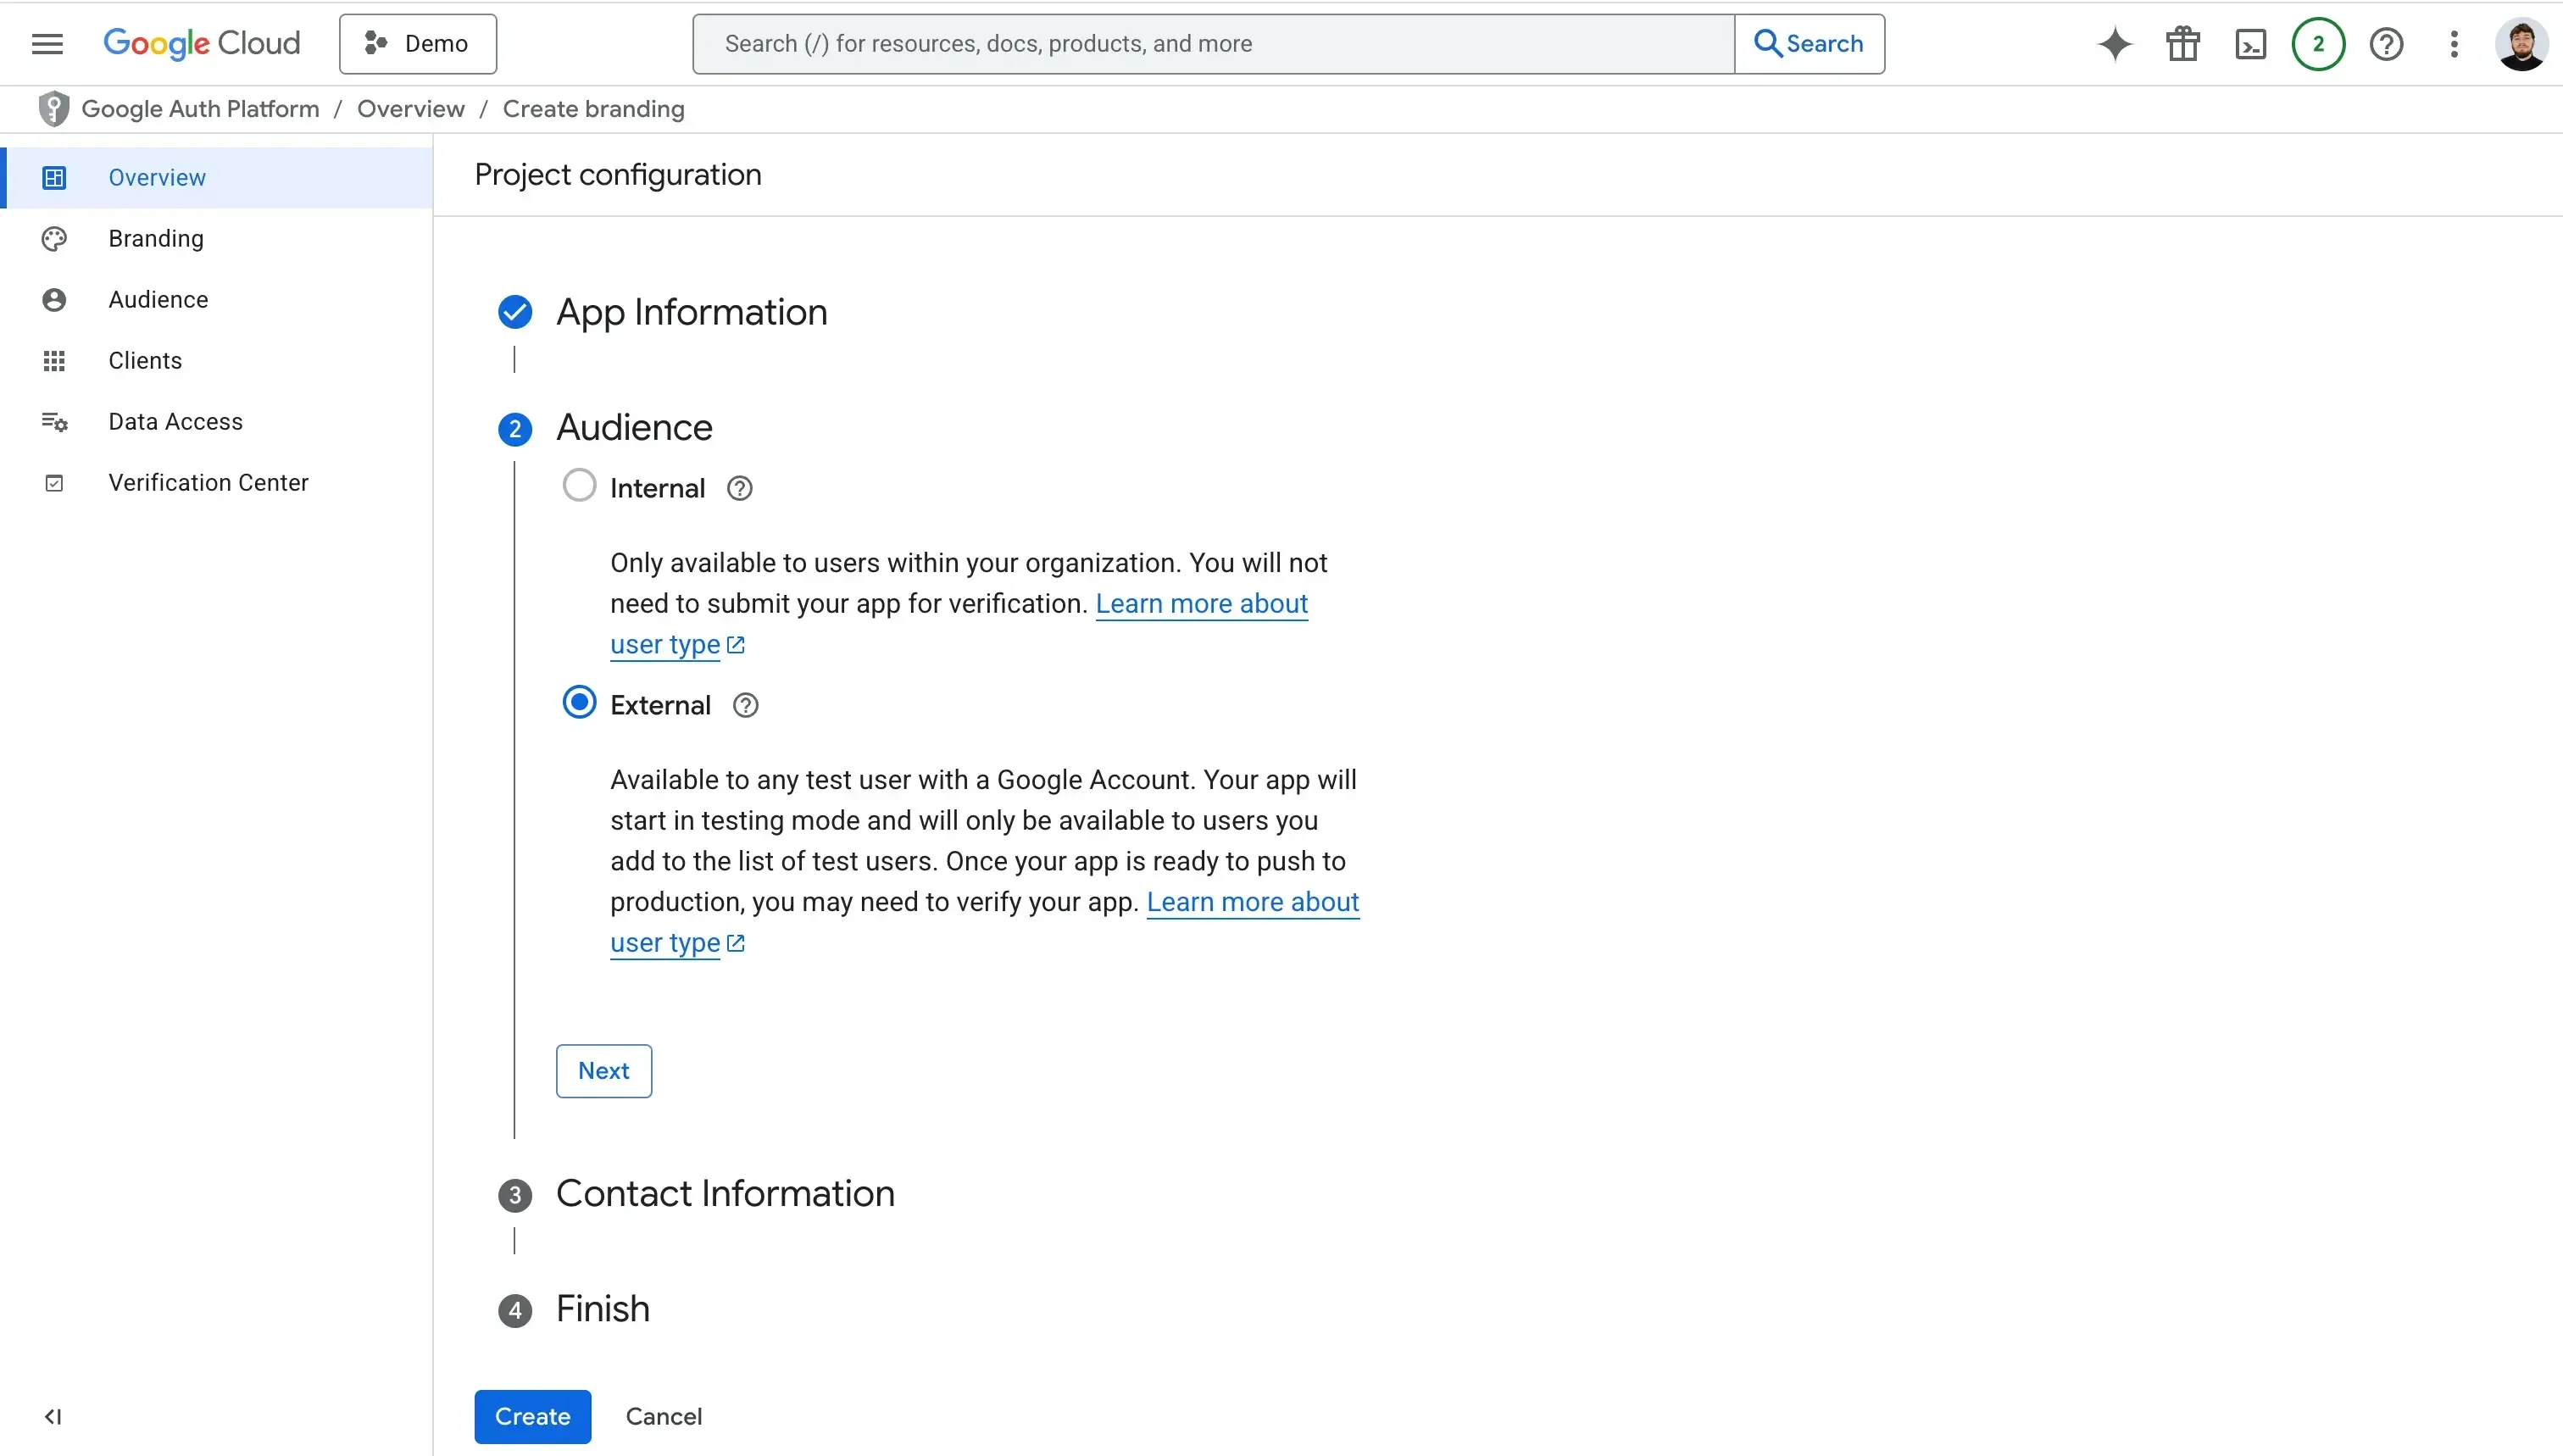
- Choose the audience . Audience can be internal or external. Choose internal if your app won’t be public, and only users within your organization can connect their calendars through your app. Choose external if any public accounts will sign in, regardless if they’re part of your organization or not.
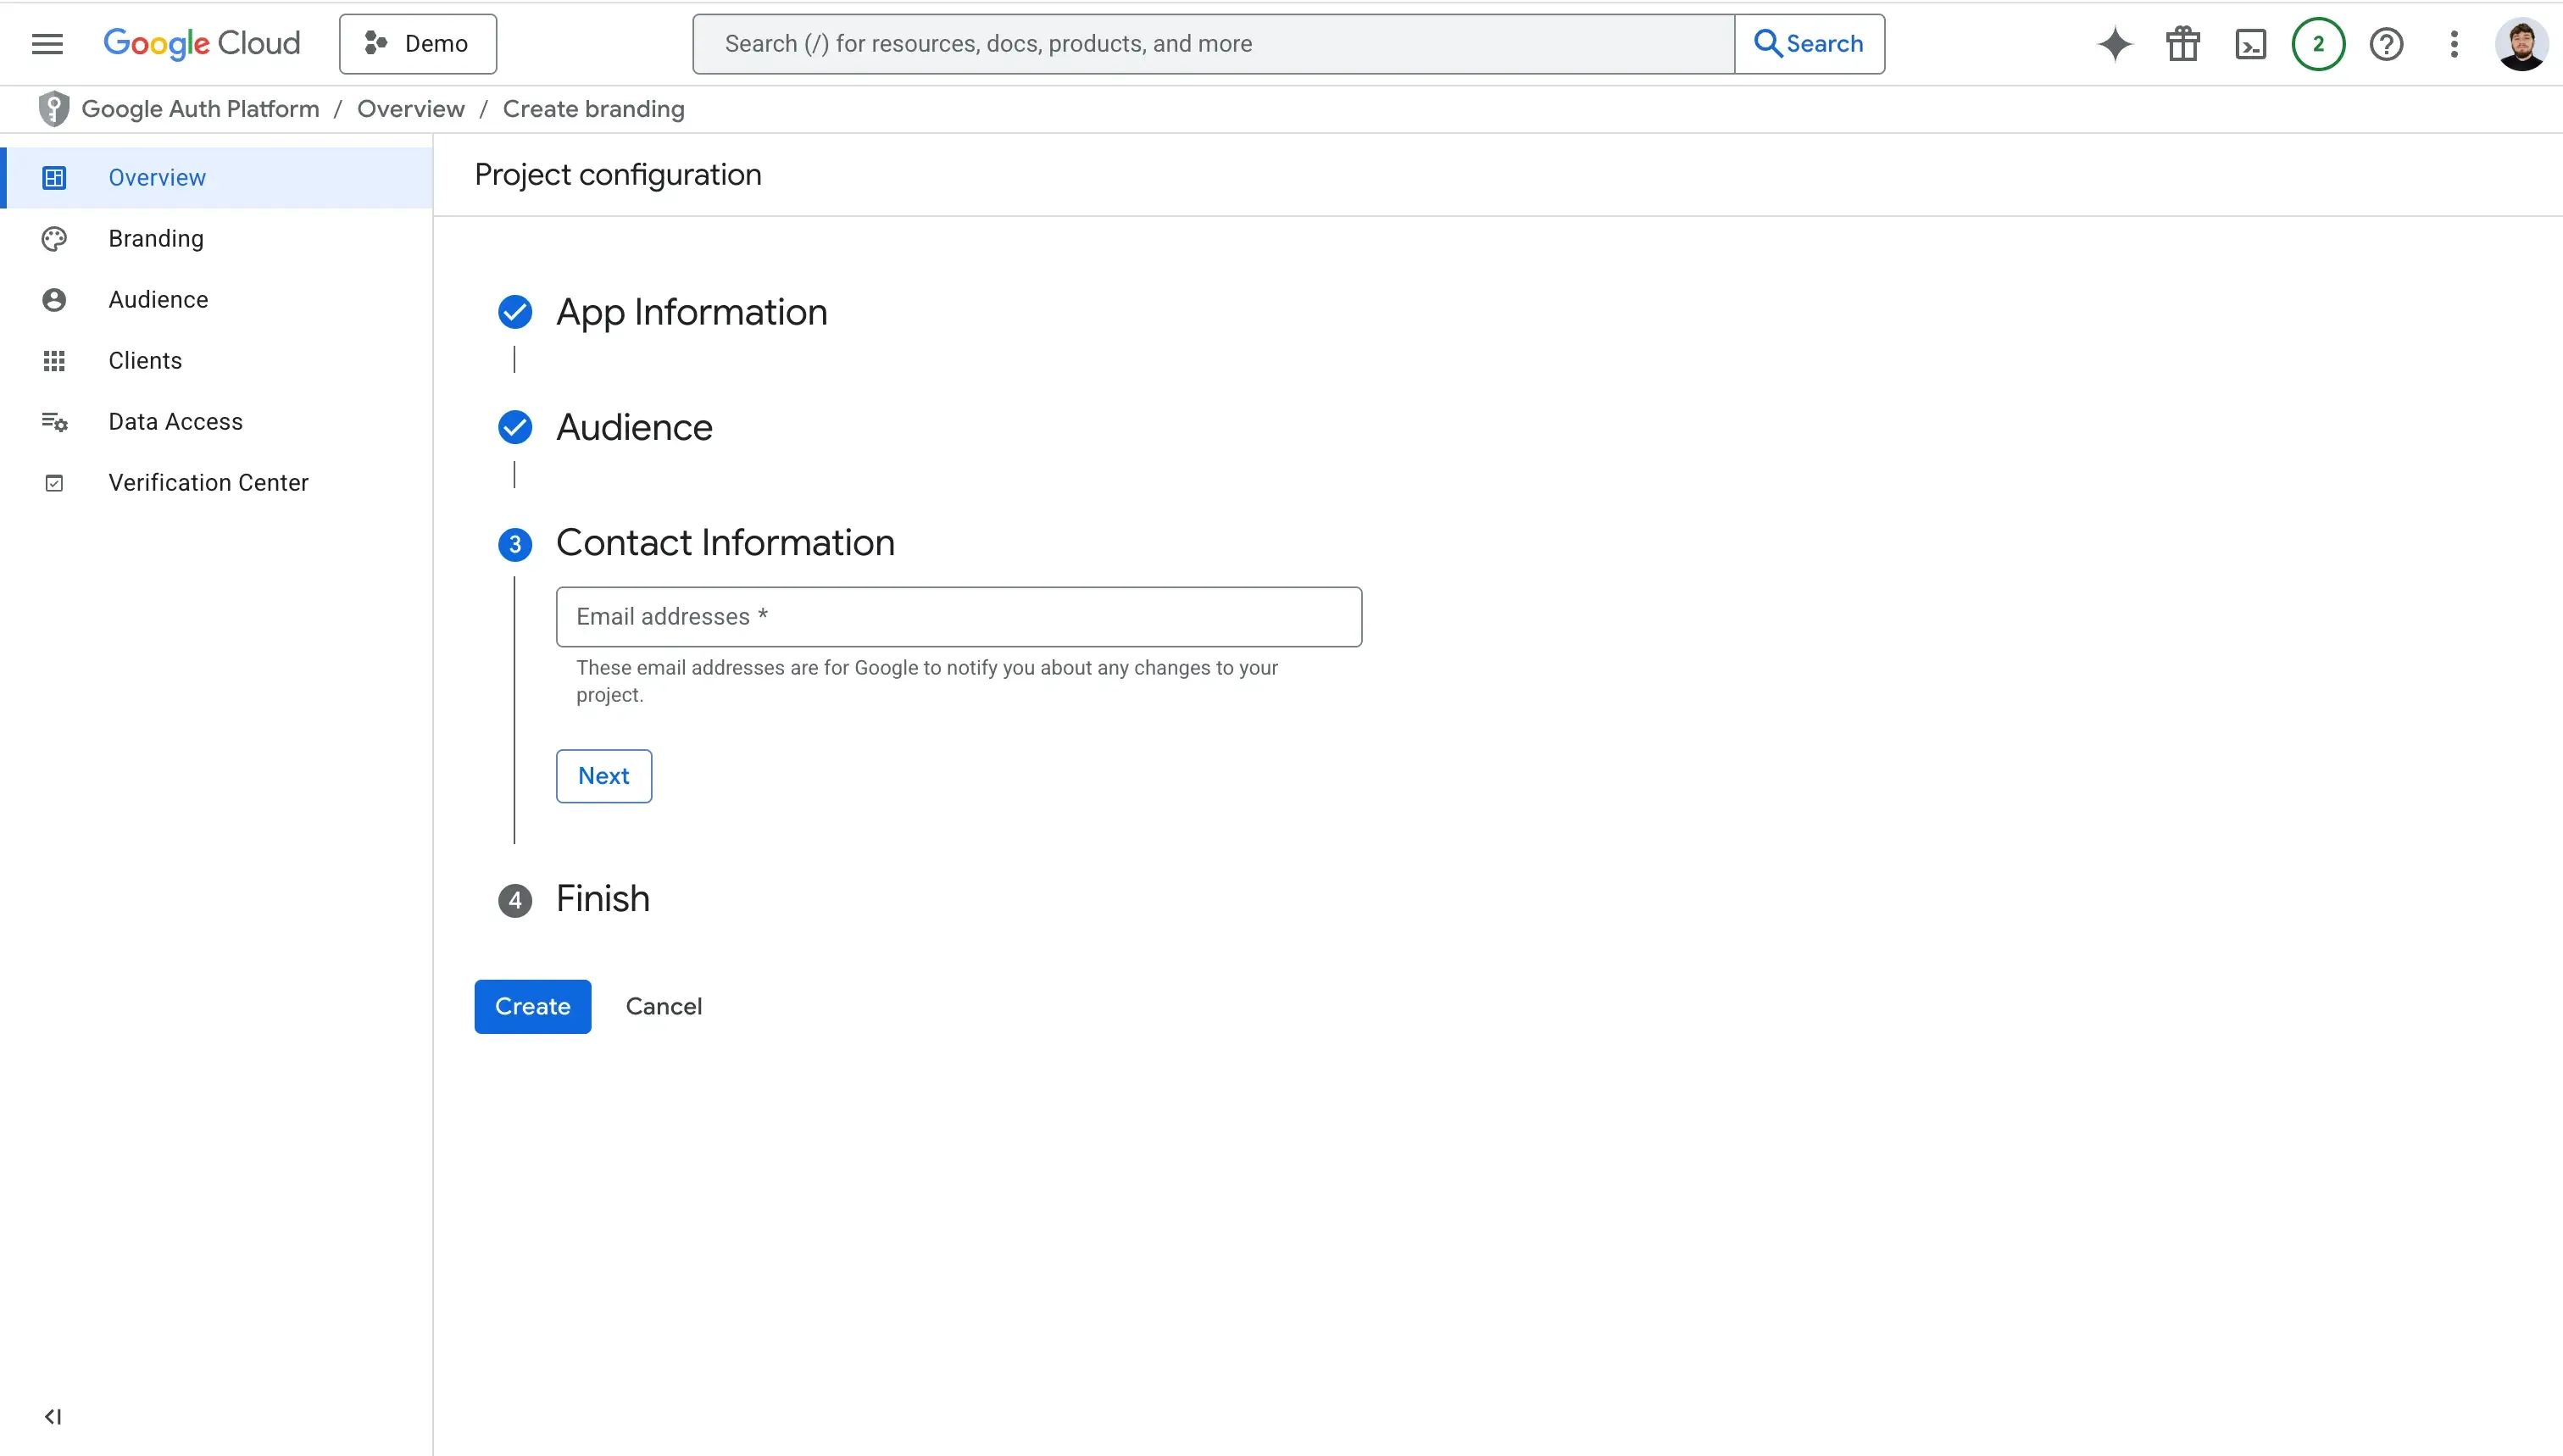
- Fill in your contact information. Google requires you to enter an email to notify you about any changes to your project.
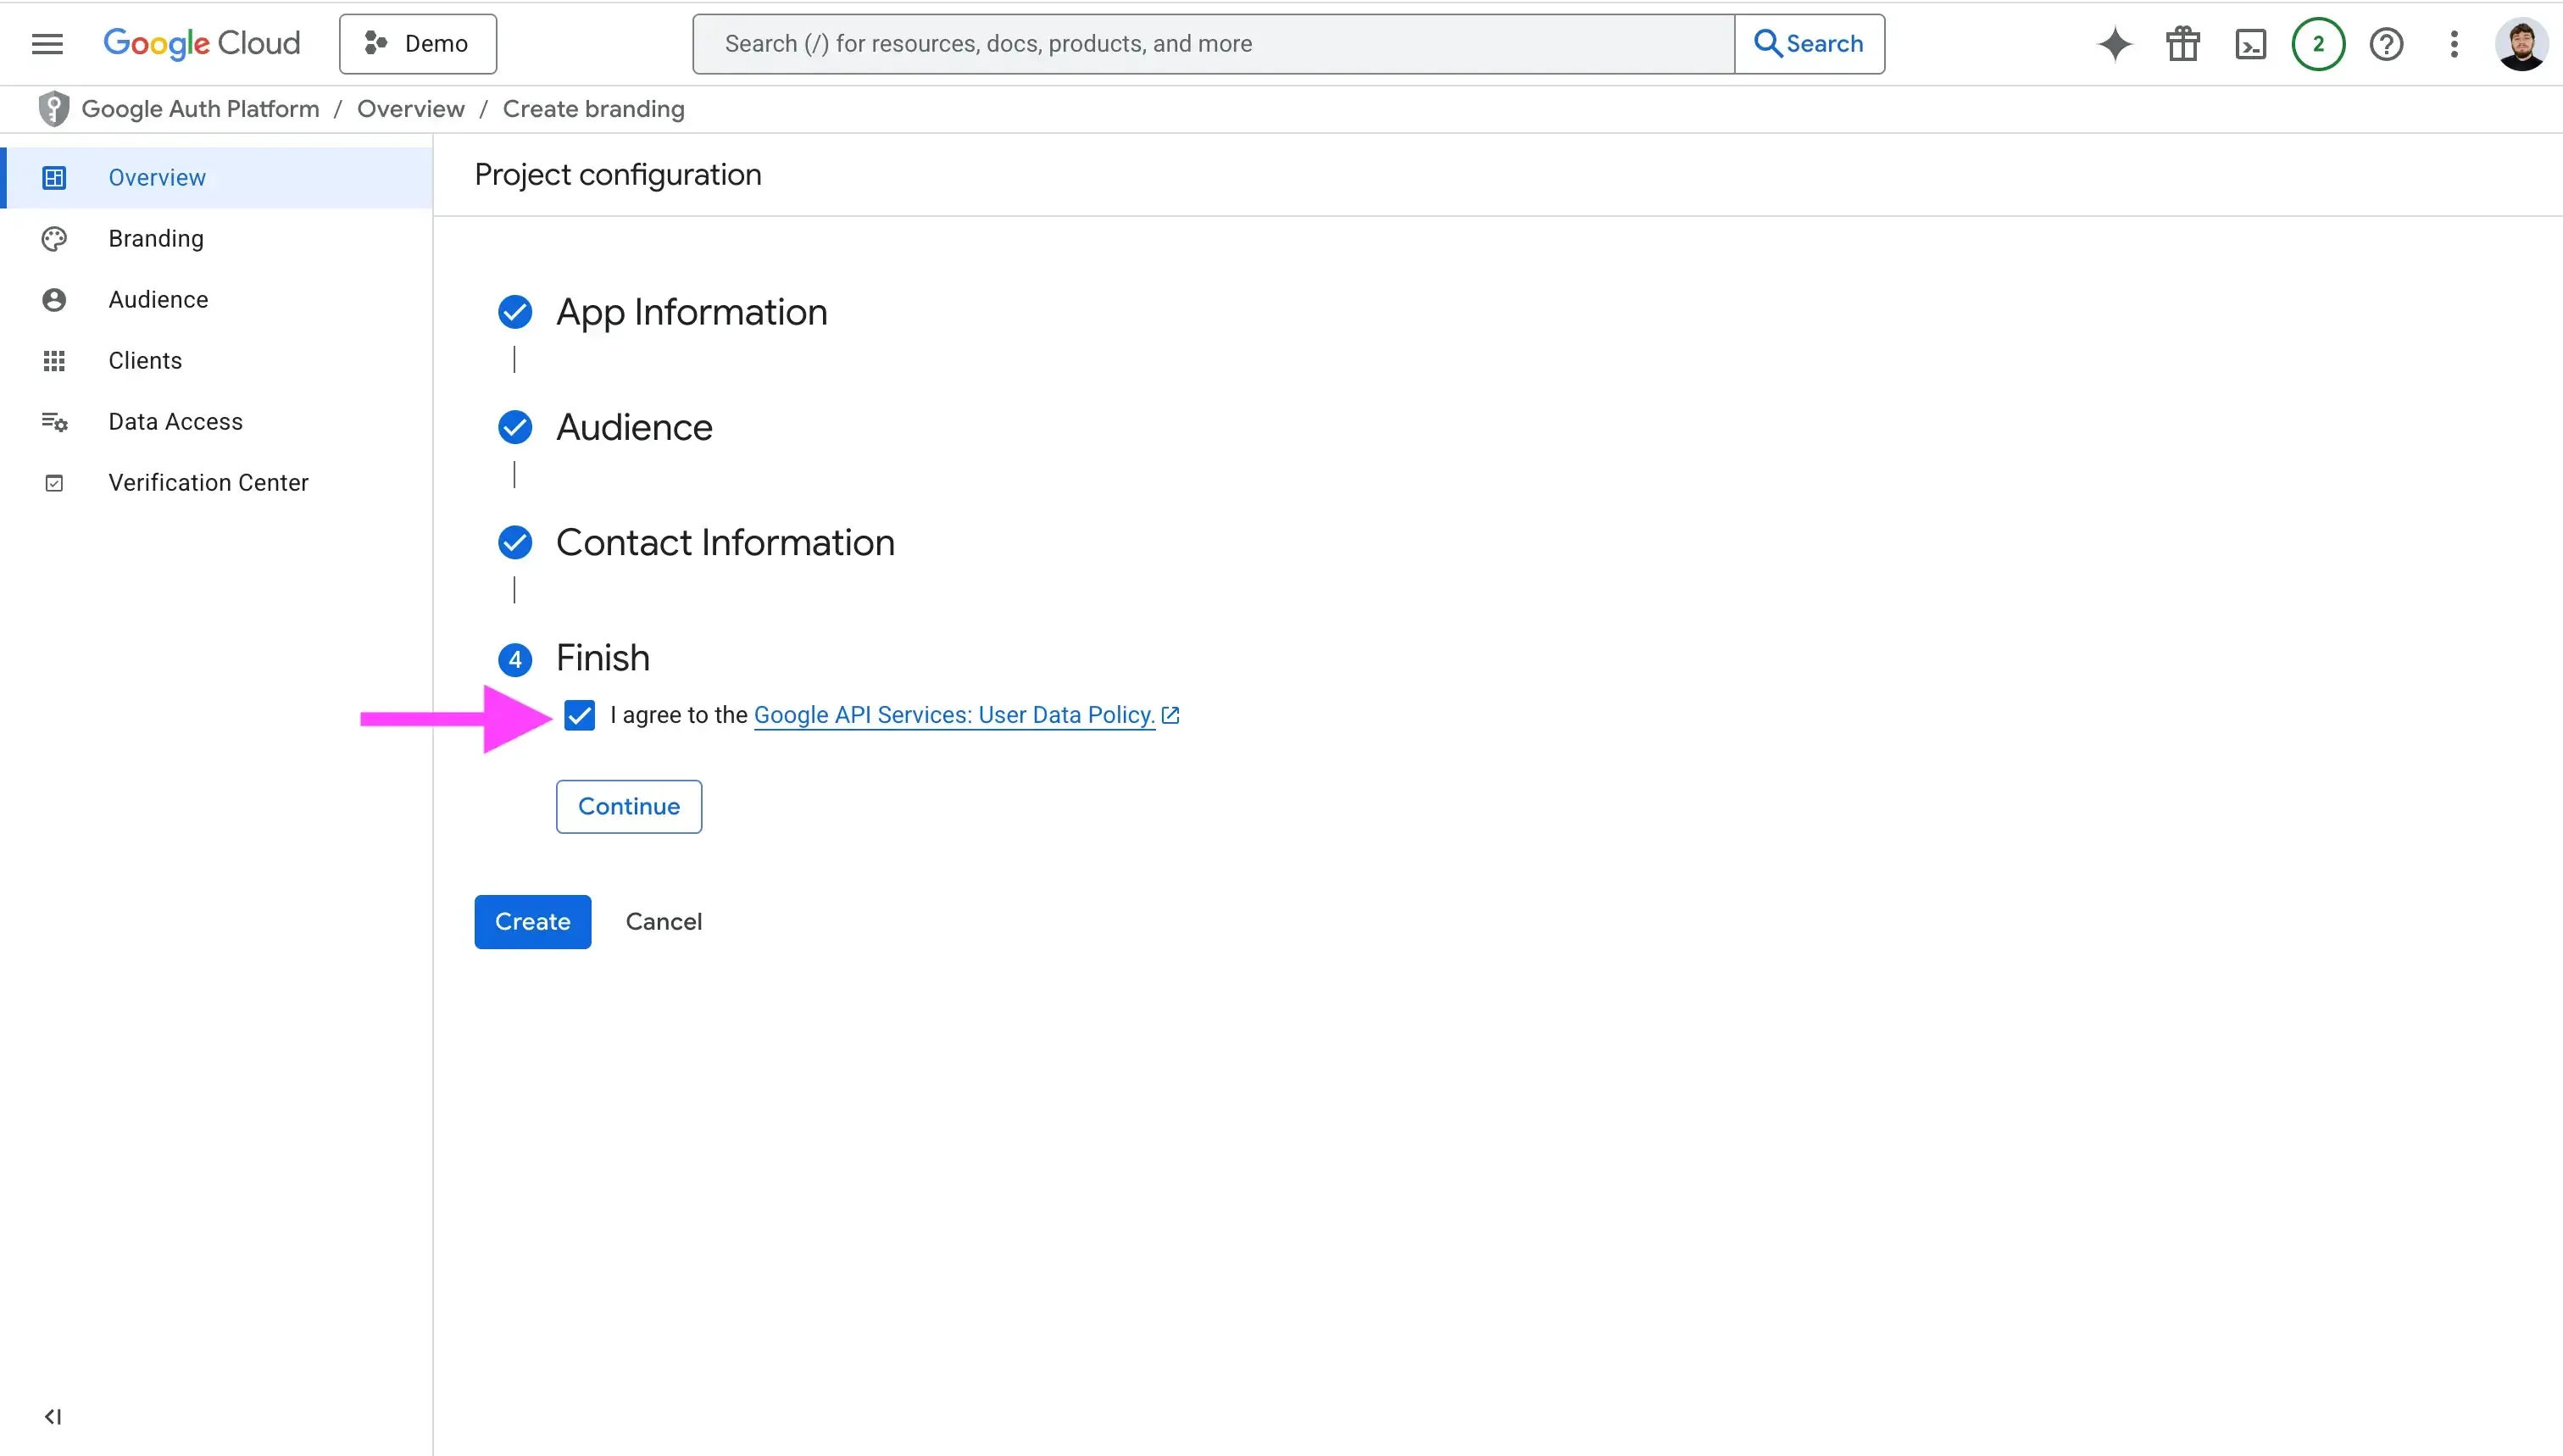
- Check the "Agree to the Google API Services: User Data Policy" checkbox.
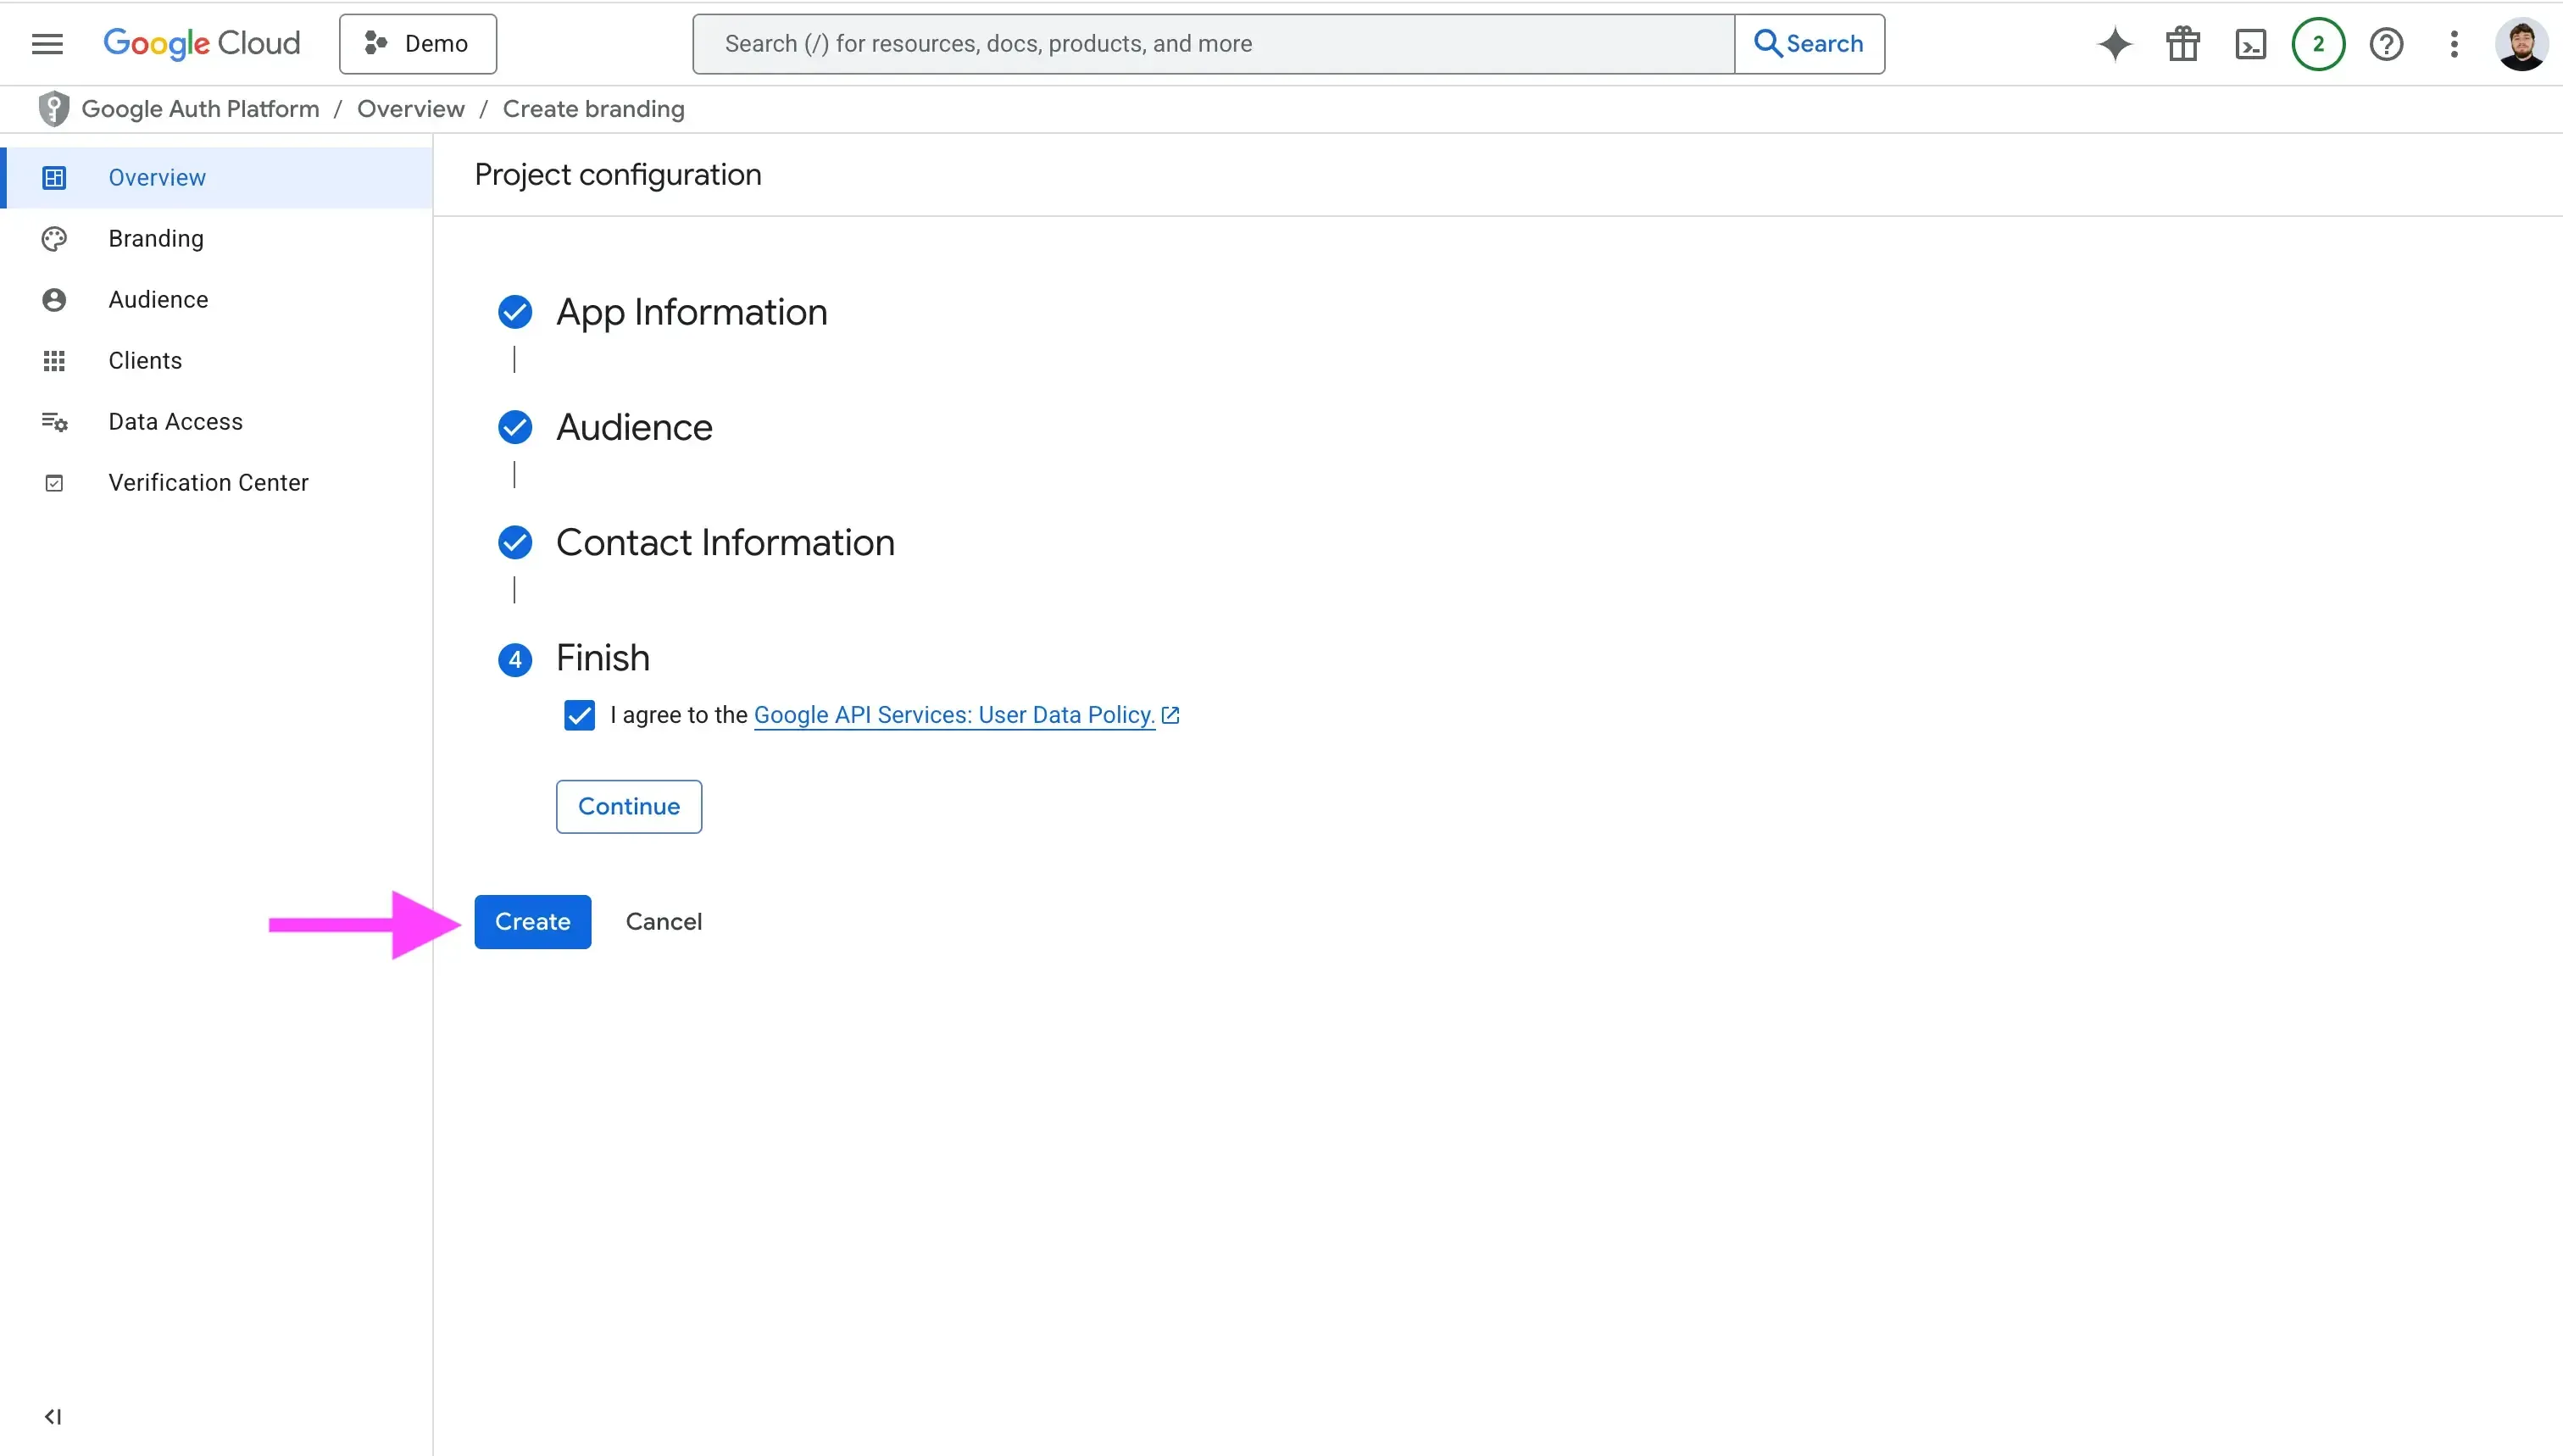
- Click “Create” .
5. Create your OAuth Client
After setting up the OAuth Consent Screen, you can create the OAuth client for your project. Click the “Clients” tab, then click “Create Client”.
Alternatively, click "Create OAuth Client" on the overview page.

You can create a client for each platform your app runs on. For example, if you build a web app and an iOS app, you need a separate OAuth Client ID for each of them.

In this example, we create a “Web Application” client and name it “Web Client”.

In the same flow, we also set up the Authorized JavaScript origins and the Authorized redirect URIs.
In the Authorized JavaScript origins input, enter the domain or URL that hosts your web application, for example: myapp.domain.com

In the Authorized redirect URIs, enter all the URLs you will redirect users to after they authenticate with Google. Google appends the authorization code to this URL, and the URL must include a protocol.

After filling out these fields, click “Create”. Google then opens a modal that shows the Client ID and Client Secret. Copy both values and store them somewhere safe (usually in your .env file, since we use them in the authentication flow below). You can also download the JSON file with these values and keep it in a secret manager such as 1Password.

6. Add some test users for testing purposes
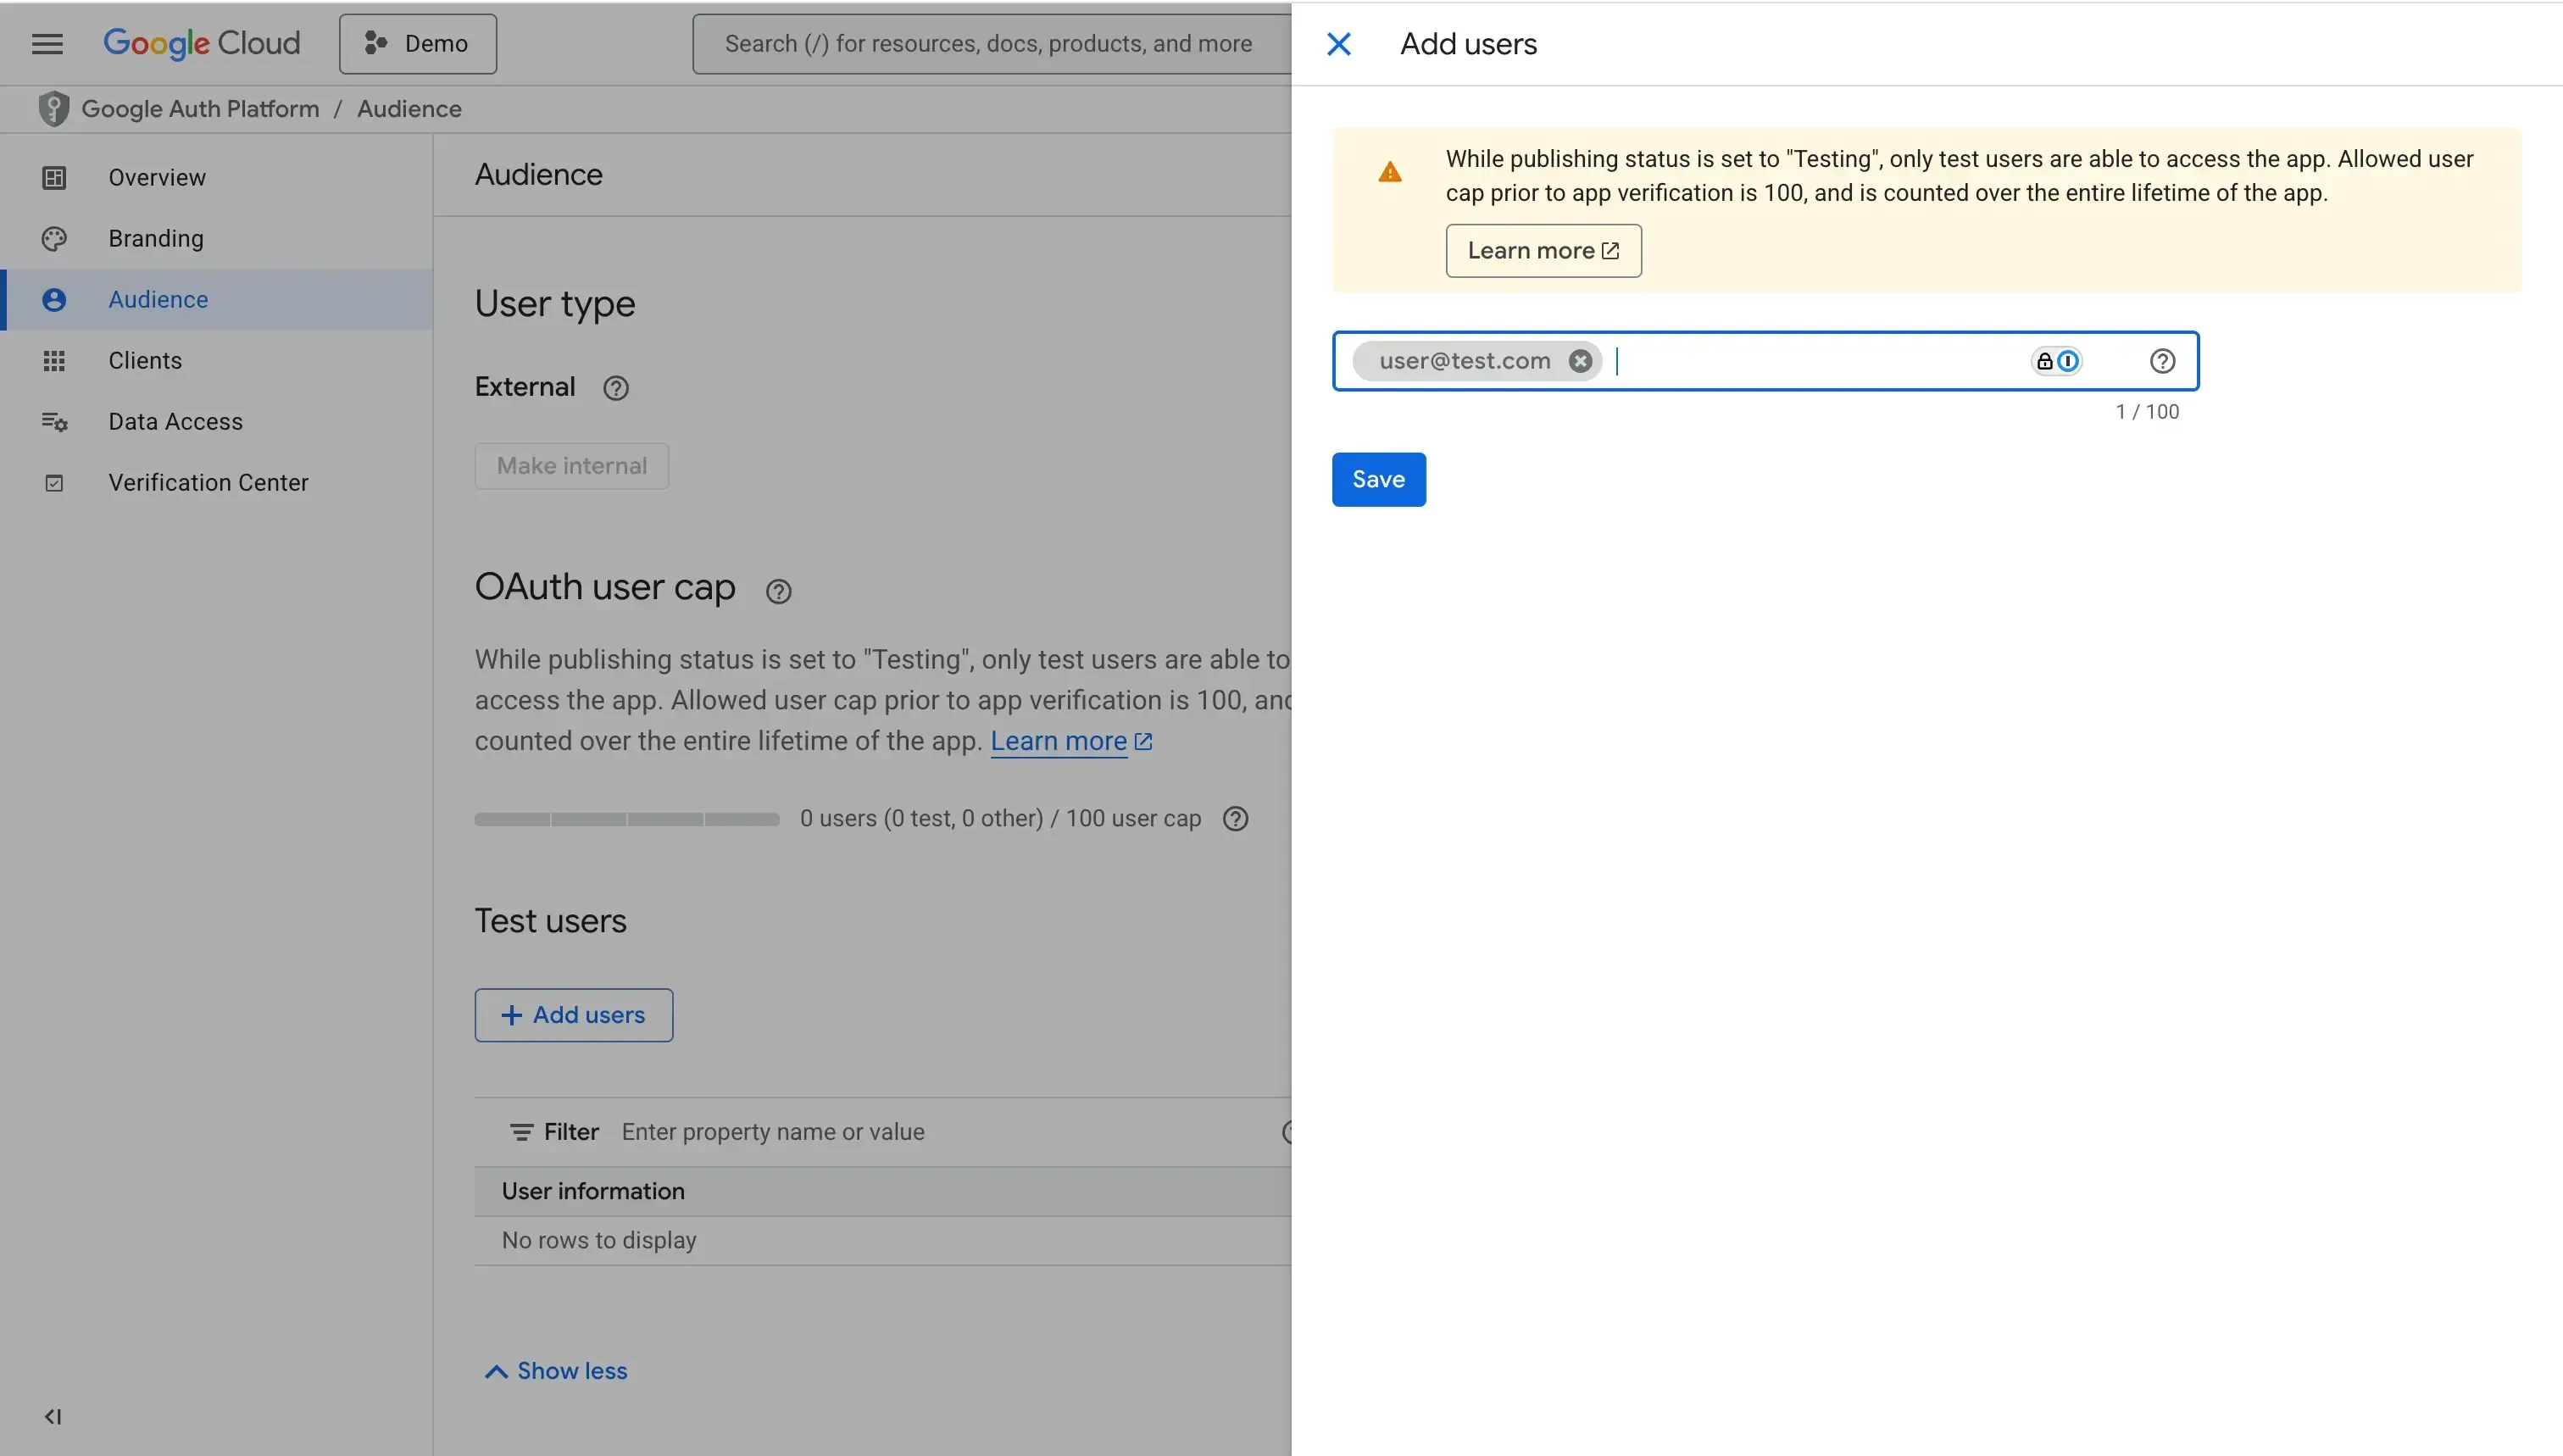
While you develop your app locally, you cannot connect any Google Calendar account unless you add some test users to your app. The reason is that the app is external and has not been approved by Google yet.
To add test users, follow these steps:
- Click the “Audience” tab.
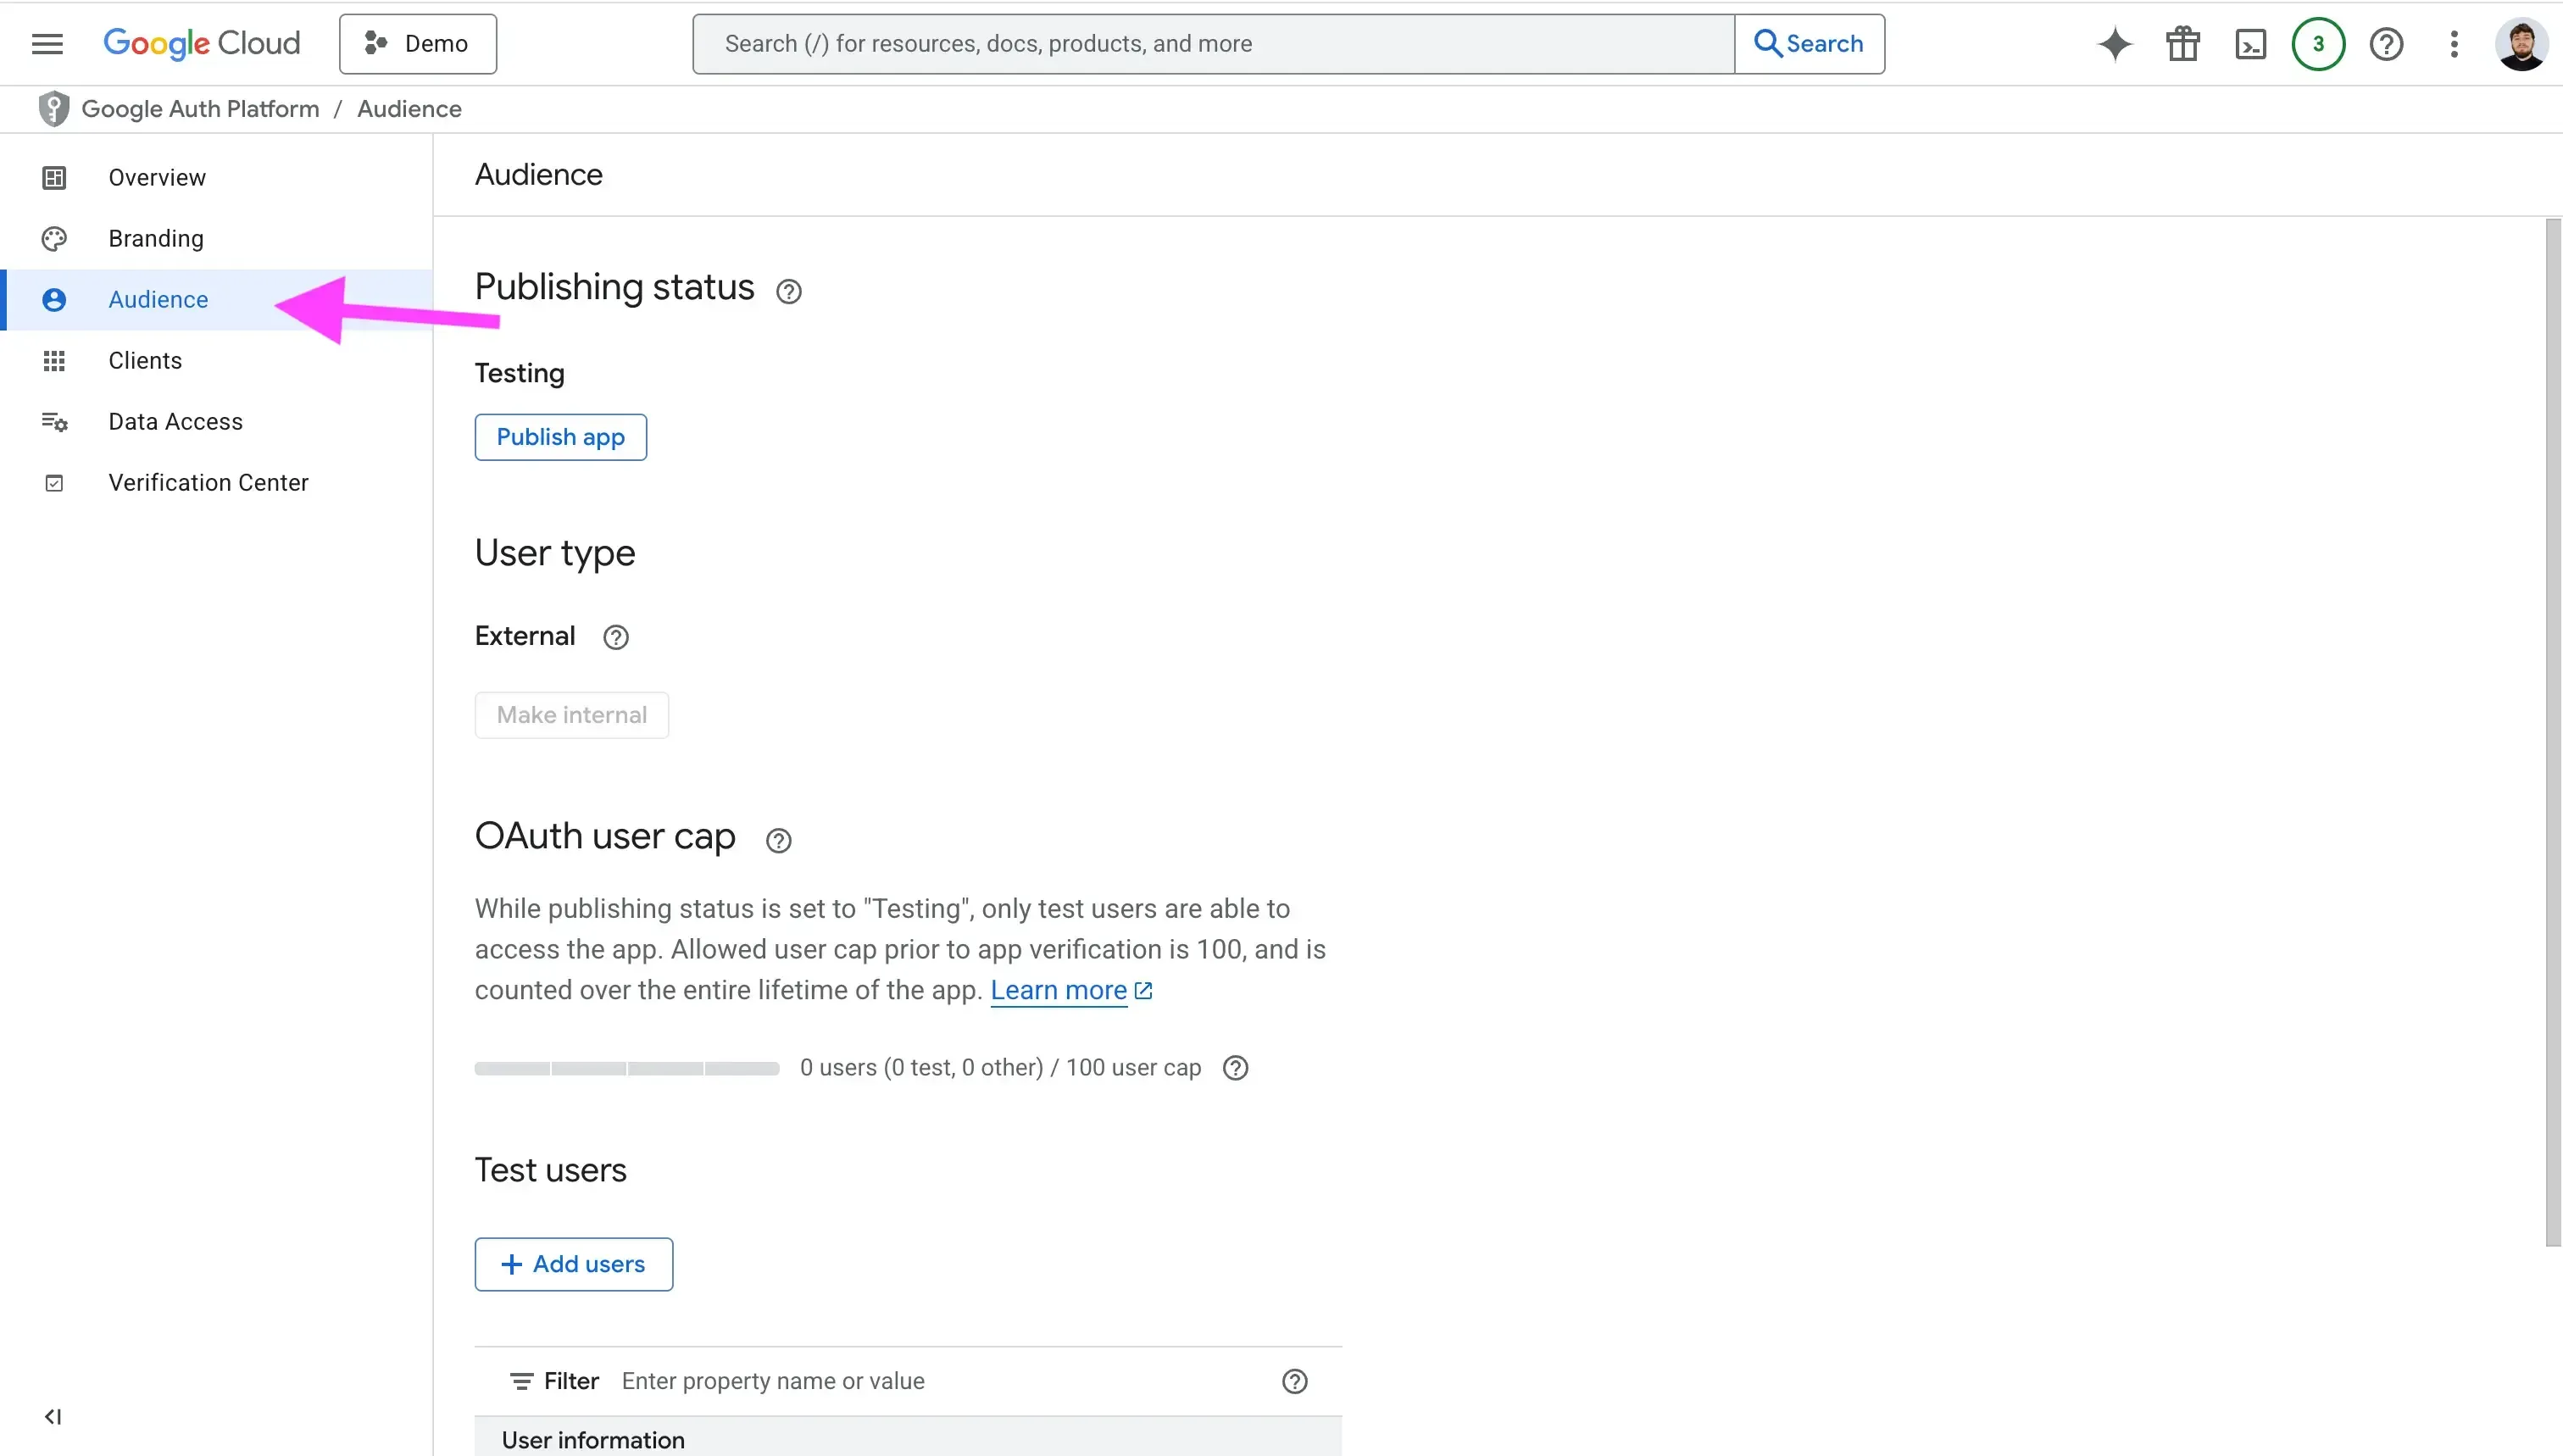
- Scroll until you find the “Test Users” section.
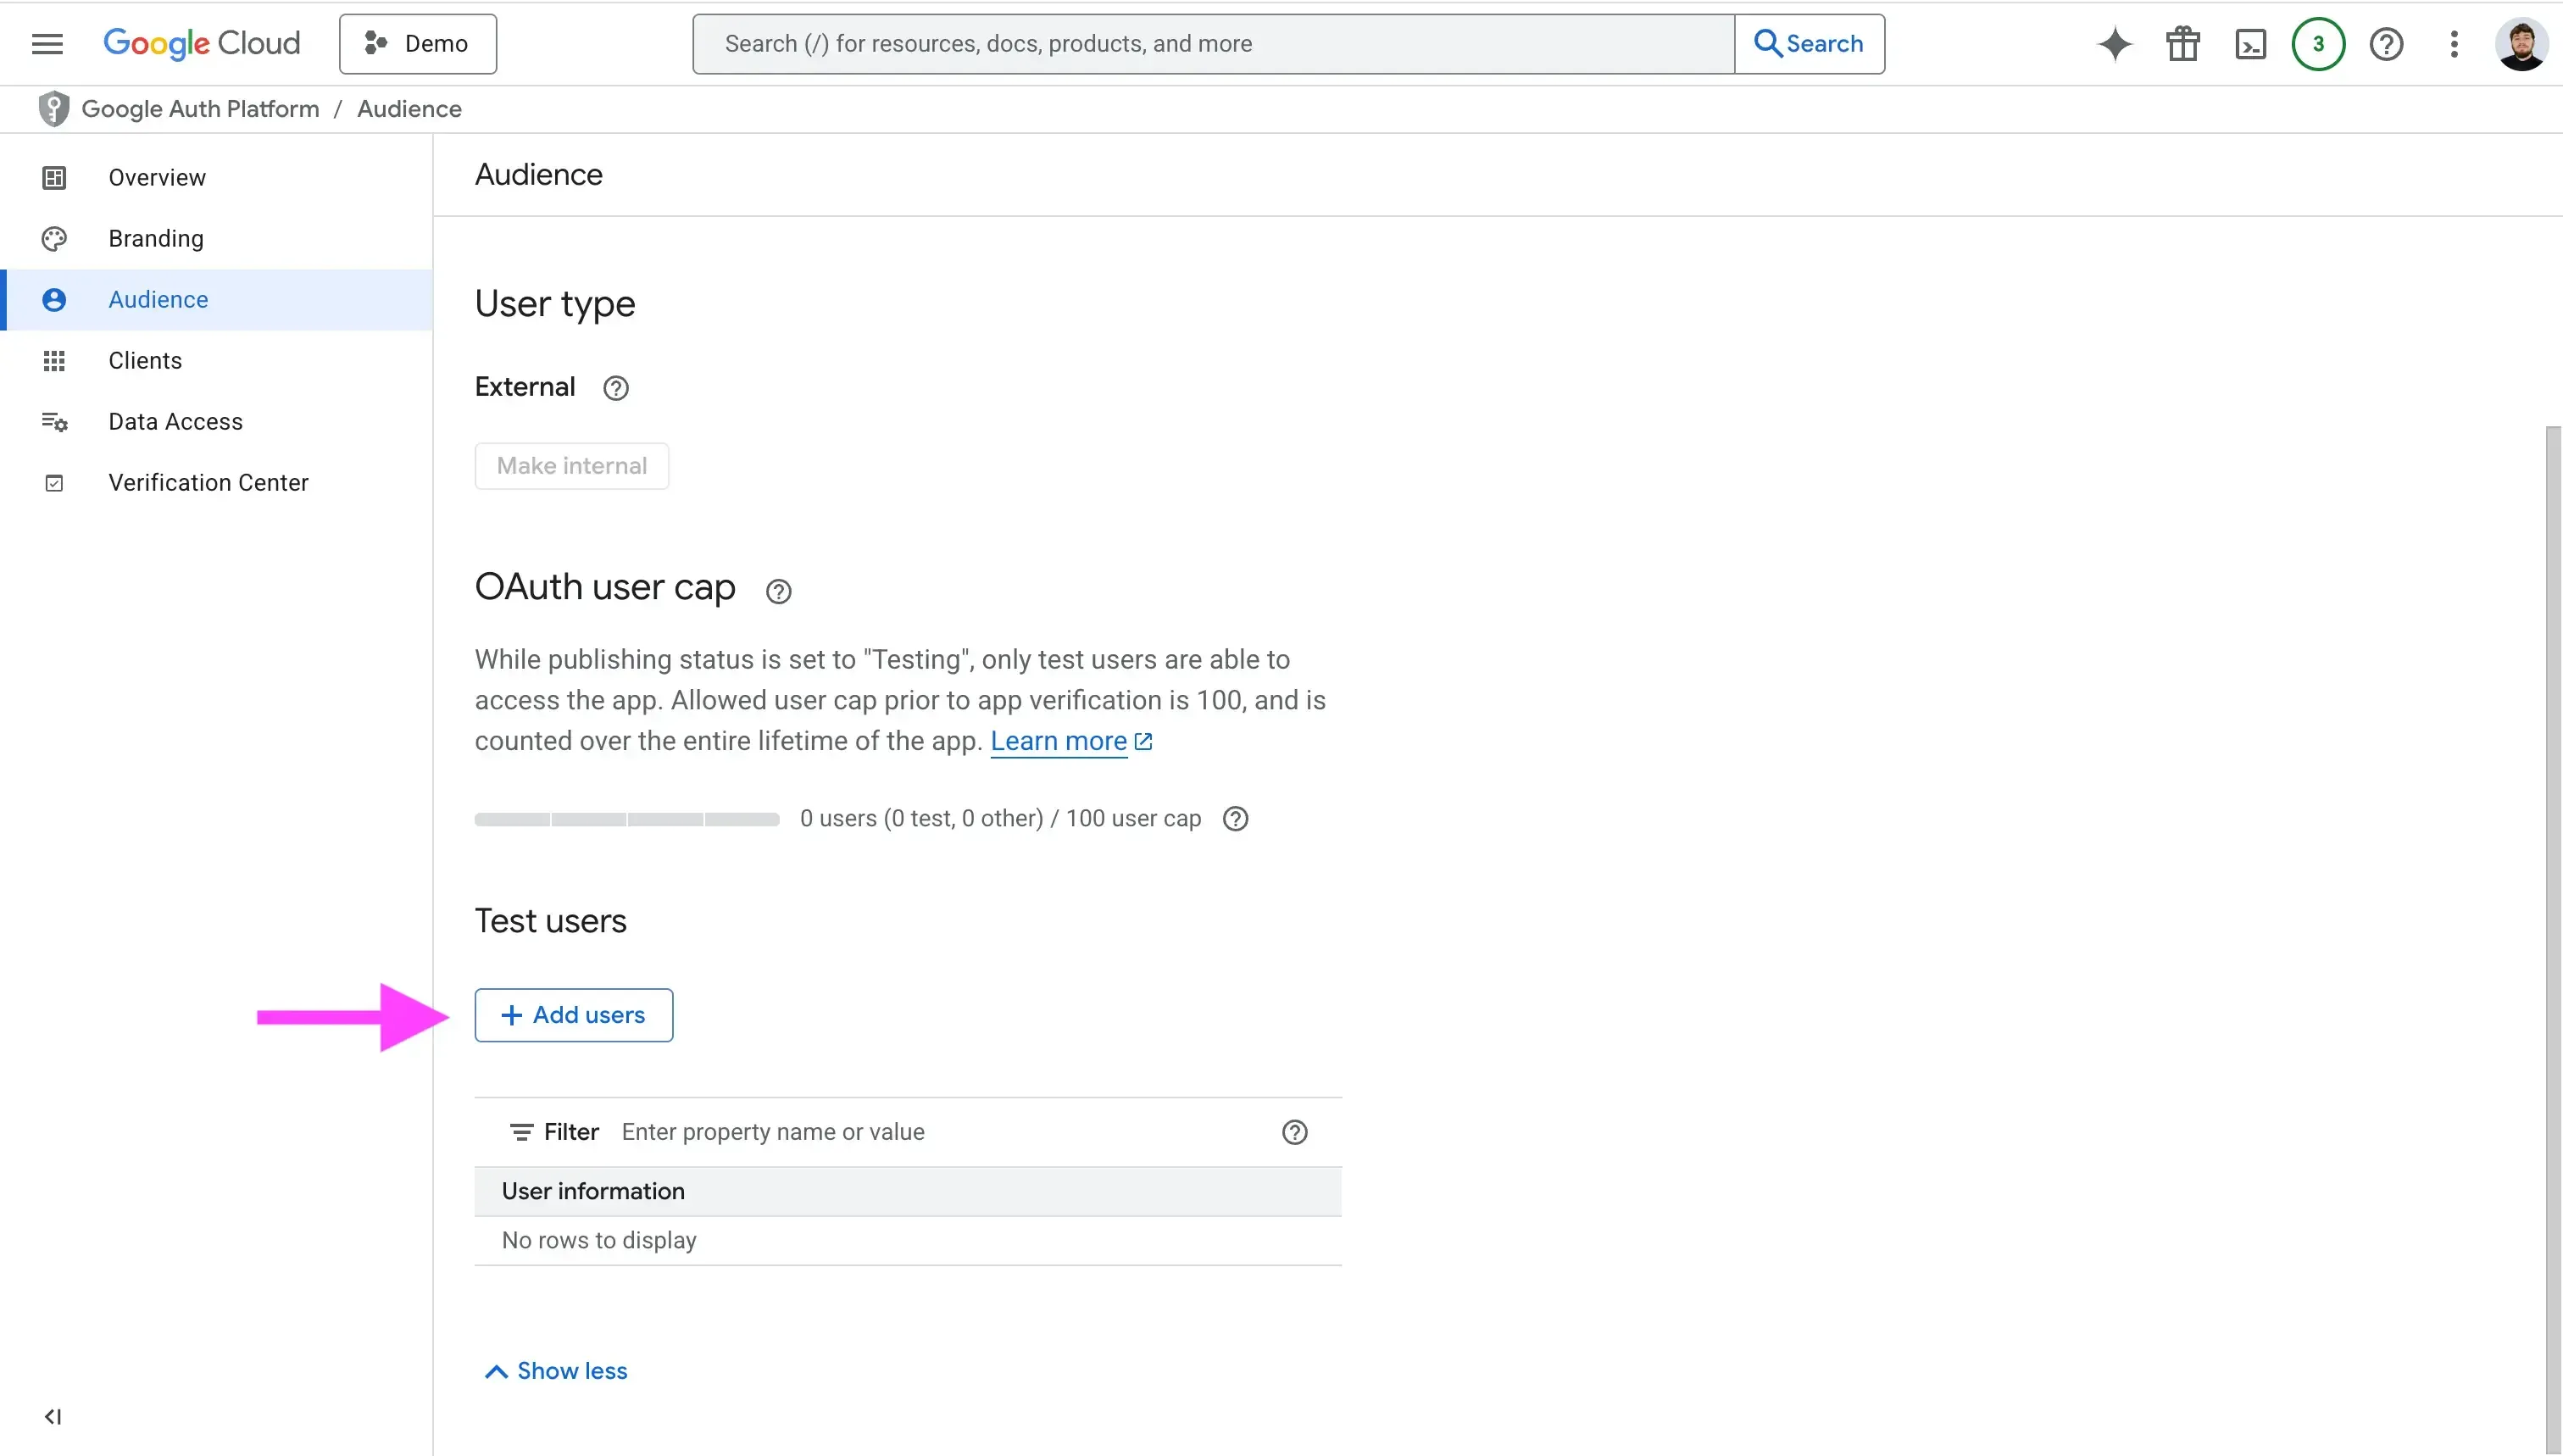
- Click “Add Users”, then enter the user’s email.
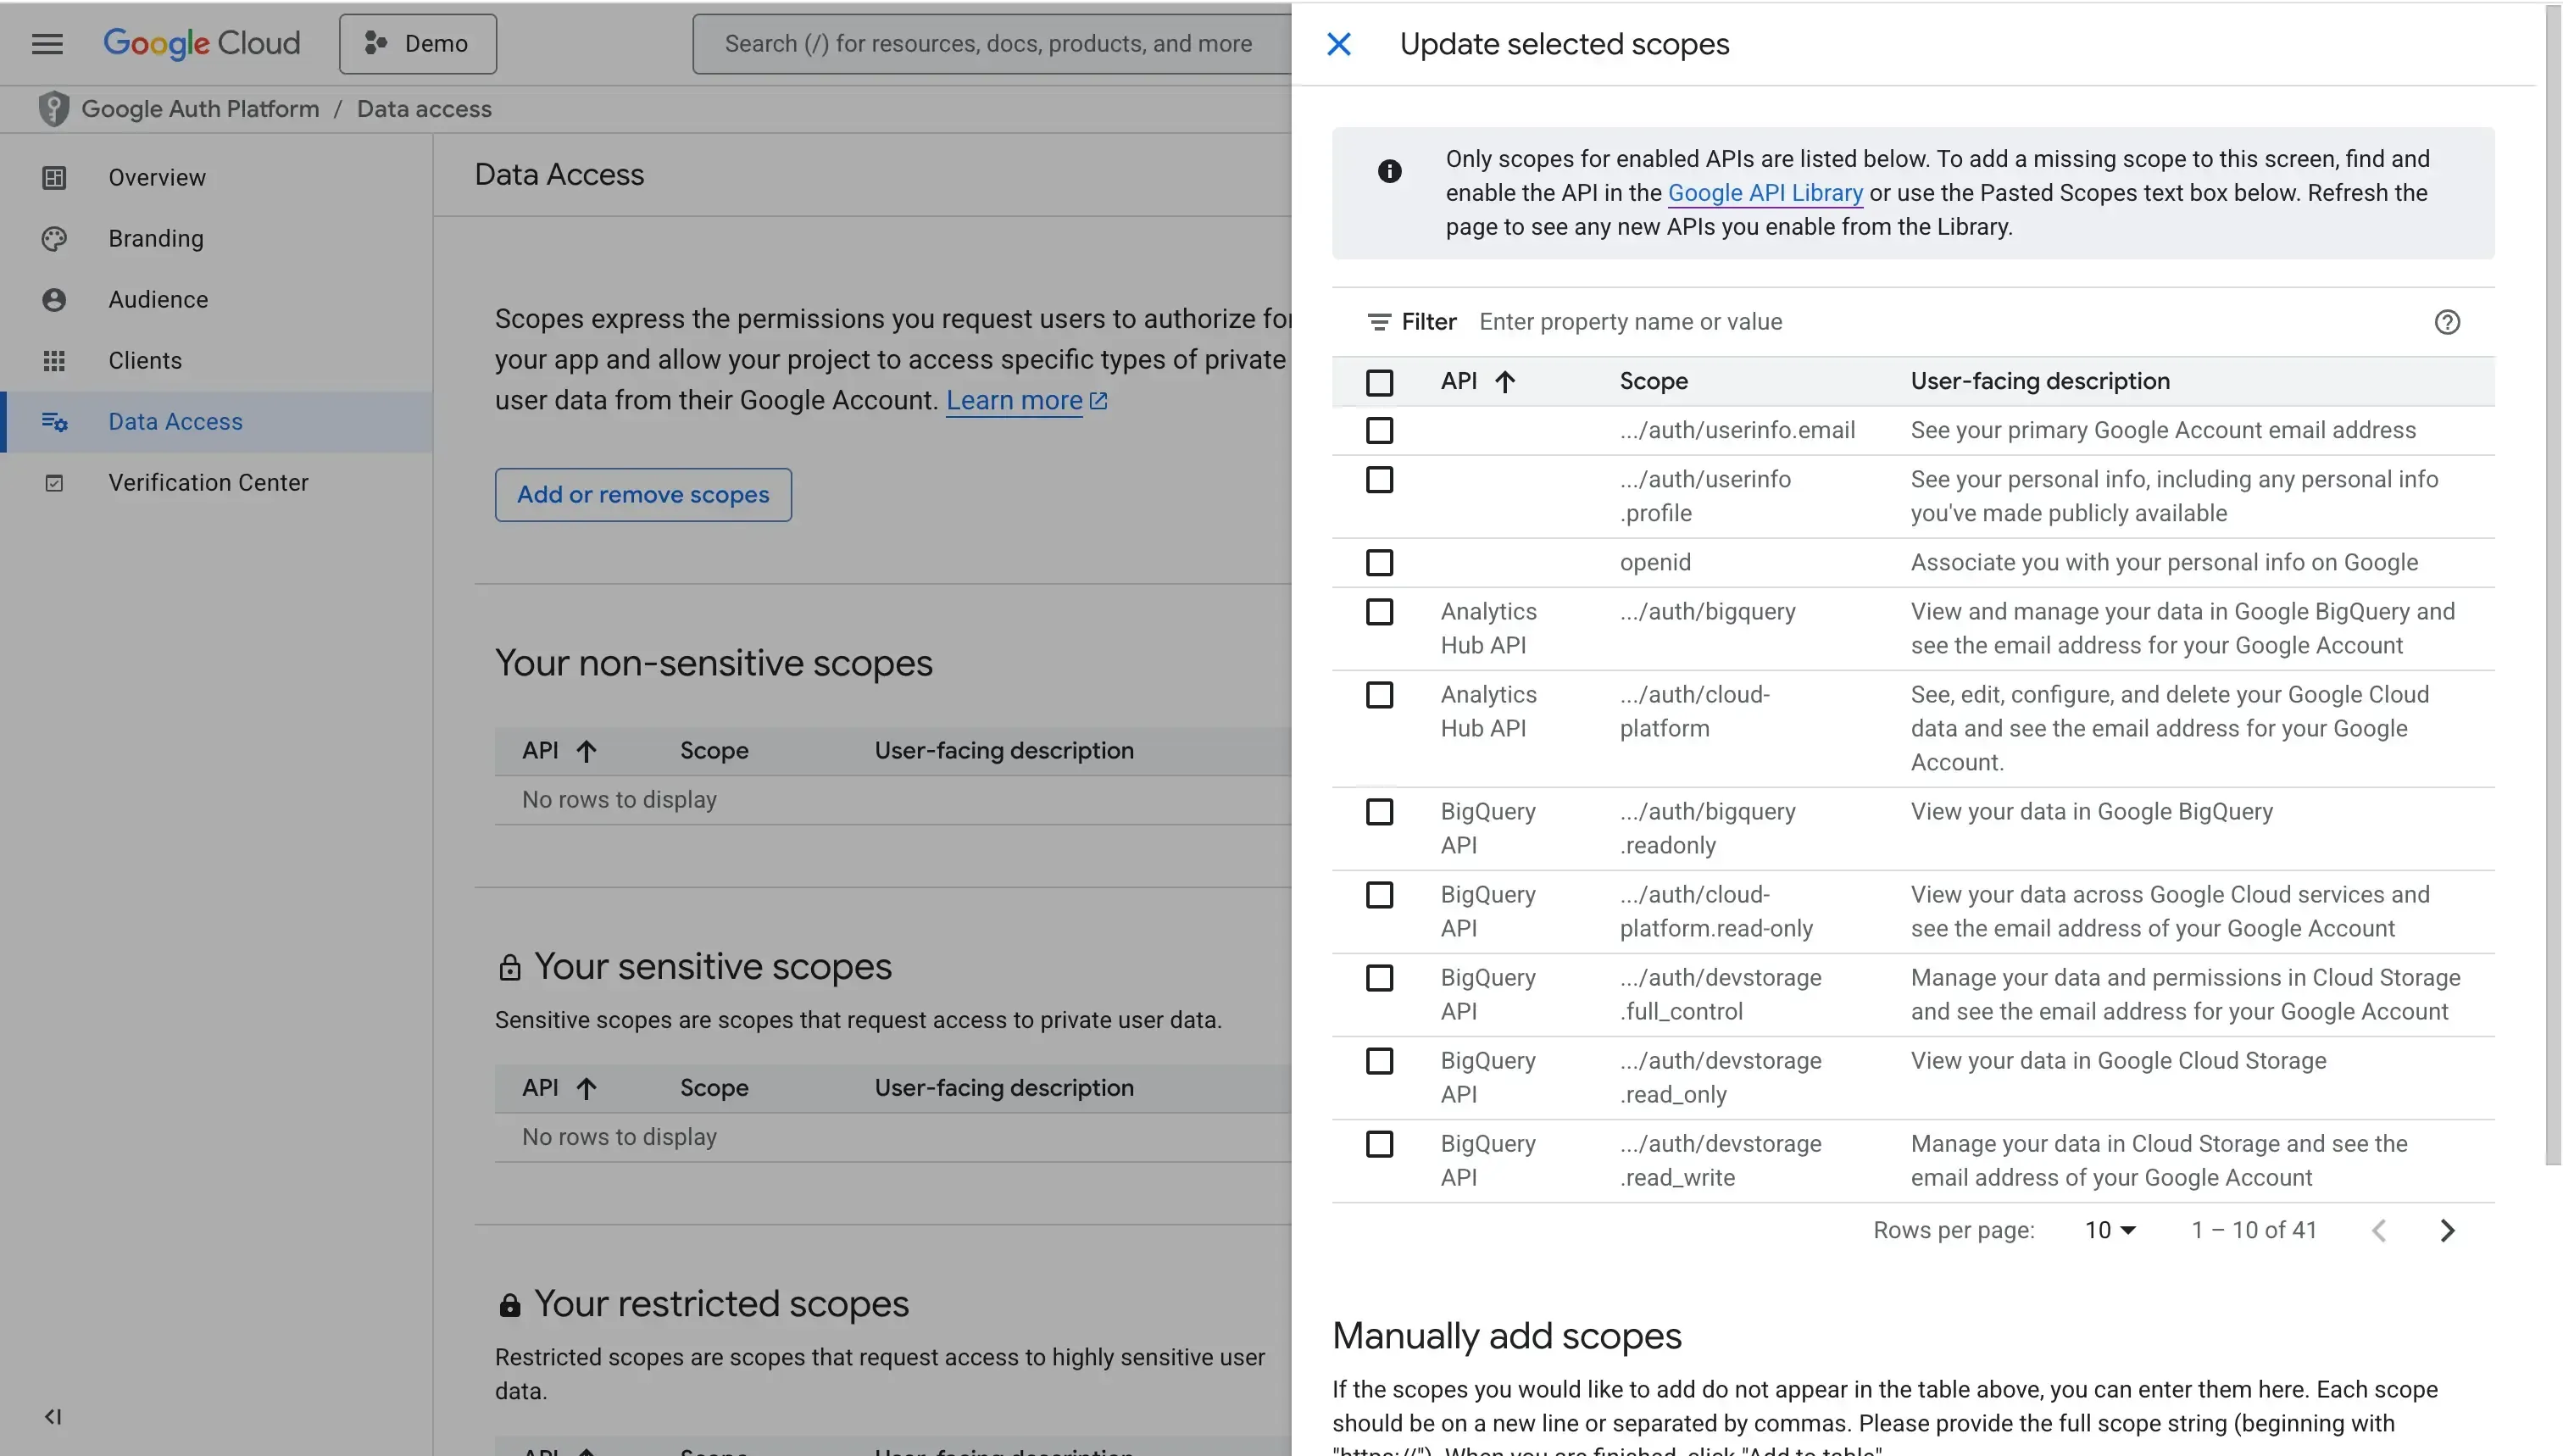
7. Add the calendar scopes you plan to use
Depending on the use case you want to solve with the Google Calendar integration, you may need to request different scopes from users when they authorize their Google Calendar accounts in your app.
Think of scopes as permissions that you request from users. They allow your app to access private data from their Google account. Examples of scopes are listing their calendars, reading their calendar events, and more.
Google splits scopes into sensitive and non-sensitive scopes. If you add sensitive scopes, you need to submit your app for verification. The same applies when your app is already verified and you add more sensitive scopes.
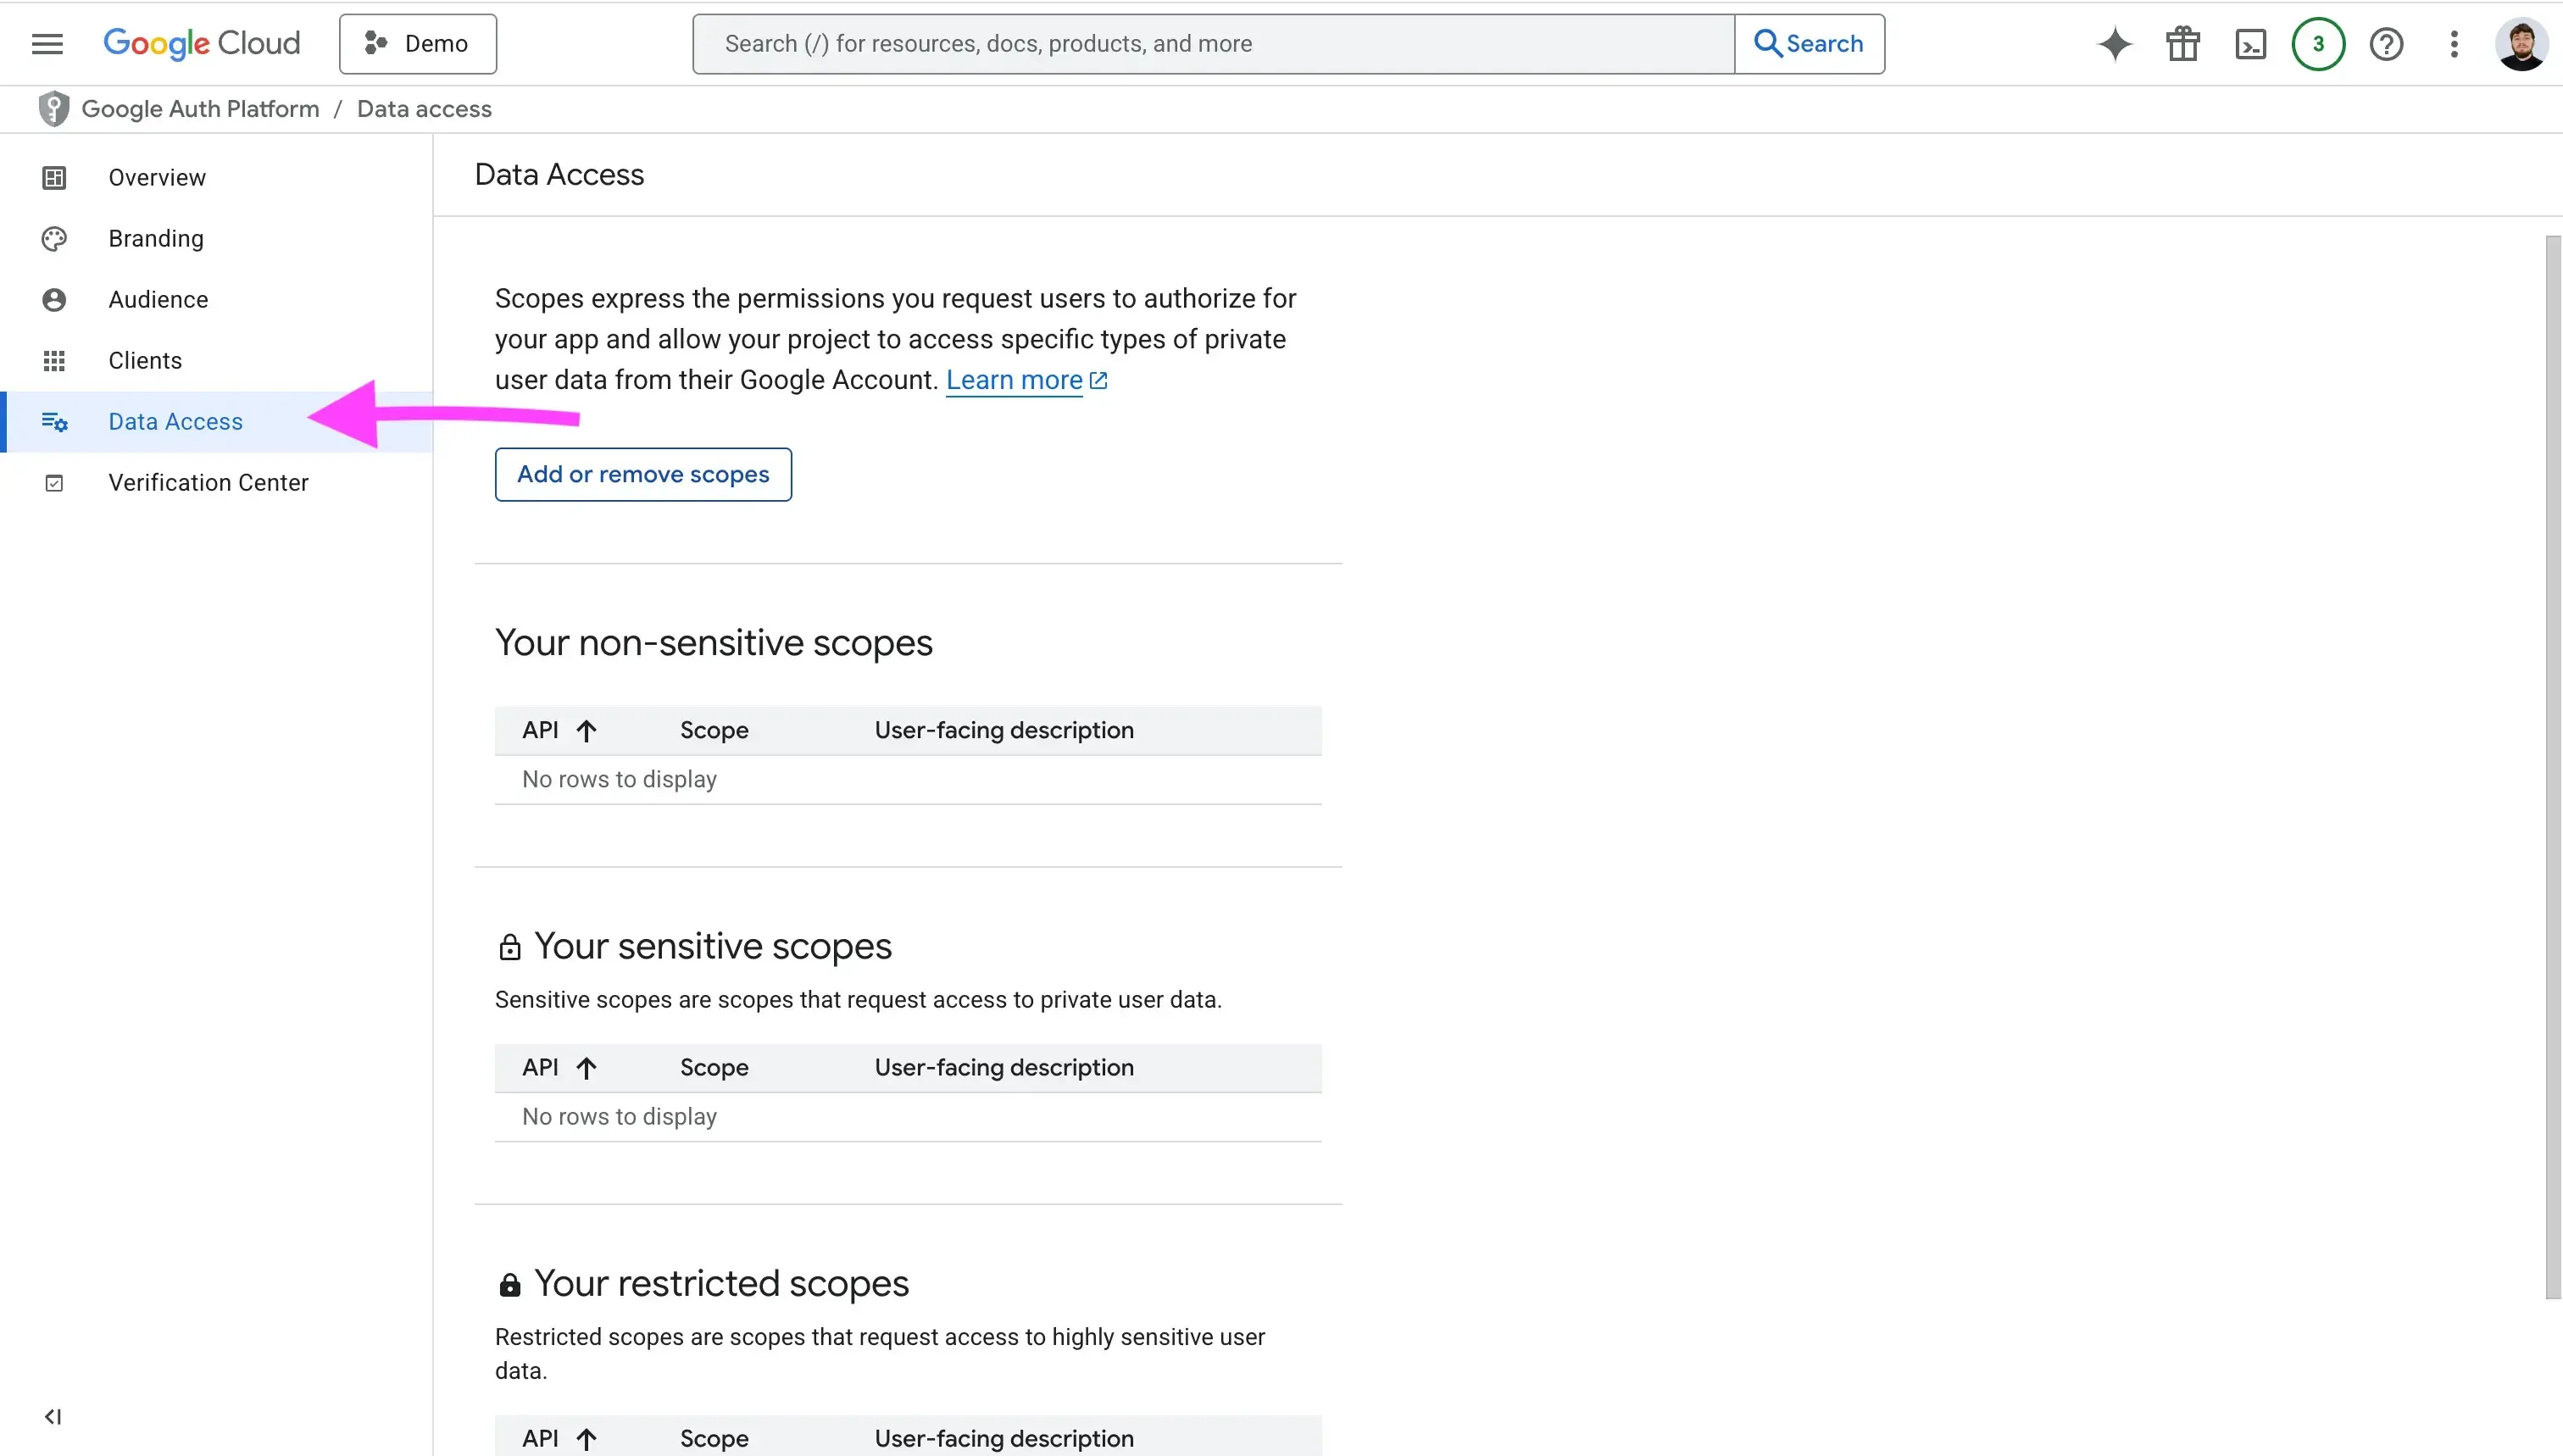
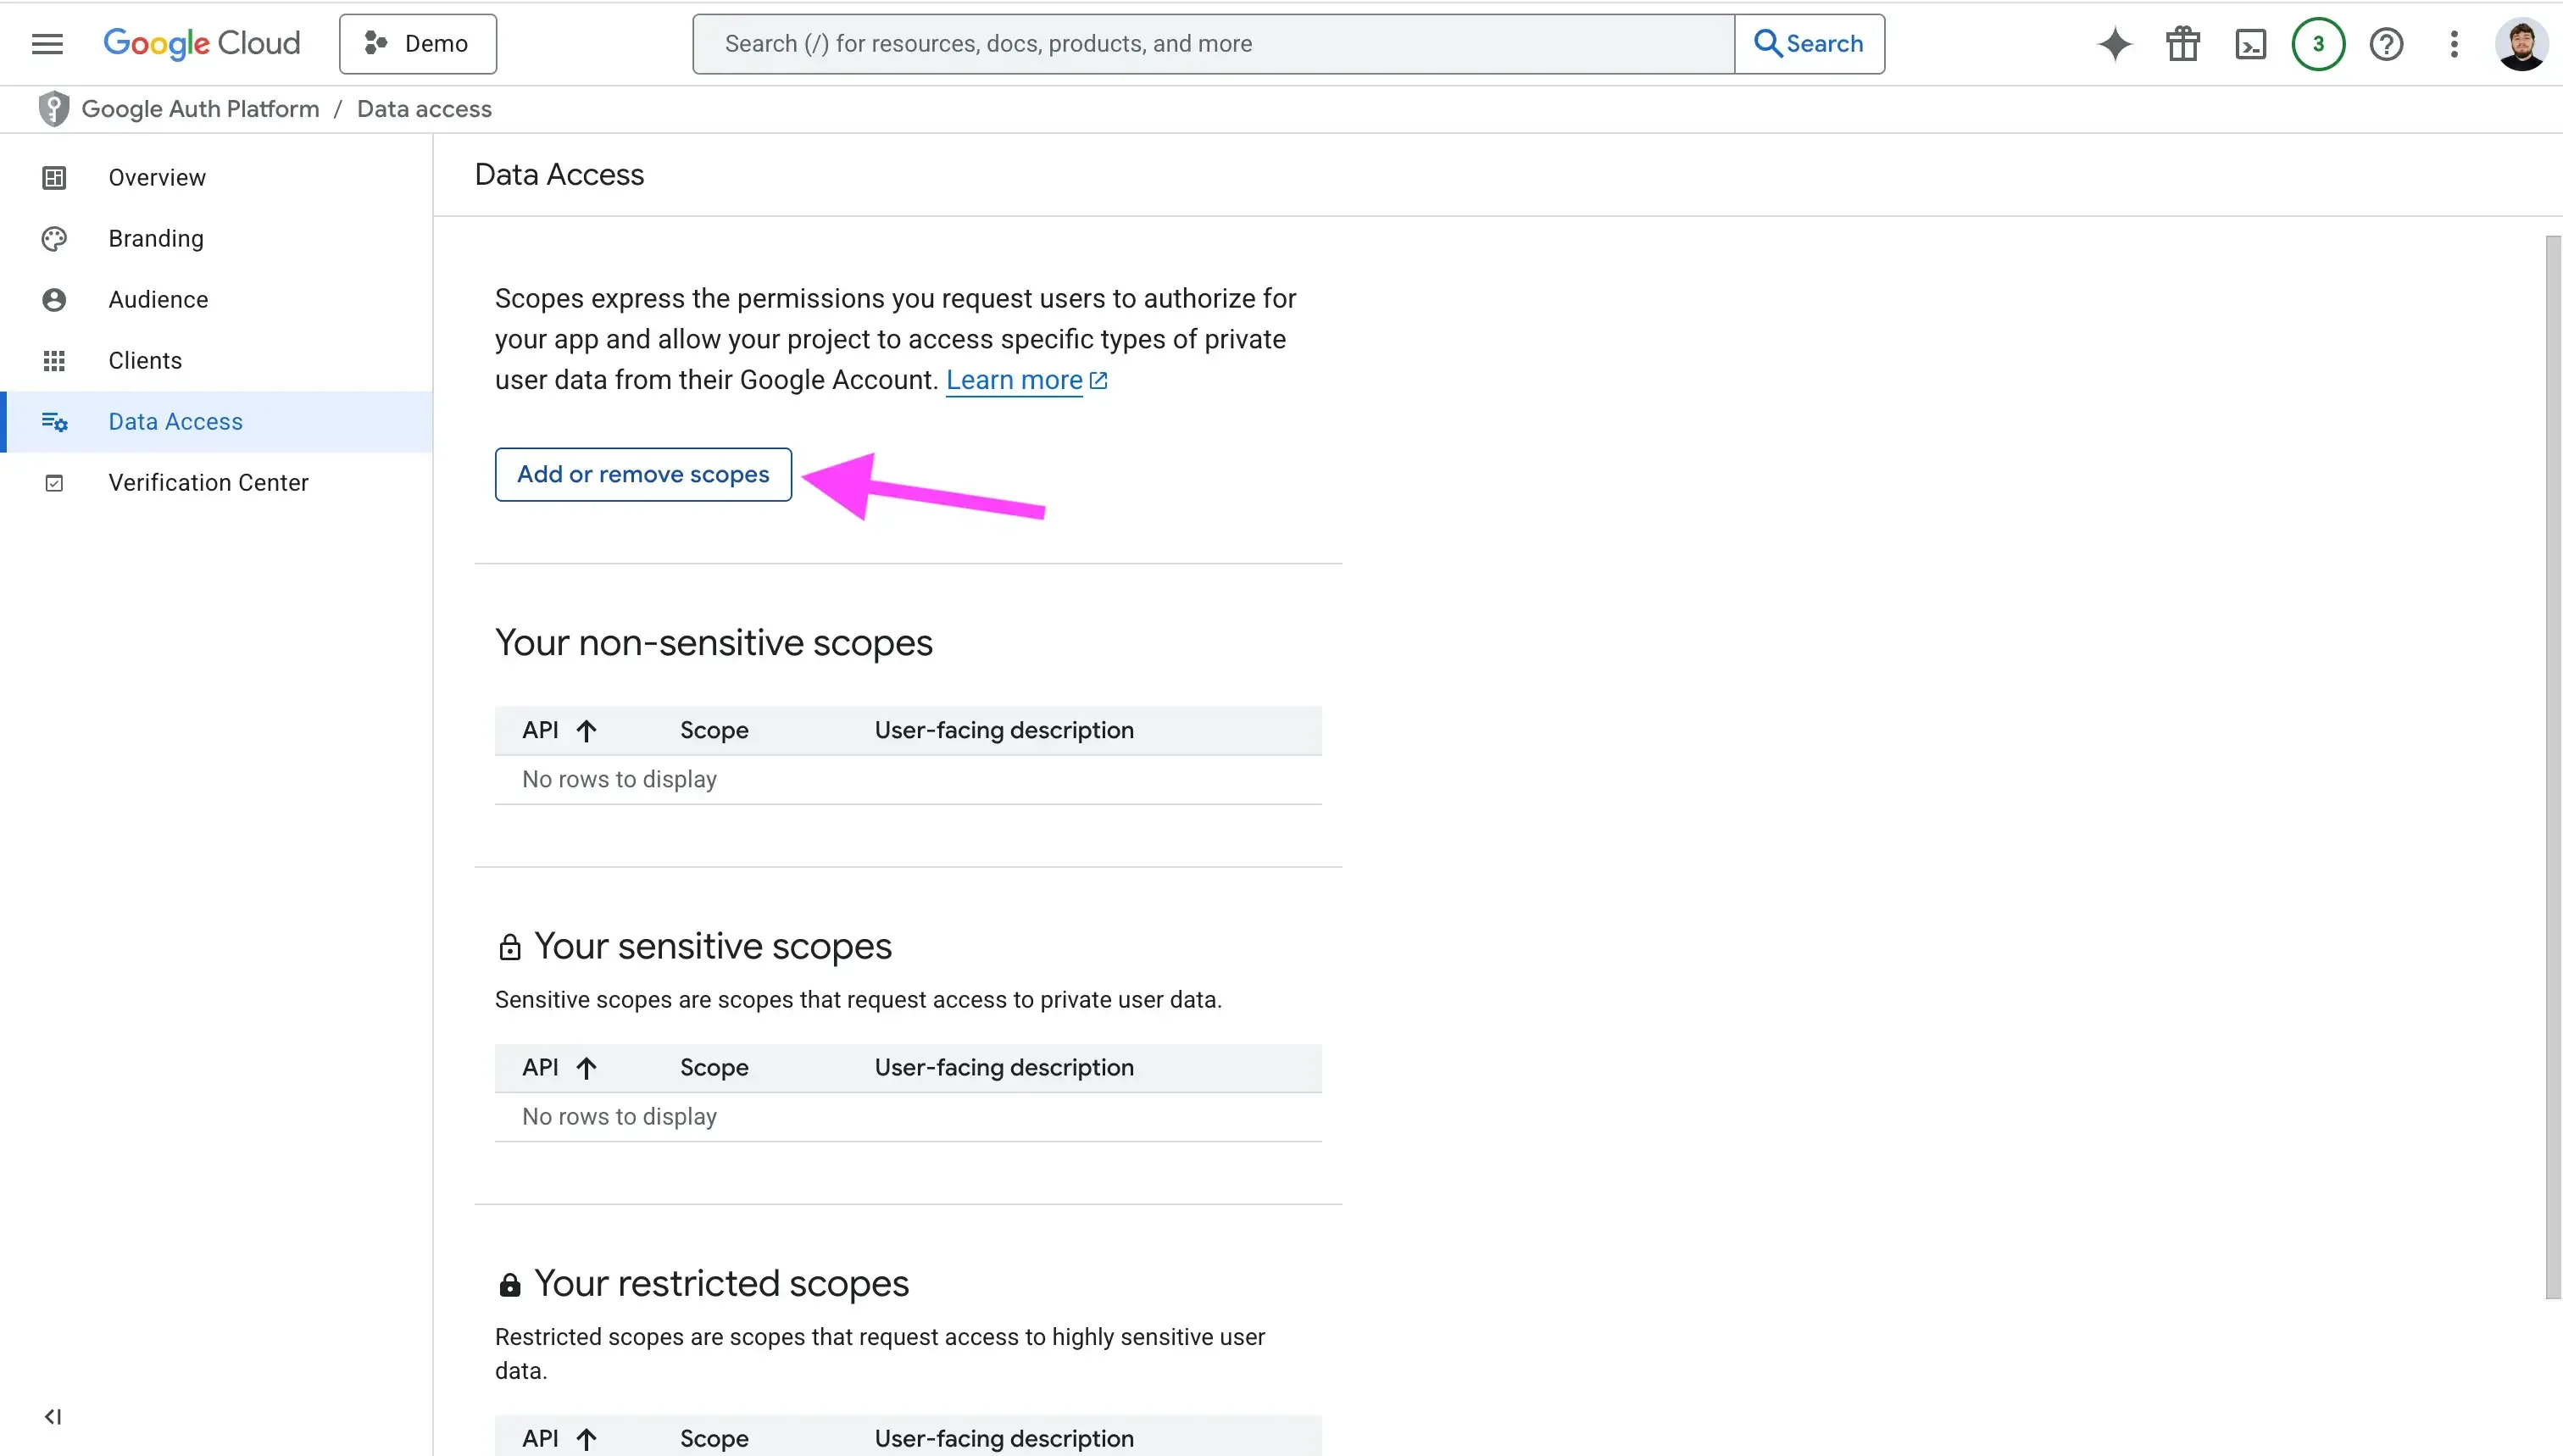
To manage scopes, follow these steps:
- Click the "Data Access" tab.
- Click "Add or remove scopes"
- Search the scope by name or value, then add it.
8. Get familiar with the Google Calendar API
Now that the Google client app is set up and all the information needed for users to connect their calendars is in place, it is time to get familiar with the Google Calendar API itself.
We recommend going through the Google Calendar API Overview page and looking at the most important endpoints, such as the Events and Calendars endpoints.
9. Use a Unified Calendar API service to integrate multiple providers using one API
If Google Calendar is the only calendar you want to integrate into your app, you can skip this step. Otherwise, we recommend using a Unified Calendar API, which gives you one API for all calendar providers.
With a unified calendar API, you only build and maintain one integration for all providers. If you decide to support Outlook or iCloud later, you can add them without writing a new integration.
You also avoid maintaining several integrations, dealing with breaking changes, and spending time learning the details of each provider’s API.
Example of a Google Calendar authorization flow
The flow chart below shows a simple Google Calendar OAuth flow that lets users connect their Google Calendar to your app.

Google offers client libraries for Node.js, Python, and other languages. To keep things simple, we only use plain HTTP calls and TypeScript to show the authorization flow.
Client Side (UI)
The first part is the client (UI) side, where we render a “Connect Google Calendar” button.
const googleOauthUrl = getGoogleOAuthUrl()
<button href="googleOauthUrl"   rel="noopener noreferrer"> Connect Google Calendar </button>
We recommend using a utility function to build the Google OAuth URL. It keeps the code readable and makes it easy to pass parameters, such as client state or forced consent.
const SCOPES = [
  "openid",
  "email",
  "<https://www.googleapis.com/auth/calendar.calendarlist>",
  "<https://www.googleapis.com/auth/calendar.events>",
  "<https://www.googleapis.com/auth/calendar.readonly>",
  // add more scopes as needed
];

export interface ClientState {
  session: Session;
  returnUrl?: string;
}

export function stateToB64(session: ClientState): string {
  return encode(JSON.stringify(session));
}

export function getGoogleOAuthUrl(
  state: ClientState,
) {
  const params = new URLSearchParams({
    client_id: process.env.GOOGLE_CLIENT_ID || "",
    redirect_uri: `${getHostName()}/api/connect/google`, // change the redirect URL as needed
    response_type: "code",
    scope: SCOPES.join(" "),
    prompt: "consent",
    access_type: "offline",
    state: stateToB64(state),
  });
  return `https://accounts.google.com/o/oauth2/v2/auth?${params}`;
}
The prompt parameter can have one of three values: none, consent, or select_account.
The consent value is useful when a user has already authorized their calendars, but you still want Google to show the authorization screen again. This happens, for example, when you add new scopes to your app and want users to approve them.
Another case for consent is when the user did not grant all the scopes your app requires, so you want to ask for them again.
The select_account value asks the user to pick an account.
The none value does not show any authentication or consent screens.
API Side (Backend)
Next, let’s build the API handler. It receives the code and scopes from Google and exchanges the code for tokens.
In this example, we use zod for validation.
import { z } from "zod";
const successSchema = z.object({
  code: z.string(),
  scope: z.string(),
  state: z.string(),
});

const errorSchema = z.object({
  error: z.string(),
});
type ErrorParams = z.infer<typeof errorSchema>;

const querySchema = z.union([successSchema, errorSchema]);

// Handler
const googleHanlder: NextApiHandler = async (req, res) => {
  try {
    const result = querySchema.parse(req.query);
    if (isError(result)) {
      const q = new URLSearchParams({
        error: "ACCESS_DENIED",
      });
      return res.redirect(`/?${q}`);
    }

    const { session, returnUr } = stateFromB64(
      result.state
    );

    if (!hasRequiredScopes(result.scope)) {
      const q = new URLSearchParams({
        error: "MISSING_REQUIRED_PERMISSIONS",
      });
      return res.redirect(`/?${q}`);
    }

    const { access_token, refresh_token, id_token, expires_in } =
      await exchangeCodeForTokens(result.code);
    const { email } = decodeIdToken(id_token);

		// Update or insert the calendar connection, depending on your use case
    const connection = await upsertConnection(
      {
        email,
        accessToken: access_token,
        refreshToken: refresh_token,
        expiresInSeconds: expires_in,
        status: ConnectionStatus.ACTIVE,
        provider: CalendarProvider.GOOGLE,
        scopes: result.scope,
        reminderCount: 0,
        lastRemindedAt: null,
      },
      session.user
    );

    const q = new URLSearchParams({
      cid: connection.id,
    });
    if (returnUrl) q.append("returnUrl", returnUrl);

		// The API redirects back to the client side, returning the connection, or errors if any
    res.redirect returnUrl ? returnUrl : `/calendars/google?${q}`
    );
  } catch (e: any) {
    let error = JSON.stringify(e);

      const querystr =
        typeof req.query === "string" ? req.query : JSON.stringify(req.query);
      console.error("Error in googleHandler", querystr);
      console.error("Failed to connect Google account", e);

    const q = new URLSearchParams({
      error,
    });
    return res.redirect(`/?${q}`);
  }
};
As on the client side, we recommend small utility functions for exchanging the code for tokens, decoding the ID token, reading the state from base64, and so on.
export async function exchangeCodeForTokens(code: string) {
  const data = new FormData();
  data.append("code", code);
  data.append("client_id", process.env.GOOGLE_CLIENT_ID || "");
  data.append("client_secret", process.env.GOOGLE_CLIENT_SECRET || "");
  data.append("redirect_uri", `${getHostName()}/api/connect/google`); // your URL
  data.append("grant_type", "authorization_code");

  try {
    const result = await fetch("<https://oauth2.googleapis.com/token>", {
      method: "POST",
      body: data,
    });

    const json = await result.json();
    if (json.error) throw json;

    const parsed = responseSchema.parse(json);
    return parsed;
  } catch (e) {
    console.error("Exchange failed");
    throw e;
  }
}

export function decodeIdToken(idToken: string) {
  const data = jwt.decode(idToken);
  if (typeof data === "string" || !data?.email) {
    throw new Error(`Could not parse id_token: ${idToken}`);
  }

  return data;
}

function isError(query: Record<string, any>): query is ErrorParams {
  return Boolean(query.error);
}

export function stateFromB64(encoded: string): ClientState {
  const str = decode(encoded);

  return JSON.parse(str) as ClientState;
}
Google Calendar API Integration Gotchas
- Verification can take a few weeks, so plan ahead and factor this delay into your timeline. The approval process takes time, and apps often get rejected the first time they are submitted. Add this to your timeline and make sure all stakeholders know about the possible delay.
- Webhooks stop after roughly 24 hours, so always renew them. You can register webhooks to detect changes to a calendar, but they expire after about 24 hours. A cron job can find the webhooks that expire in the next 20 minutes and renew them.
- Only request the scopes you need. It may seem smart to request as many scopes as possible, since you never know what the next version of your app needs. We recommend requesting only what your app really needs. First, Google is very thorough during verification, and extra scopes lead to rejections and back-and-forth until you get approved. Second, users hesitate to grant scopes that do not make sense for what the app does.
- Handle quotas and rate limiting. Google has a per-minute per-project quota and a per-minute per-project per-user quota. If you exceed either of them, Google returns a 403 usageLimits or a 429 rateLimitExceeded error. Use exponential backoff and similar tactics to stay under those limits.
- Be careful not to log personal data. Logging is fine, but strip out personal event data first. Events usually contain descriptions, attendee emails, and other private details.
Integrate multiple calendar providers into your app using the Apiroc Unified Calendar API
Our team has worked with Google Calendar, Outlook, and iCloud Calendar for years and has built calendar integrations that handle billions of API calls. We know what it takes to integrate several providers, learn the details of each API, and keep every implementation running reliably.
That is why we built Apiroc, a Unified Calendar API that supports Google Calendar, Microsoft Outlook, and iCloud Calendar out of the box. You can integrate all major providers through one robust and easy-to-use API.
You can get started for free, test the API with up to 10 End User Accounts, explore its capabilities, and upgrade later if you need more. No credit card is required.
FAQ
Why do I need to add test users to my Google OAuth Client?
An unverified external app can only be used by whitelisted test accounts while you develop it and before Google approves it.
How long do Google Calendar webhooks stay active?
Push notification subscriptions expire after about 24 hours, so your backend should renew them before they expire.
Is there a simpler way to add Outlook or iCloud calendars later?
Yes. A unified calendar API such as Apiroc lets you integrate Google, Outlook, and iCloud through one API. This saves you the time and cost of building and maintaining separate integrations.
Do I need “offline_access” for background jobs?
Yes. When you add access_type=offline to the consent URL, Google returns a refresh token, so your server can call the API while the user is away.