
How to Integrate Outlook Calendar API Into Your App
Published on
In our previous article on how to integrate the Google Calendar API into your application, we walked through every step a developer needs to follow to connect Google Calendar to their app.
In this article, we’ll cover the same process for the Outlook Calendar API. We’ll go through the Azure App Registration, scopes, verification, common integration gotchas, and real-world code examples.
Prerequisites
This guide assumes that you already have a Microsoft Work or Developer account with access to Azure Active Directory (now called Microsoft Entra ID).
Note that creating applications outside a directory is no longer possible. If you don’t have a directory yet, join the Microsoft 365 Developer Program or sign up for Azure.
How to use and integrate the Outlook Calendar API into your app
Step 1: Sign in to the Microsoft Azure Portal
Open the Microsoft Azure Portal Sign-in Page and sign in with your account.
The Microsoft Azure Portal page.

Step 2: Register a new application
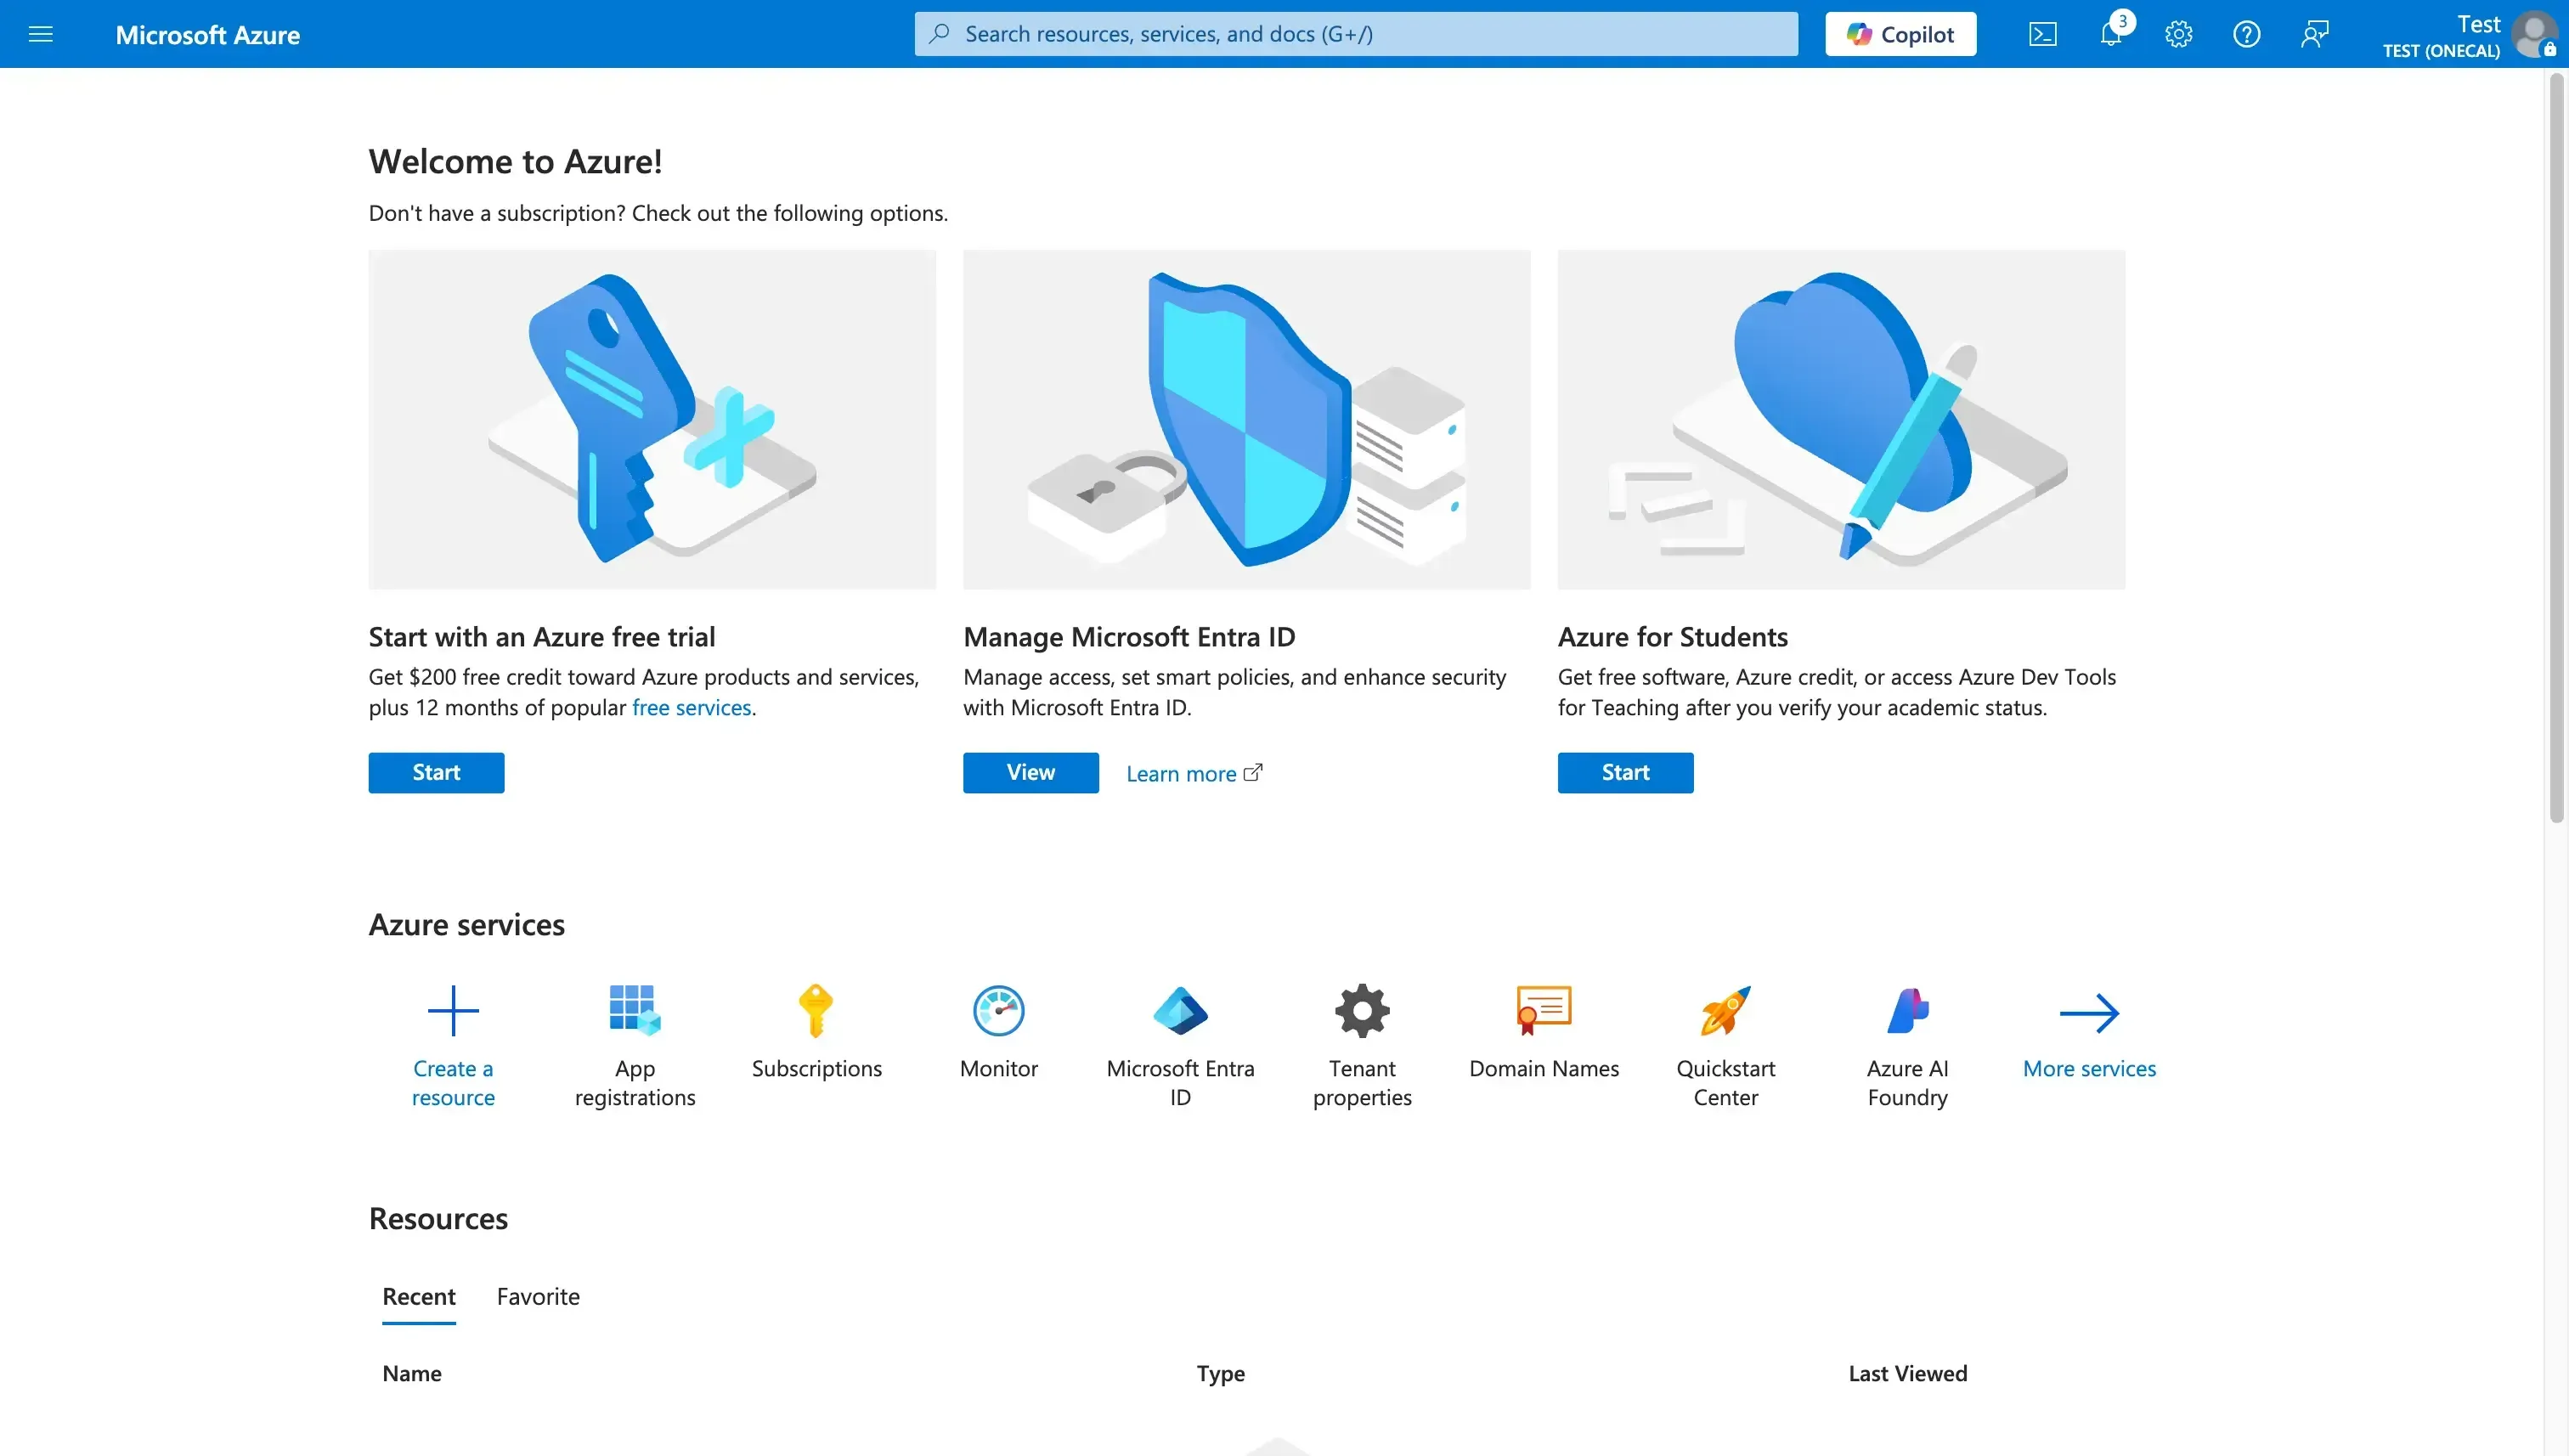
After you sign in to the Microsoft Azure Portal:
- Navigate to Azure Active Directory
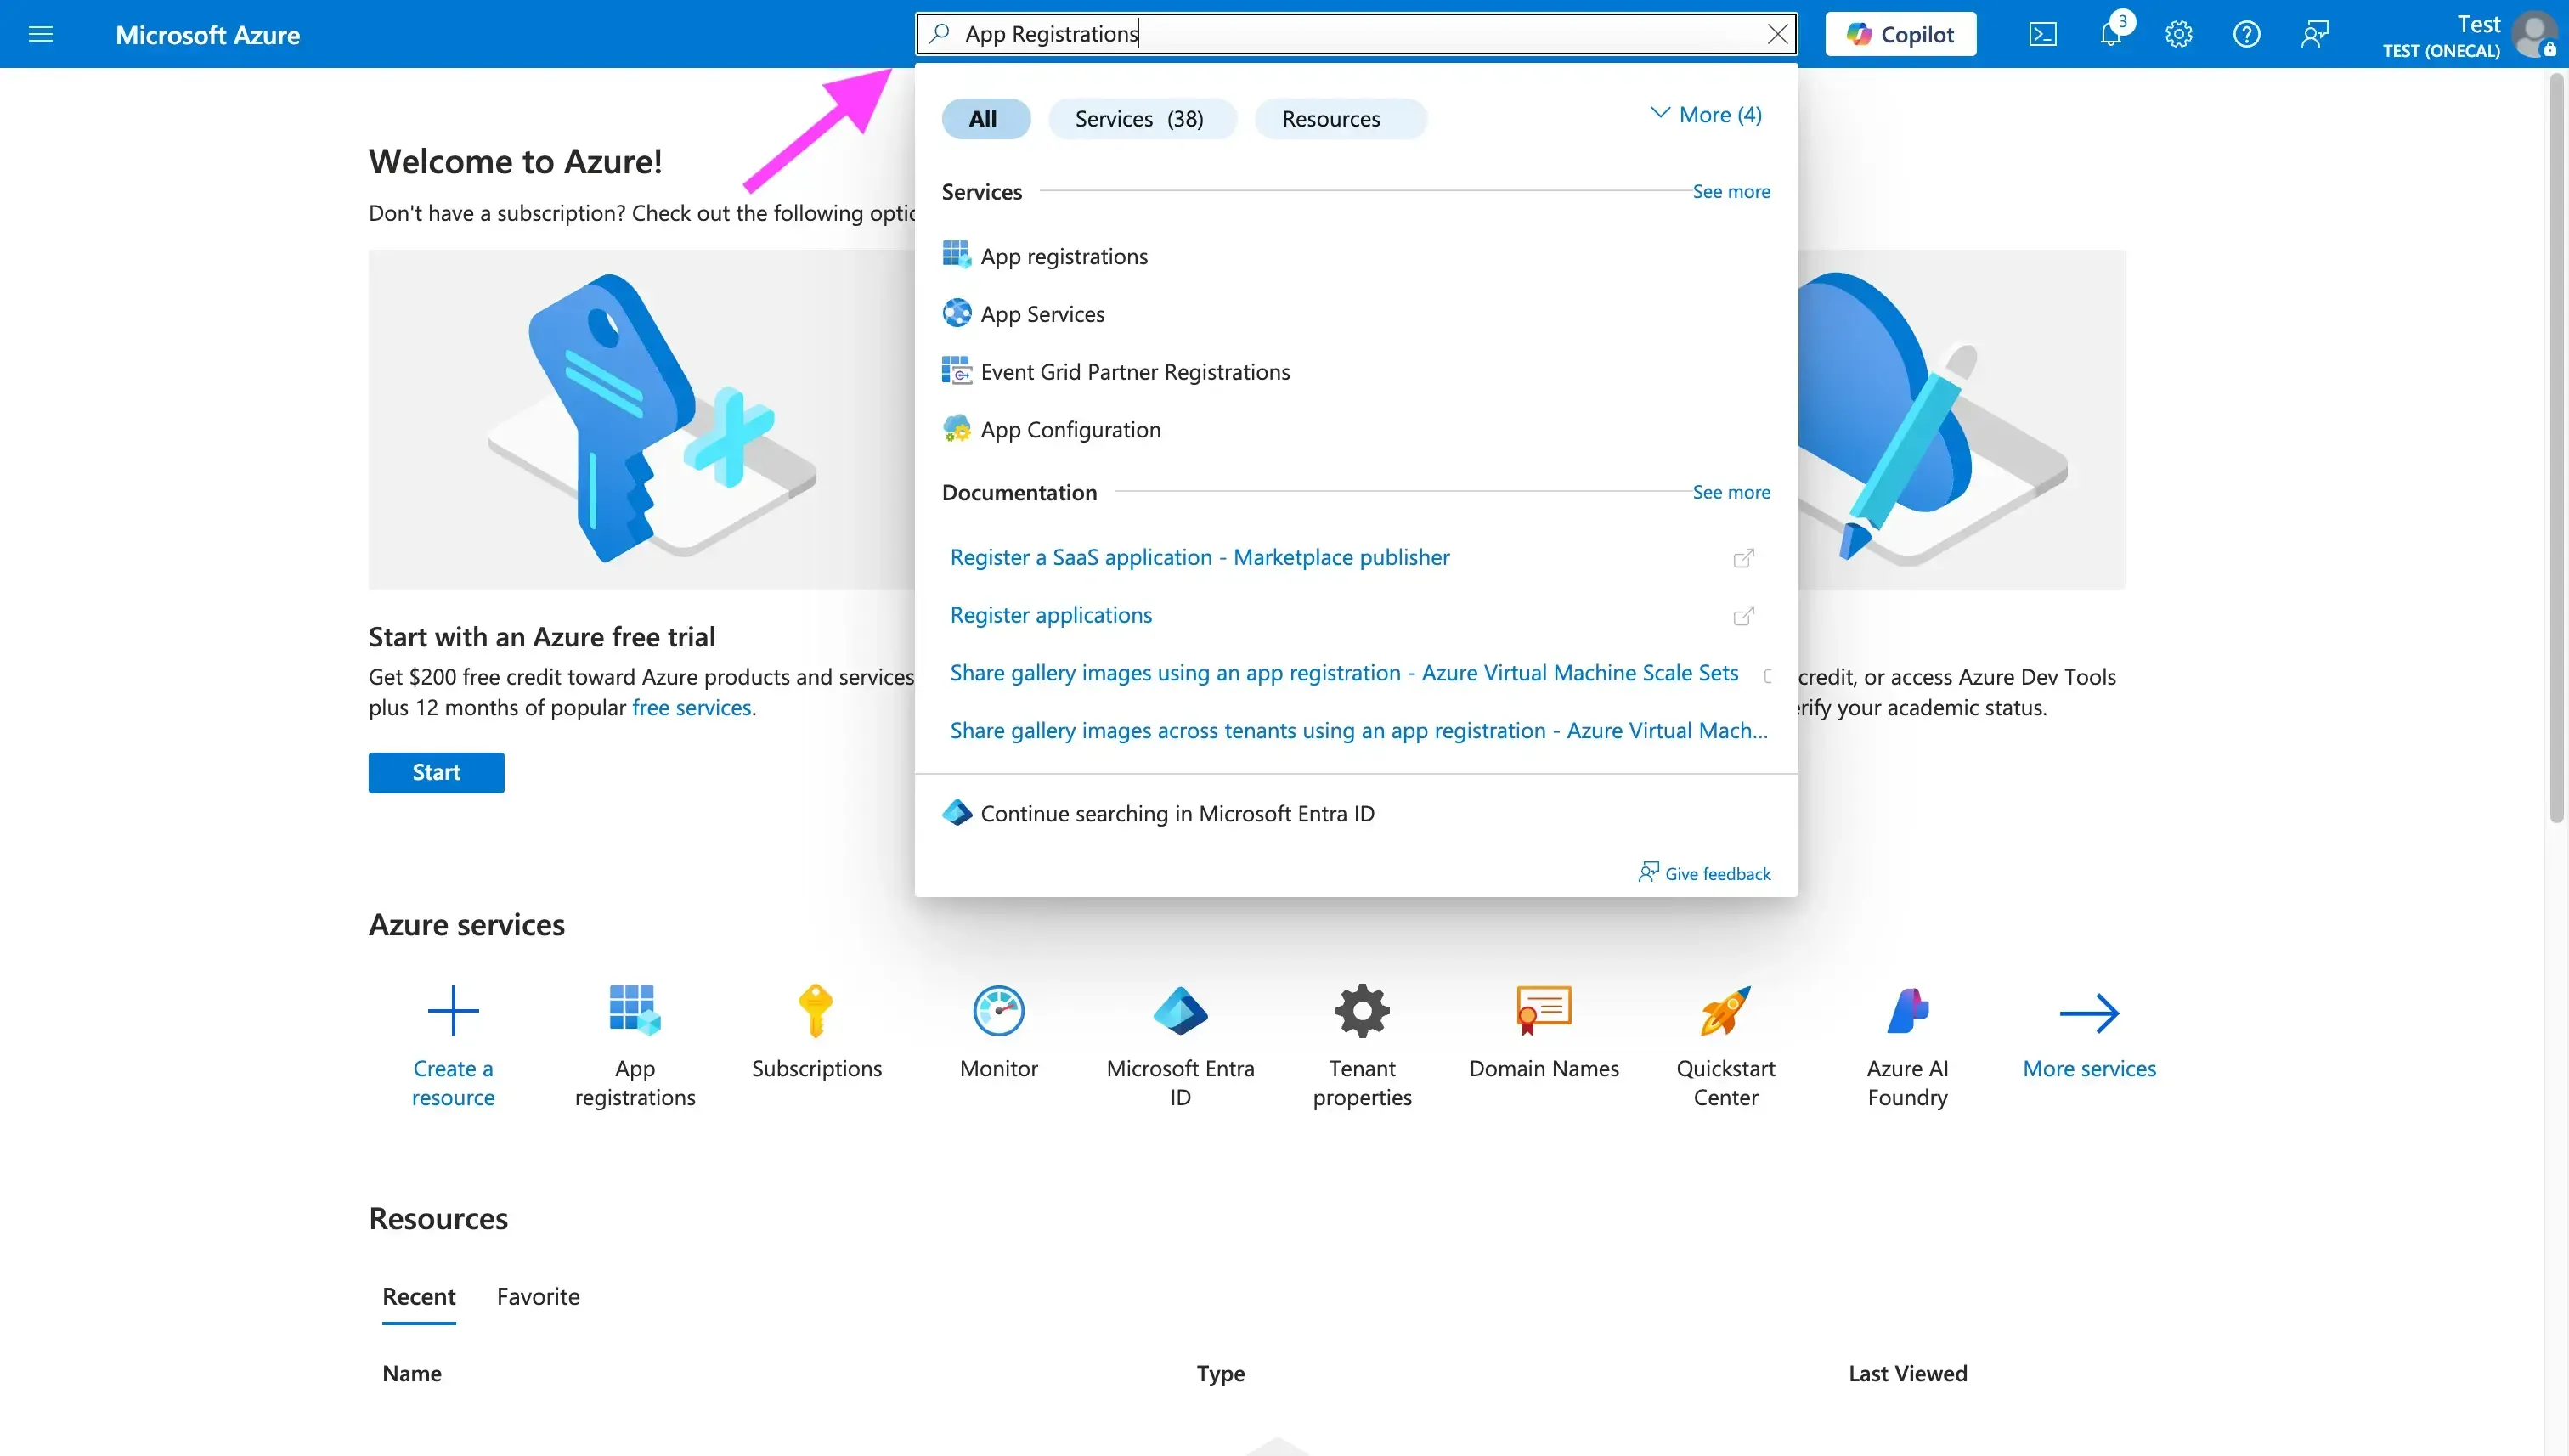
- Search for “App Registrations” in the search bar
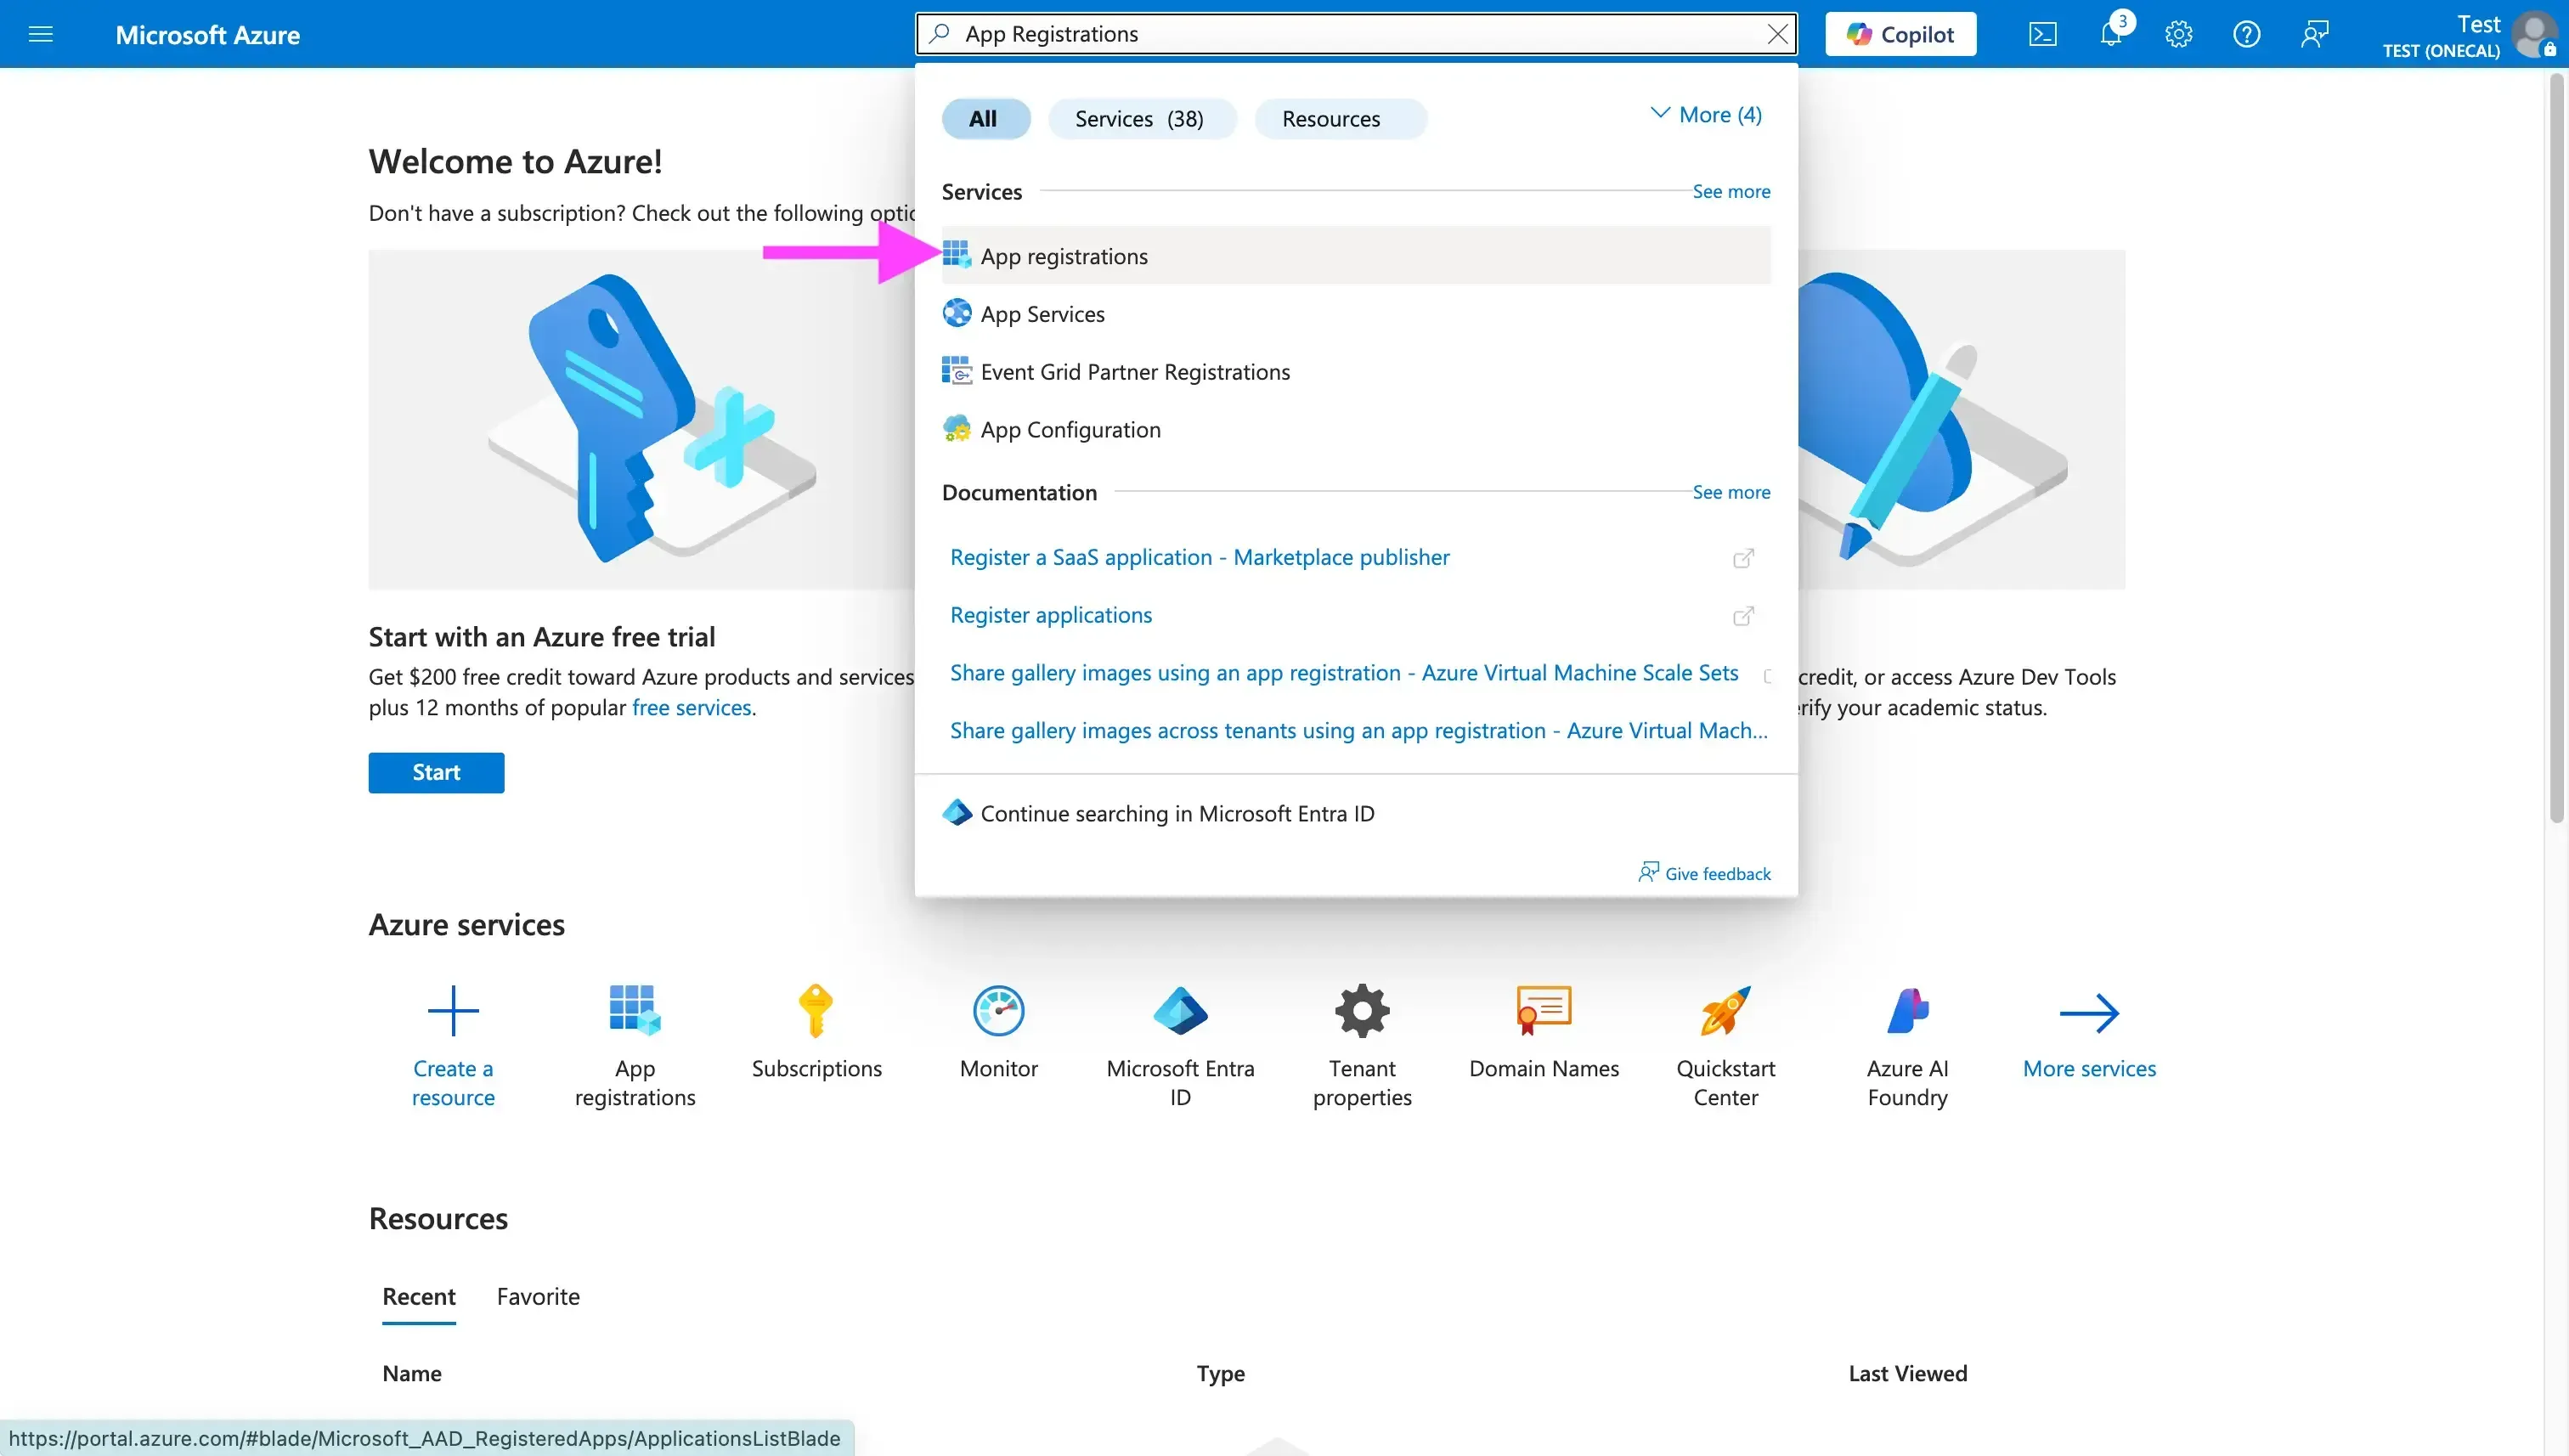
- Click “App Registrations”
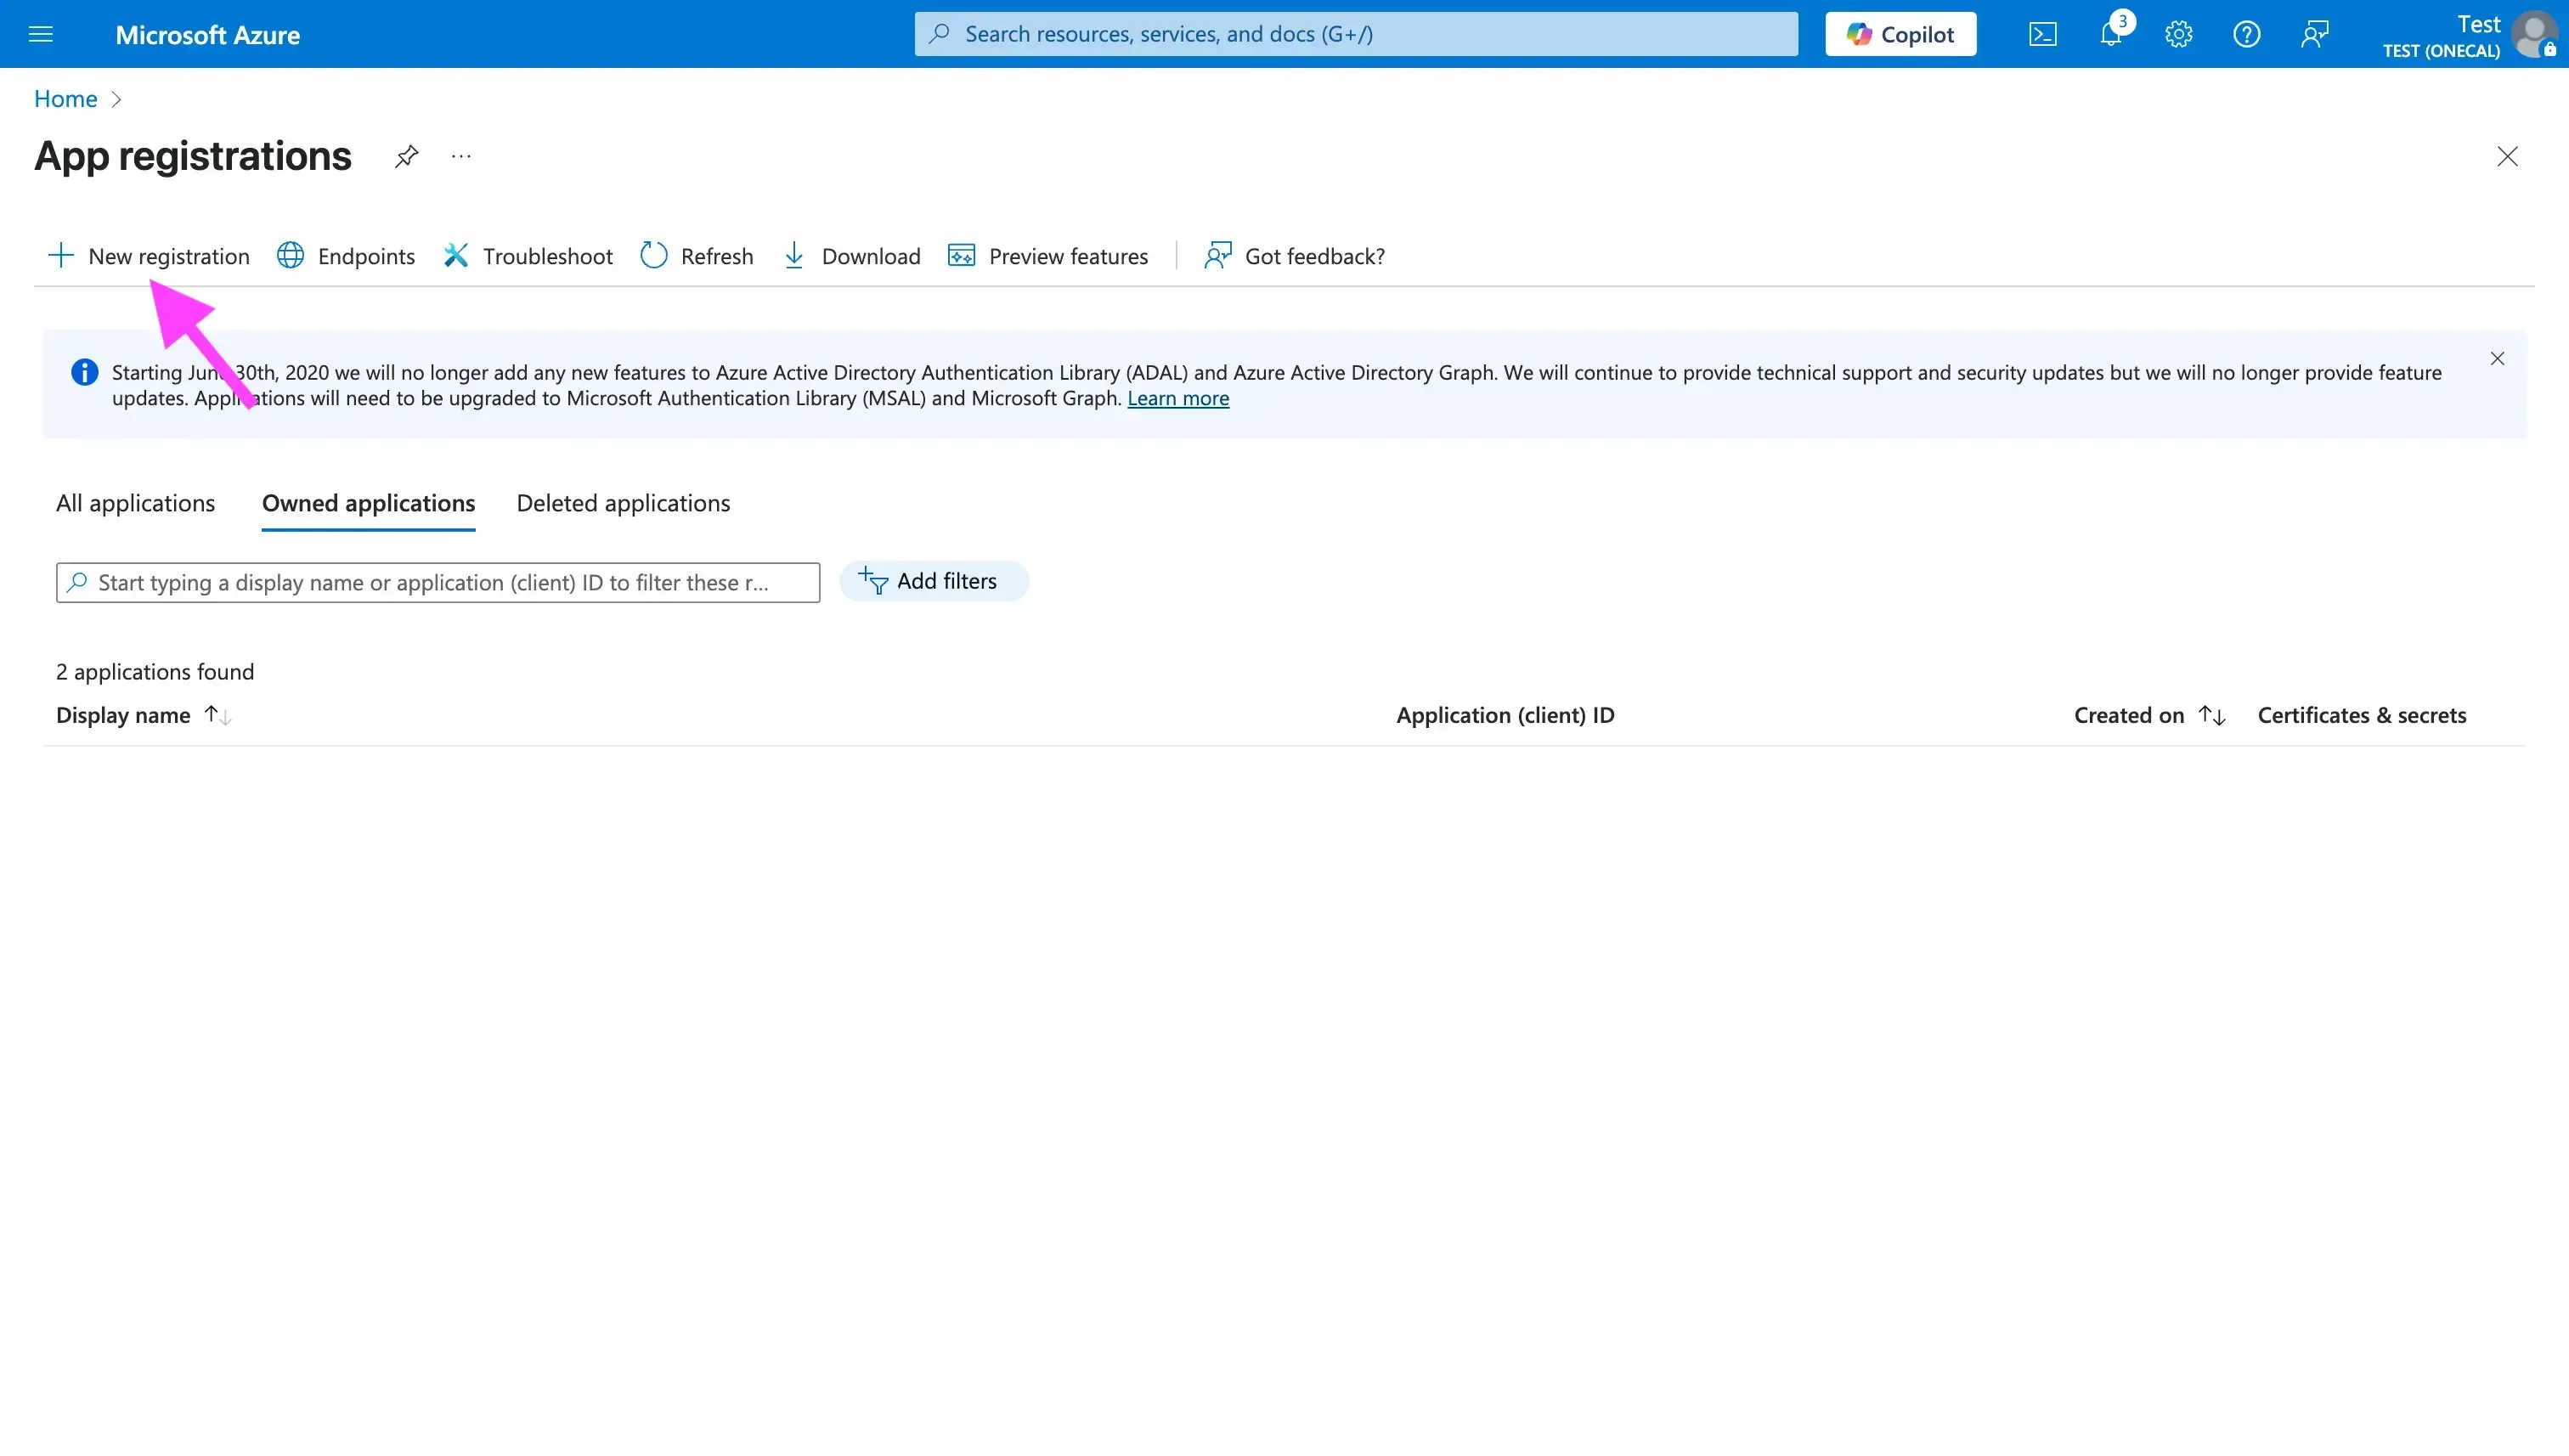
- Click “New registration”
- Fill in the required fields:

- The first field is the Name of your application. This is the name users will see on the consent screen.
- Next, select the supported account types. The right choice depends on the type of application you’re building (internal use or multi-tenant). For this example, I’ll select “ Accounts in any organizational directory (Any Microsoft Entra ID tenant - Multitenant)” , because it lets users from any organization (including Outlook.com users) use my app. This is the best option for SaaS products and other multi-tenant applications.
- Enter the Redirect URI: This field is optional, because not every type of application needs it. If you’re building a web application, you will most likely need it, since the Redirect URI is where Azure sends the OAuth responses. Under the “Select a platform” dropdown, select Web, then fill in the Redirect URI input (for example,
https://yourapp.com/auth/callback). For a server-side auth flow, a web redirect URI is the right choice. Make sure the domain you enter is reachable and under your control. - Click “Register”
- After you click “Register”, Azure Active Directory creates your application and takes you to the overview page, where you can copy the Client ID and Tenant ID. The Application (client) ID is a GUID that identifies your app. The Directory (tenant) ID is not always needed. For multi-tenant apps you’ll usually use the
commonendpoint instead, but the tenant ID is handy for testing in your own tenant.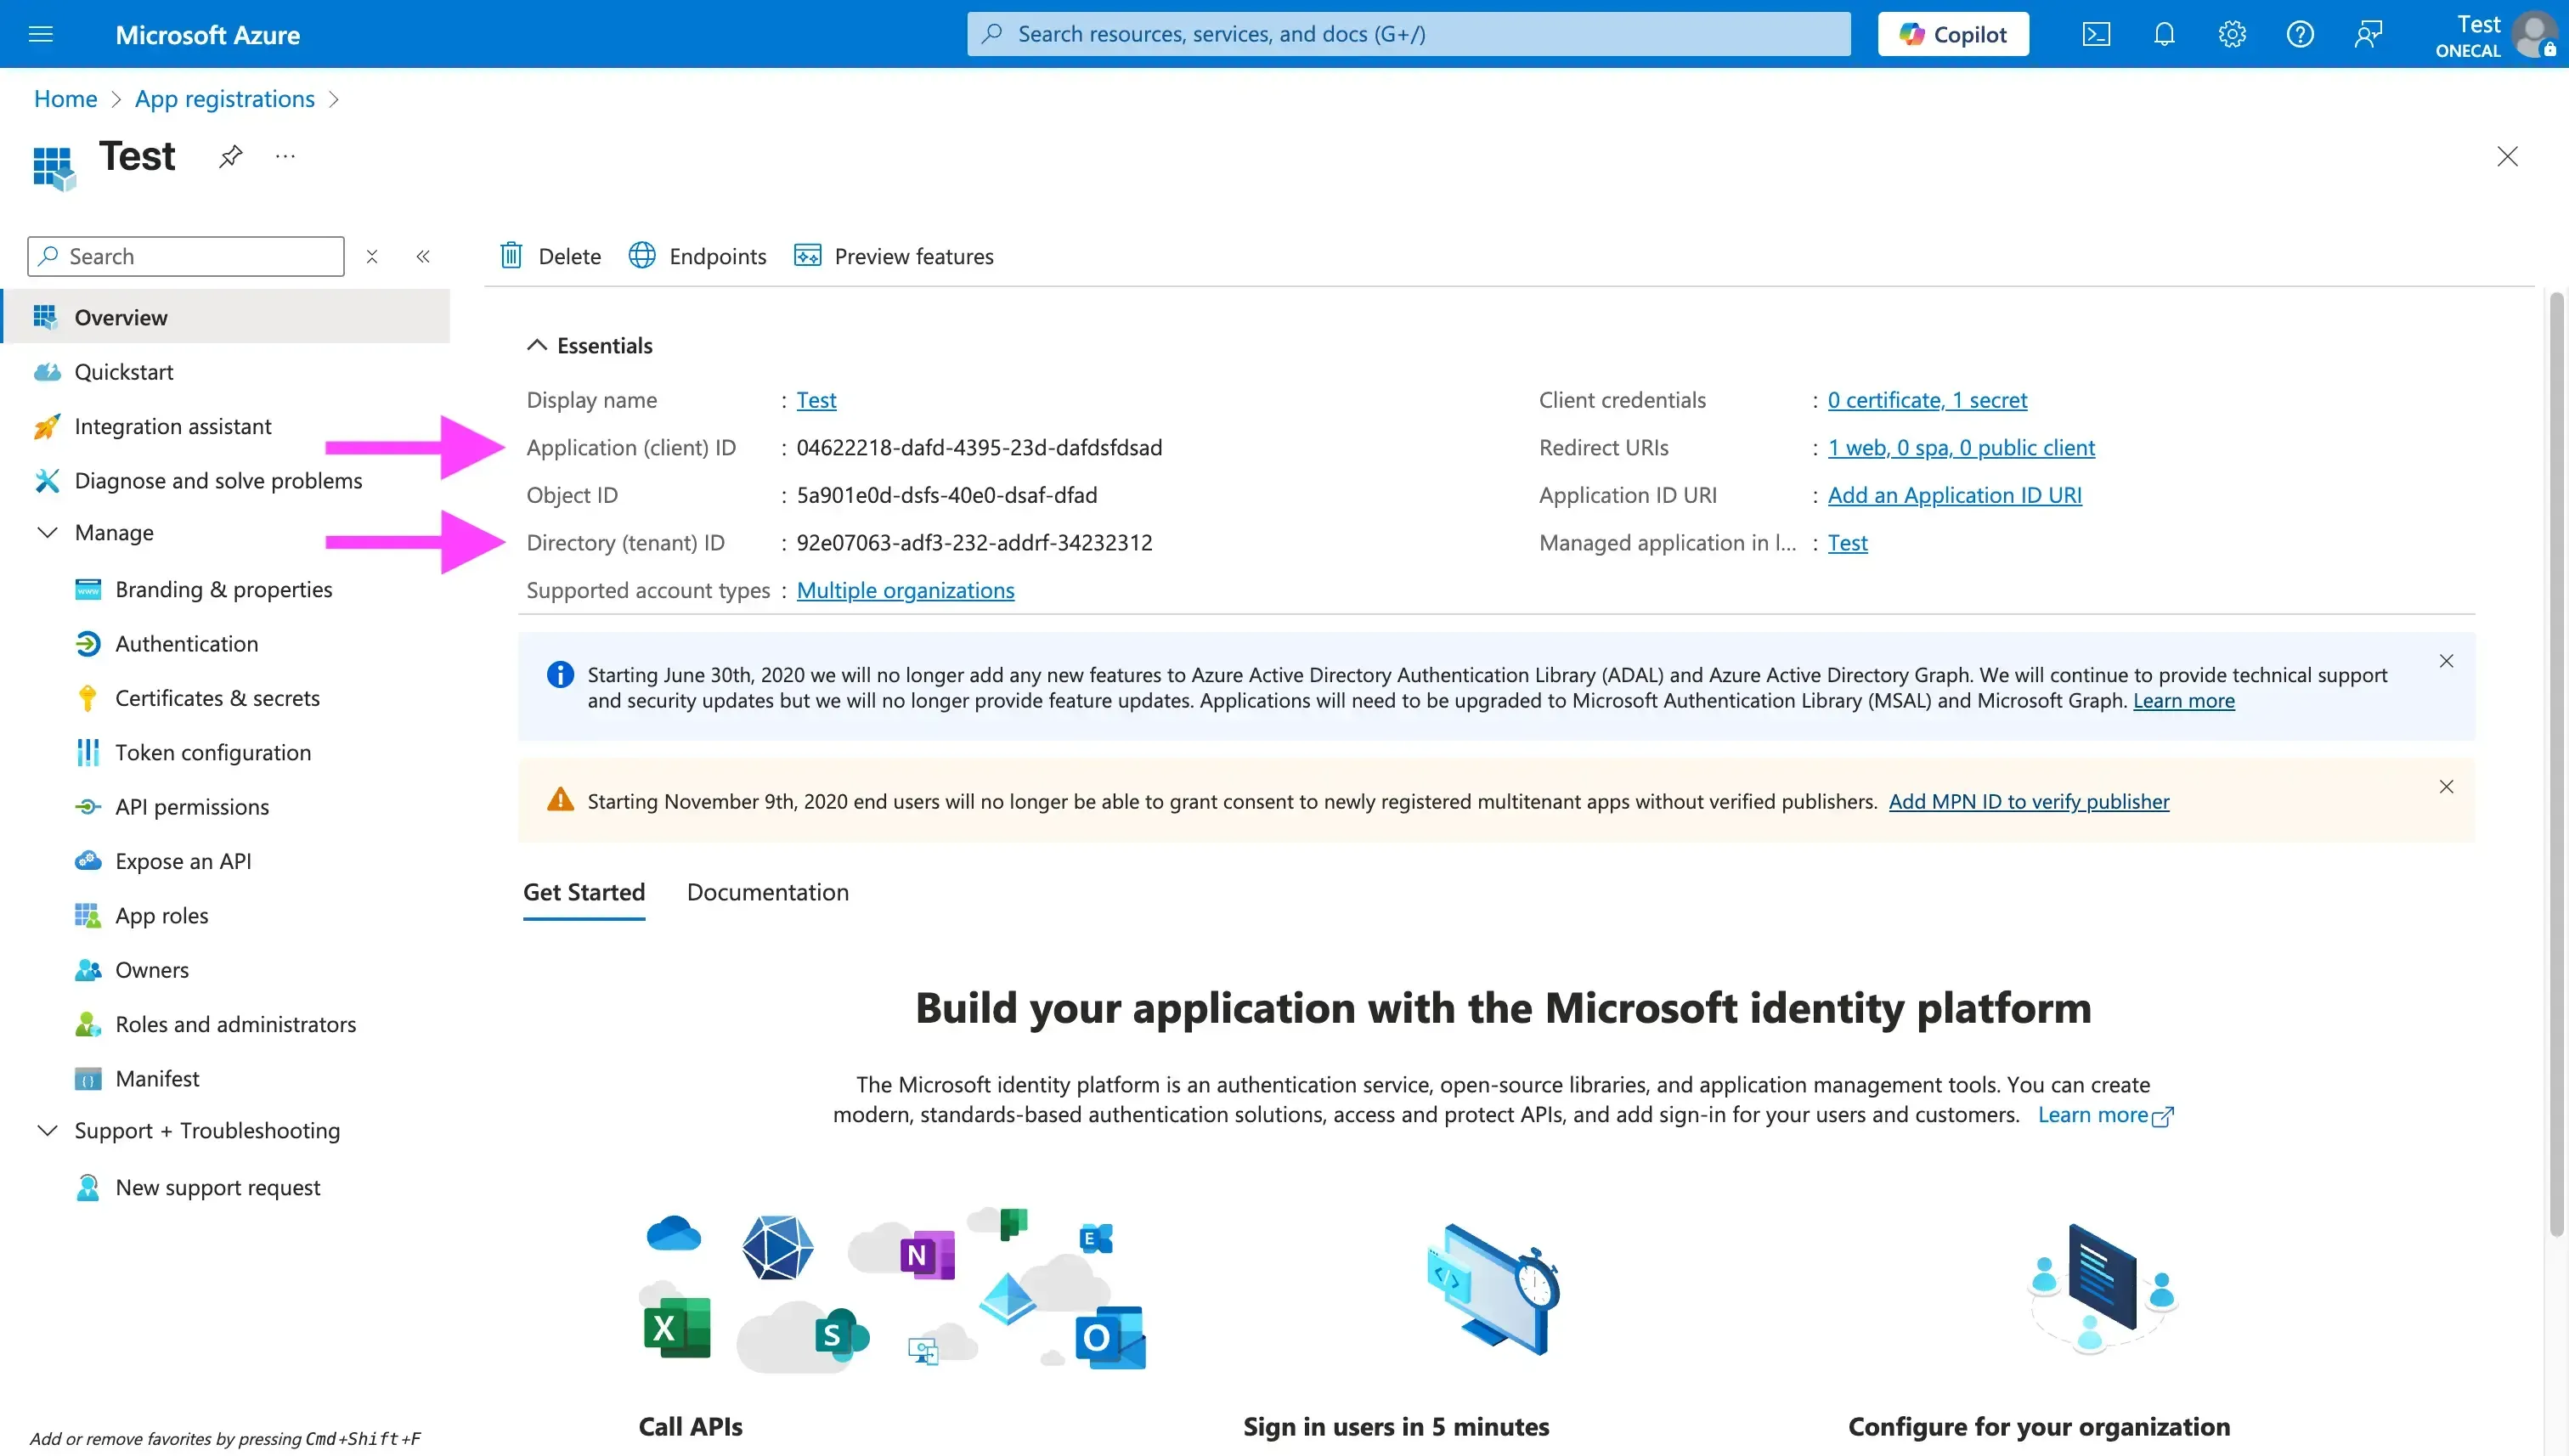
Step 3: Configure the API Permissions
Once your app is registered, it’s time to configure the calendar permissions. These permissions are shown during the OAuth flow, so the user can see which scopes your application asks for before granting access to their calendars.
By default, your application only gets the “User.Read” permission. If all you need is to sign the user in and read their profile, you can skip this step.
To add API Permissions, follow these steps:
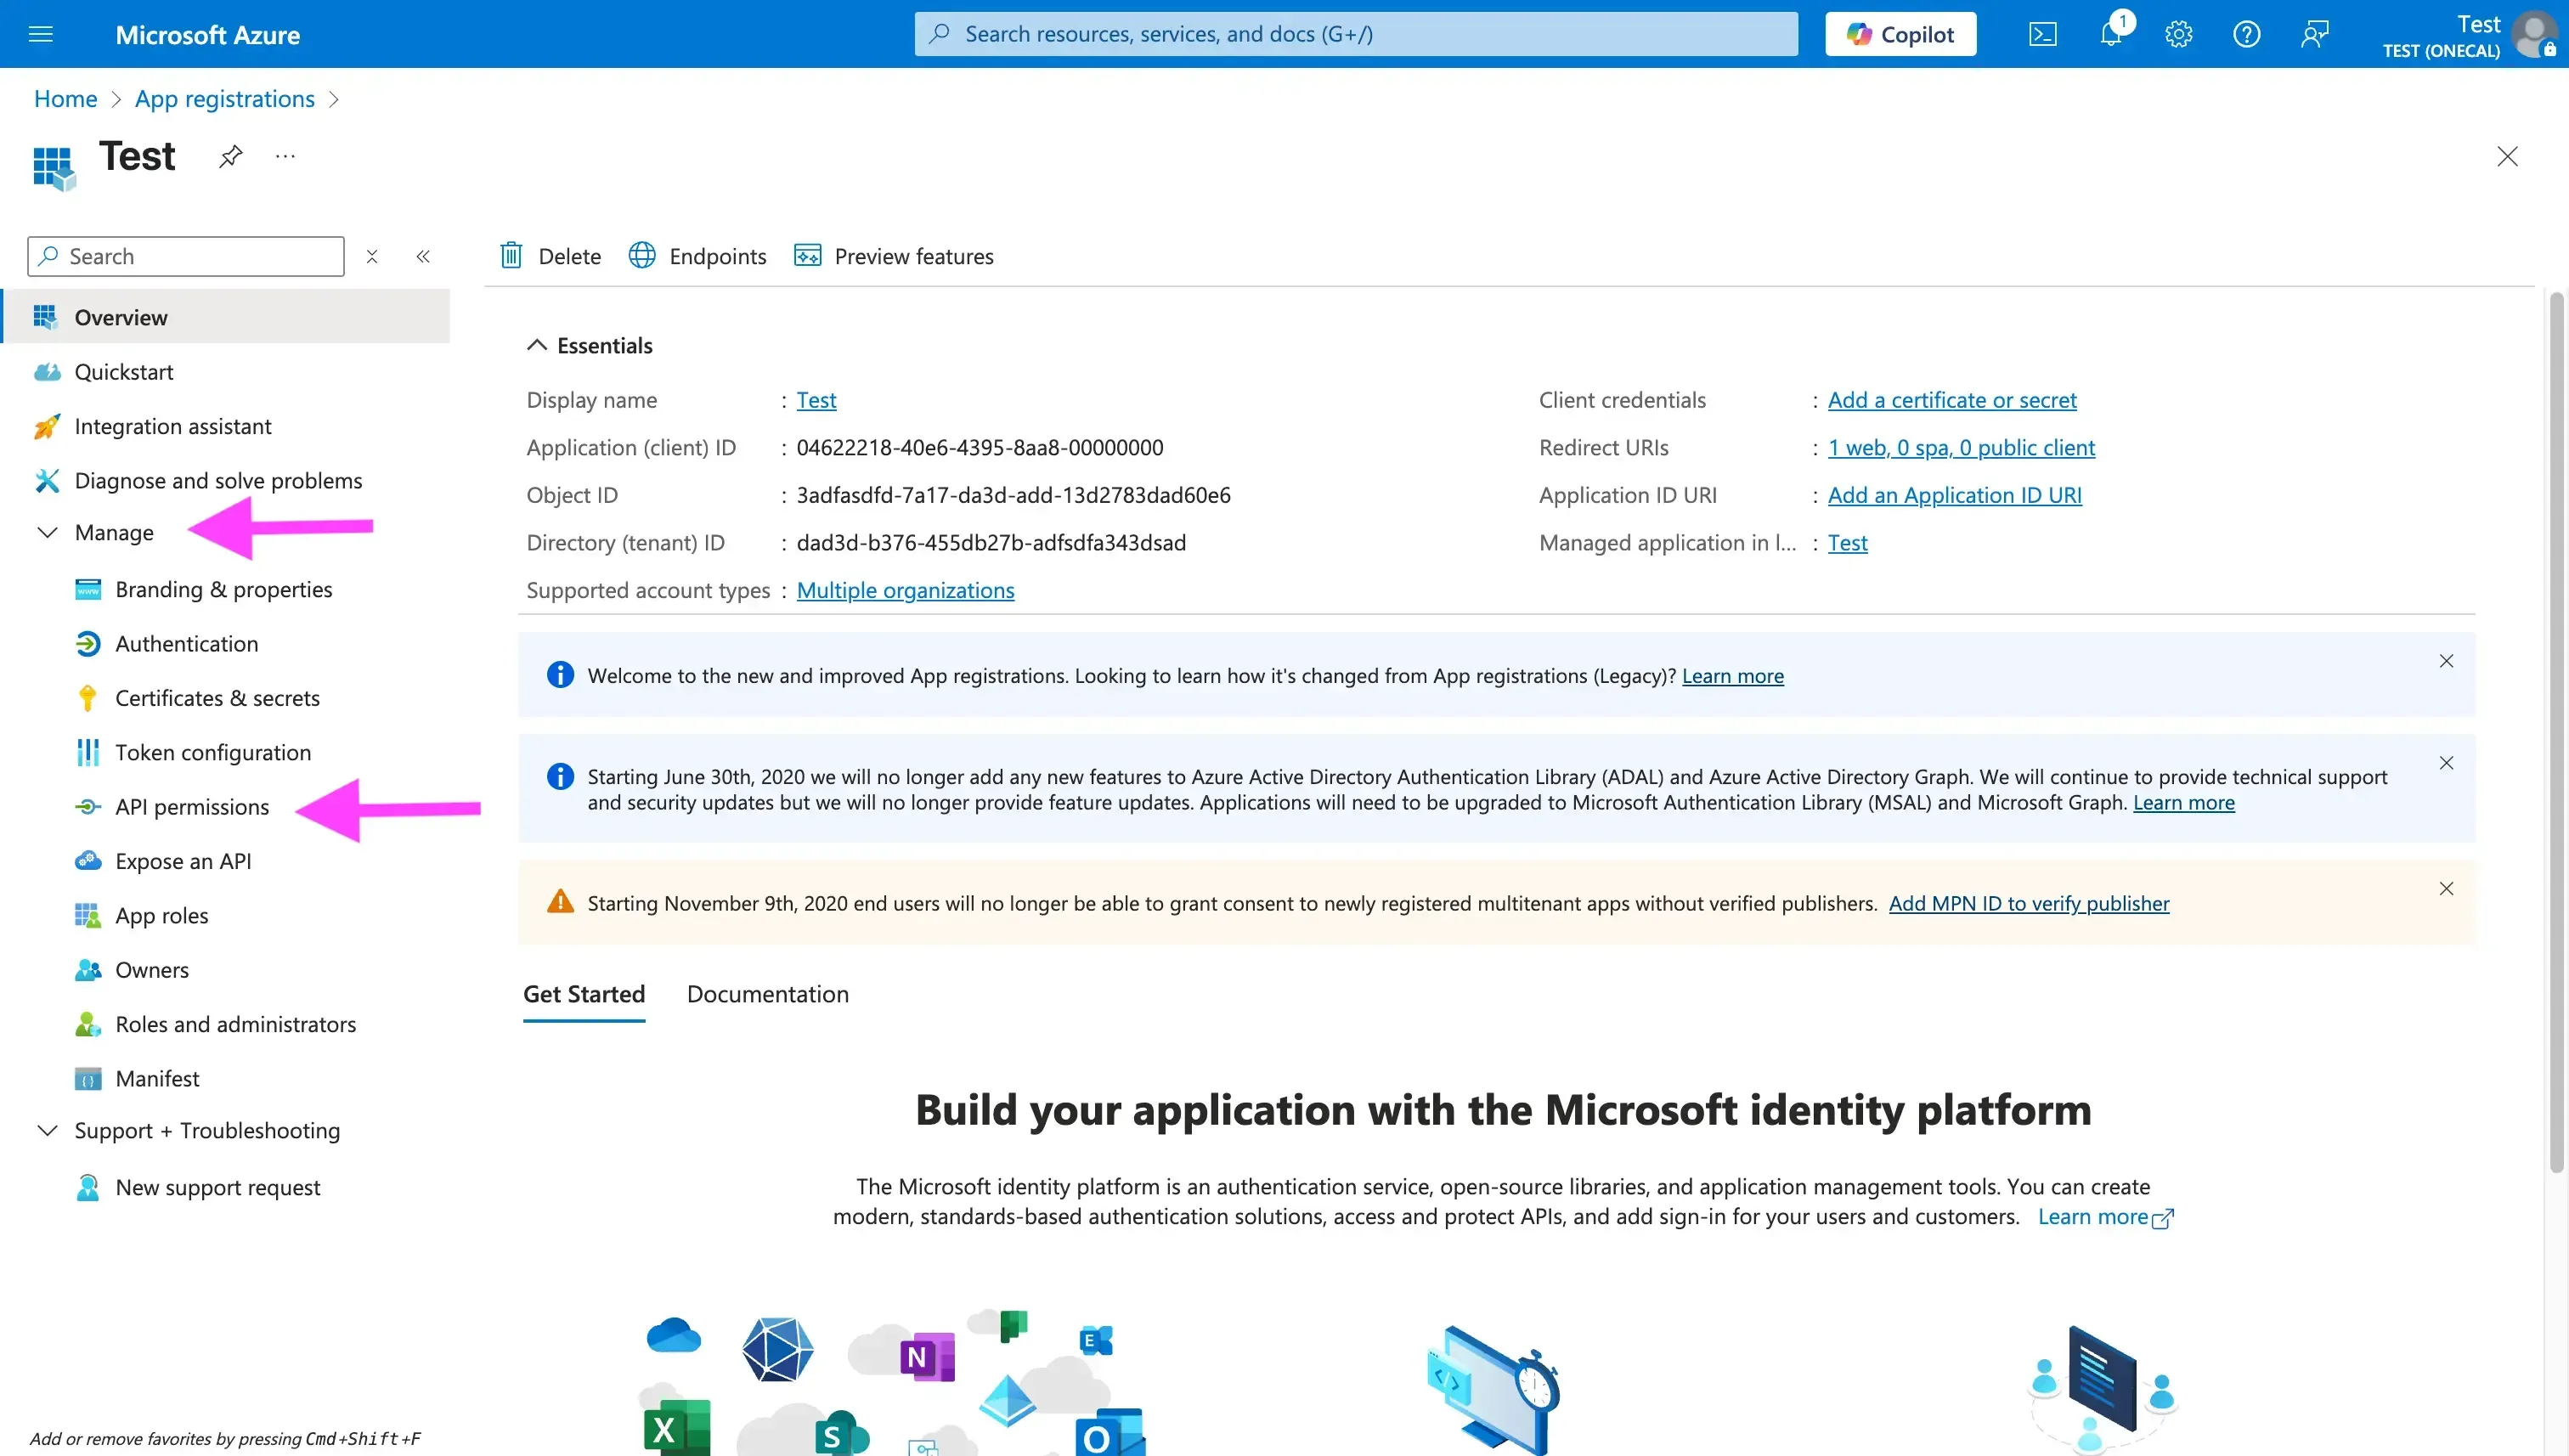
- Click the “Manage” tab on the left sidebar.
- Click “API Permissions”.
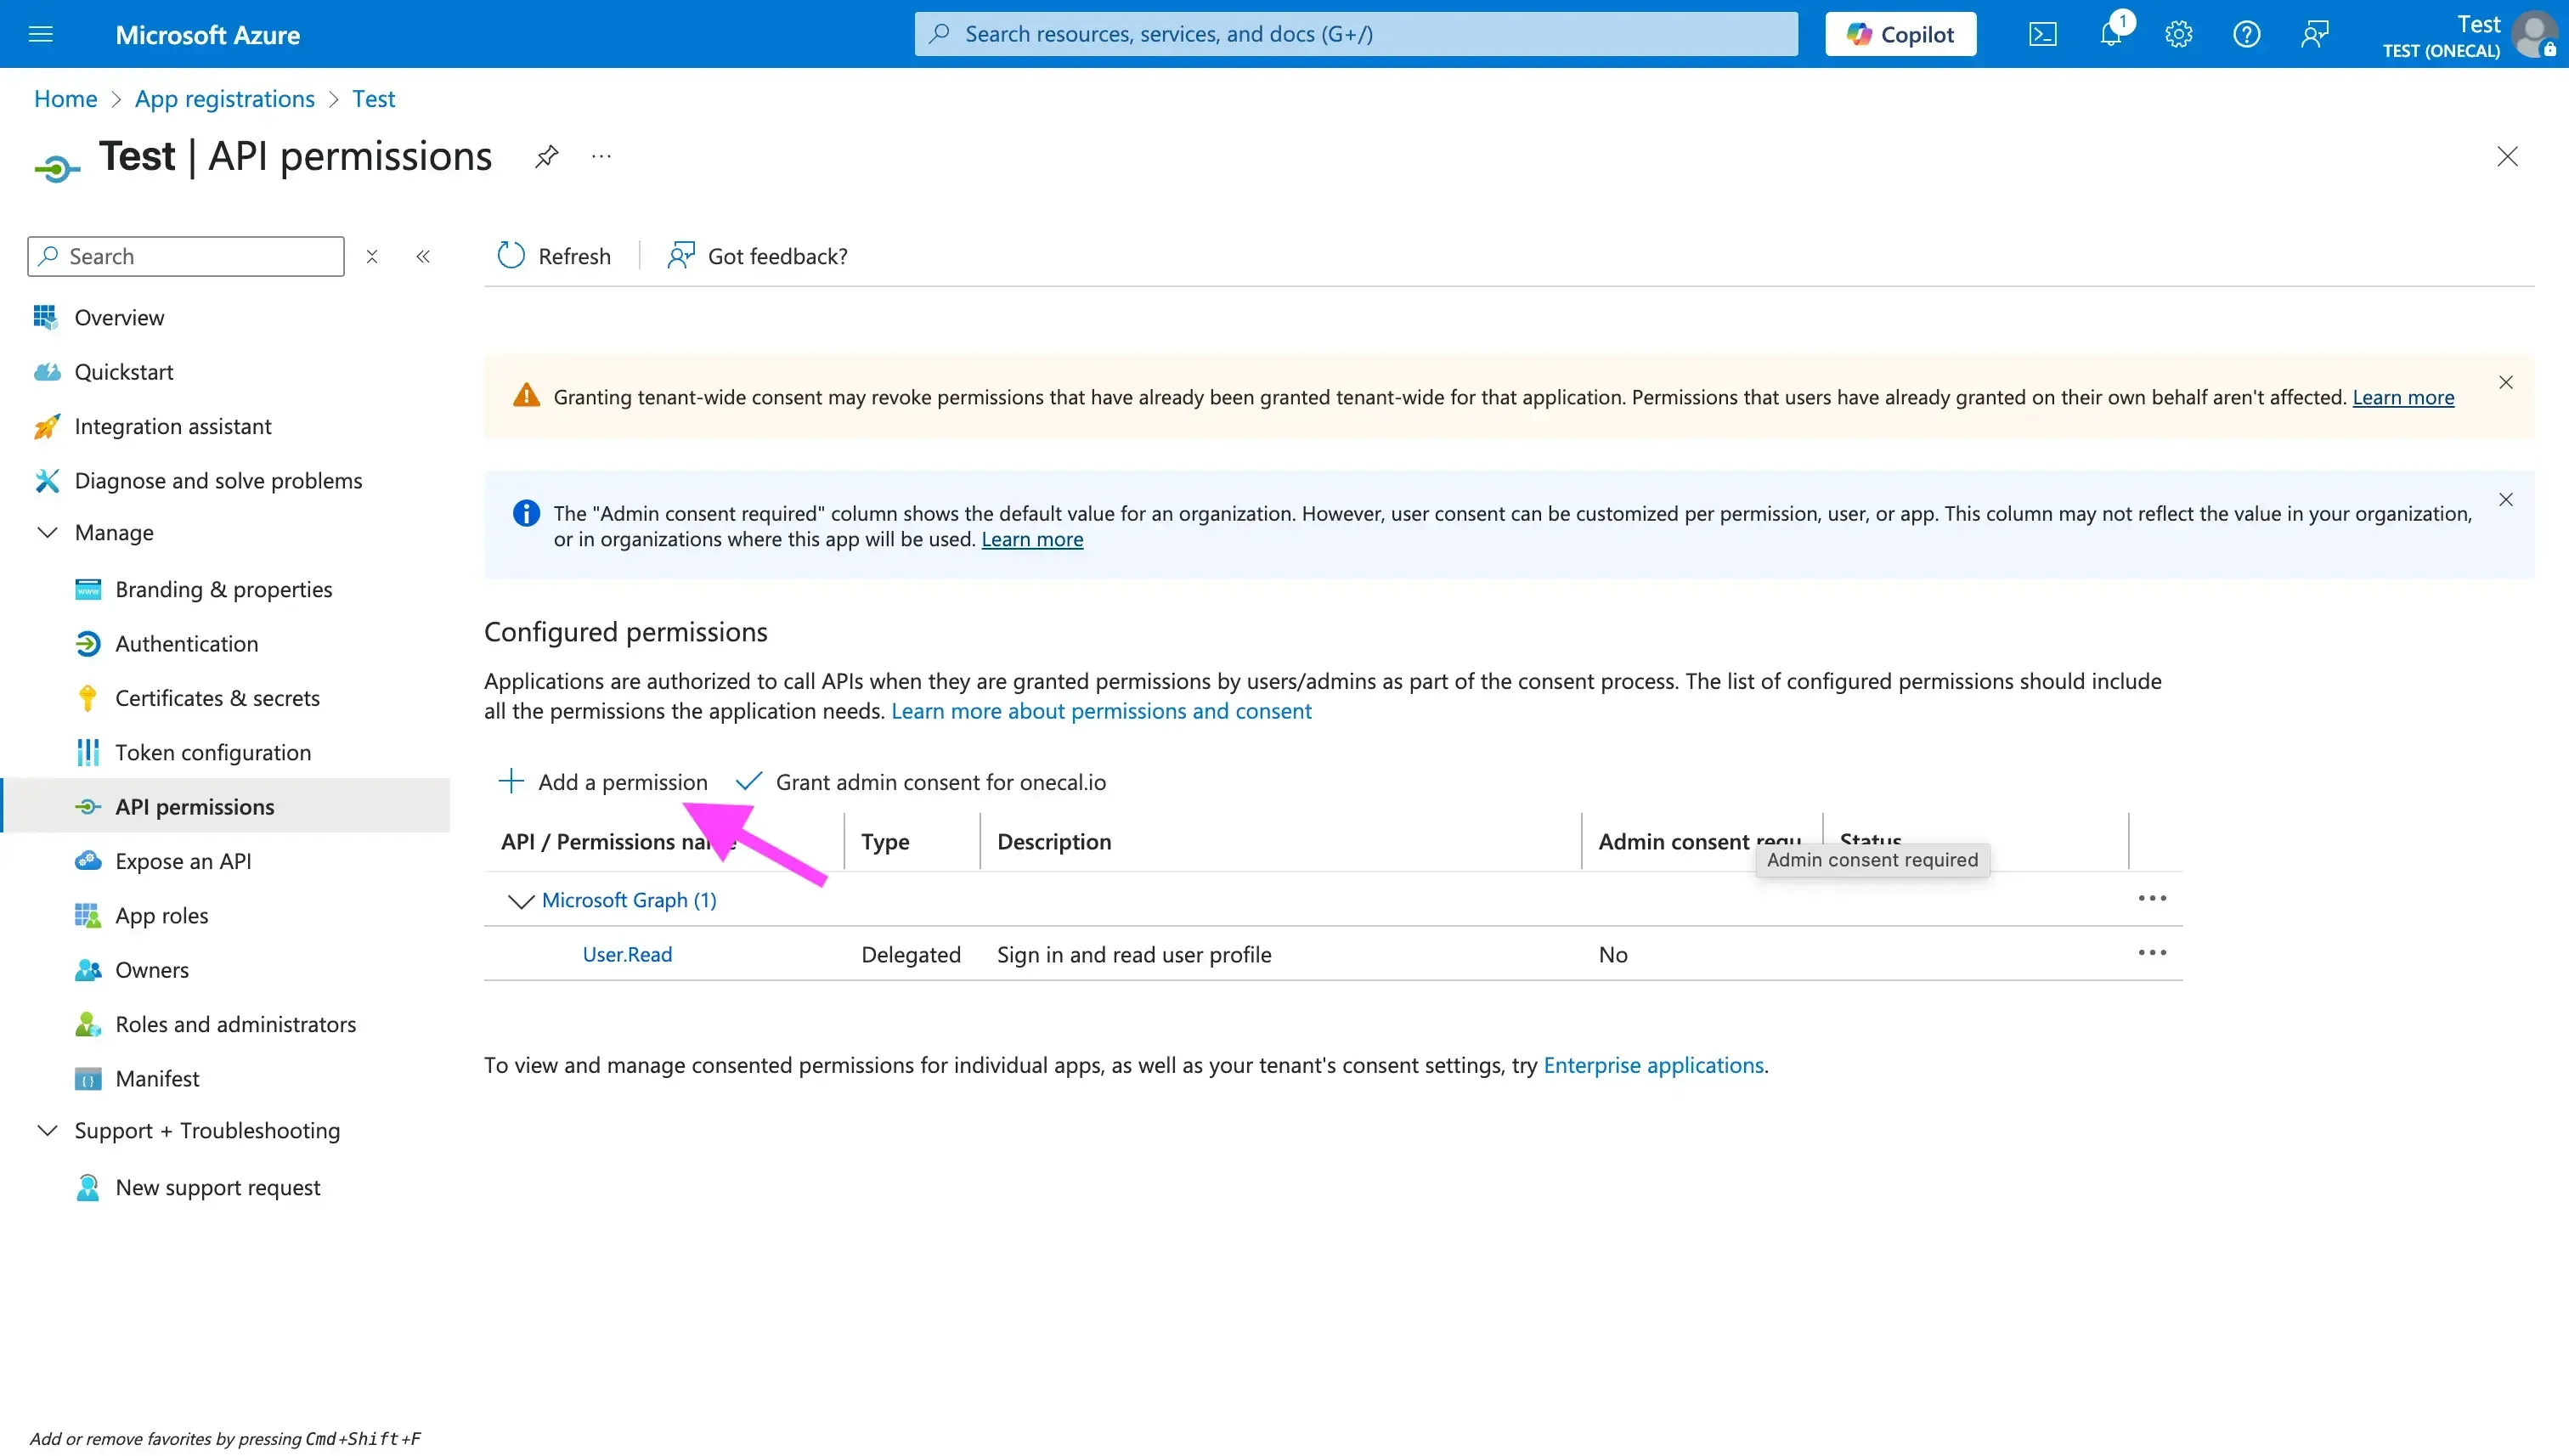
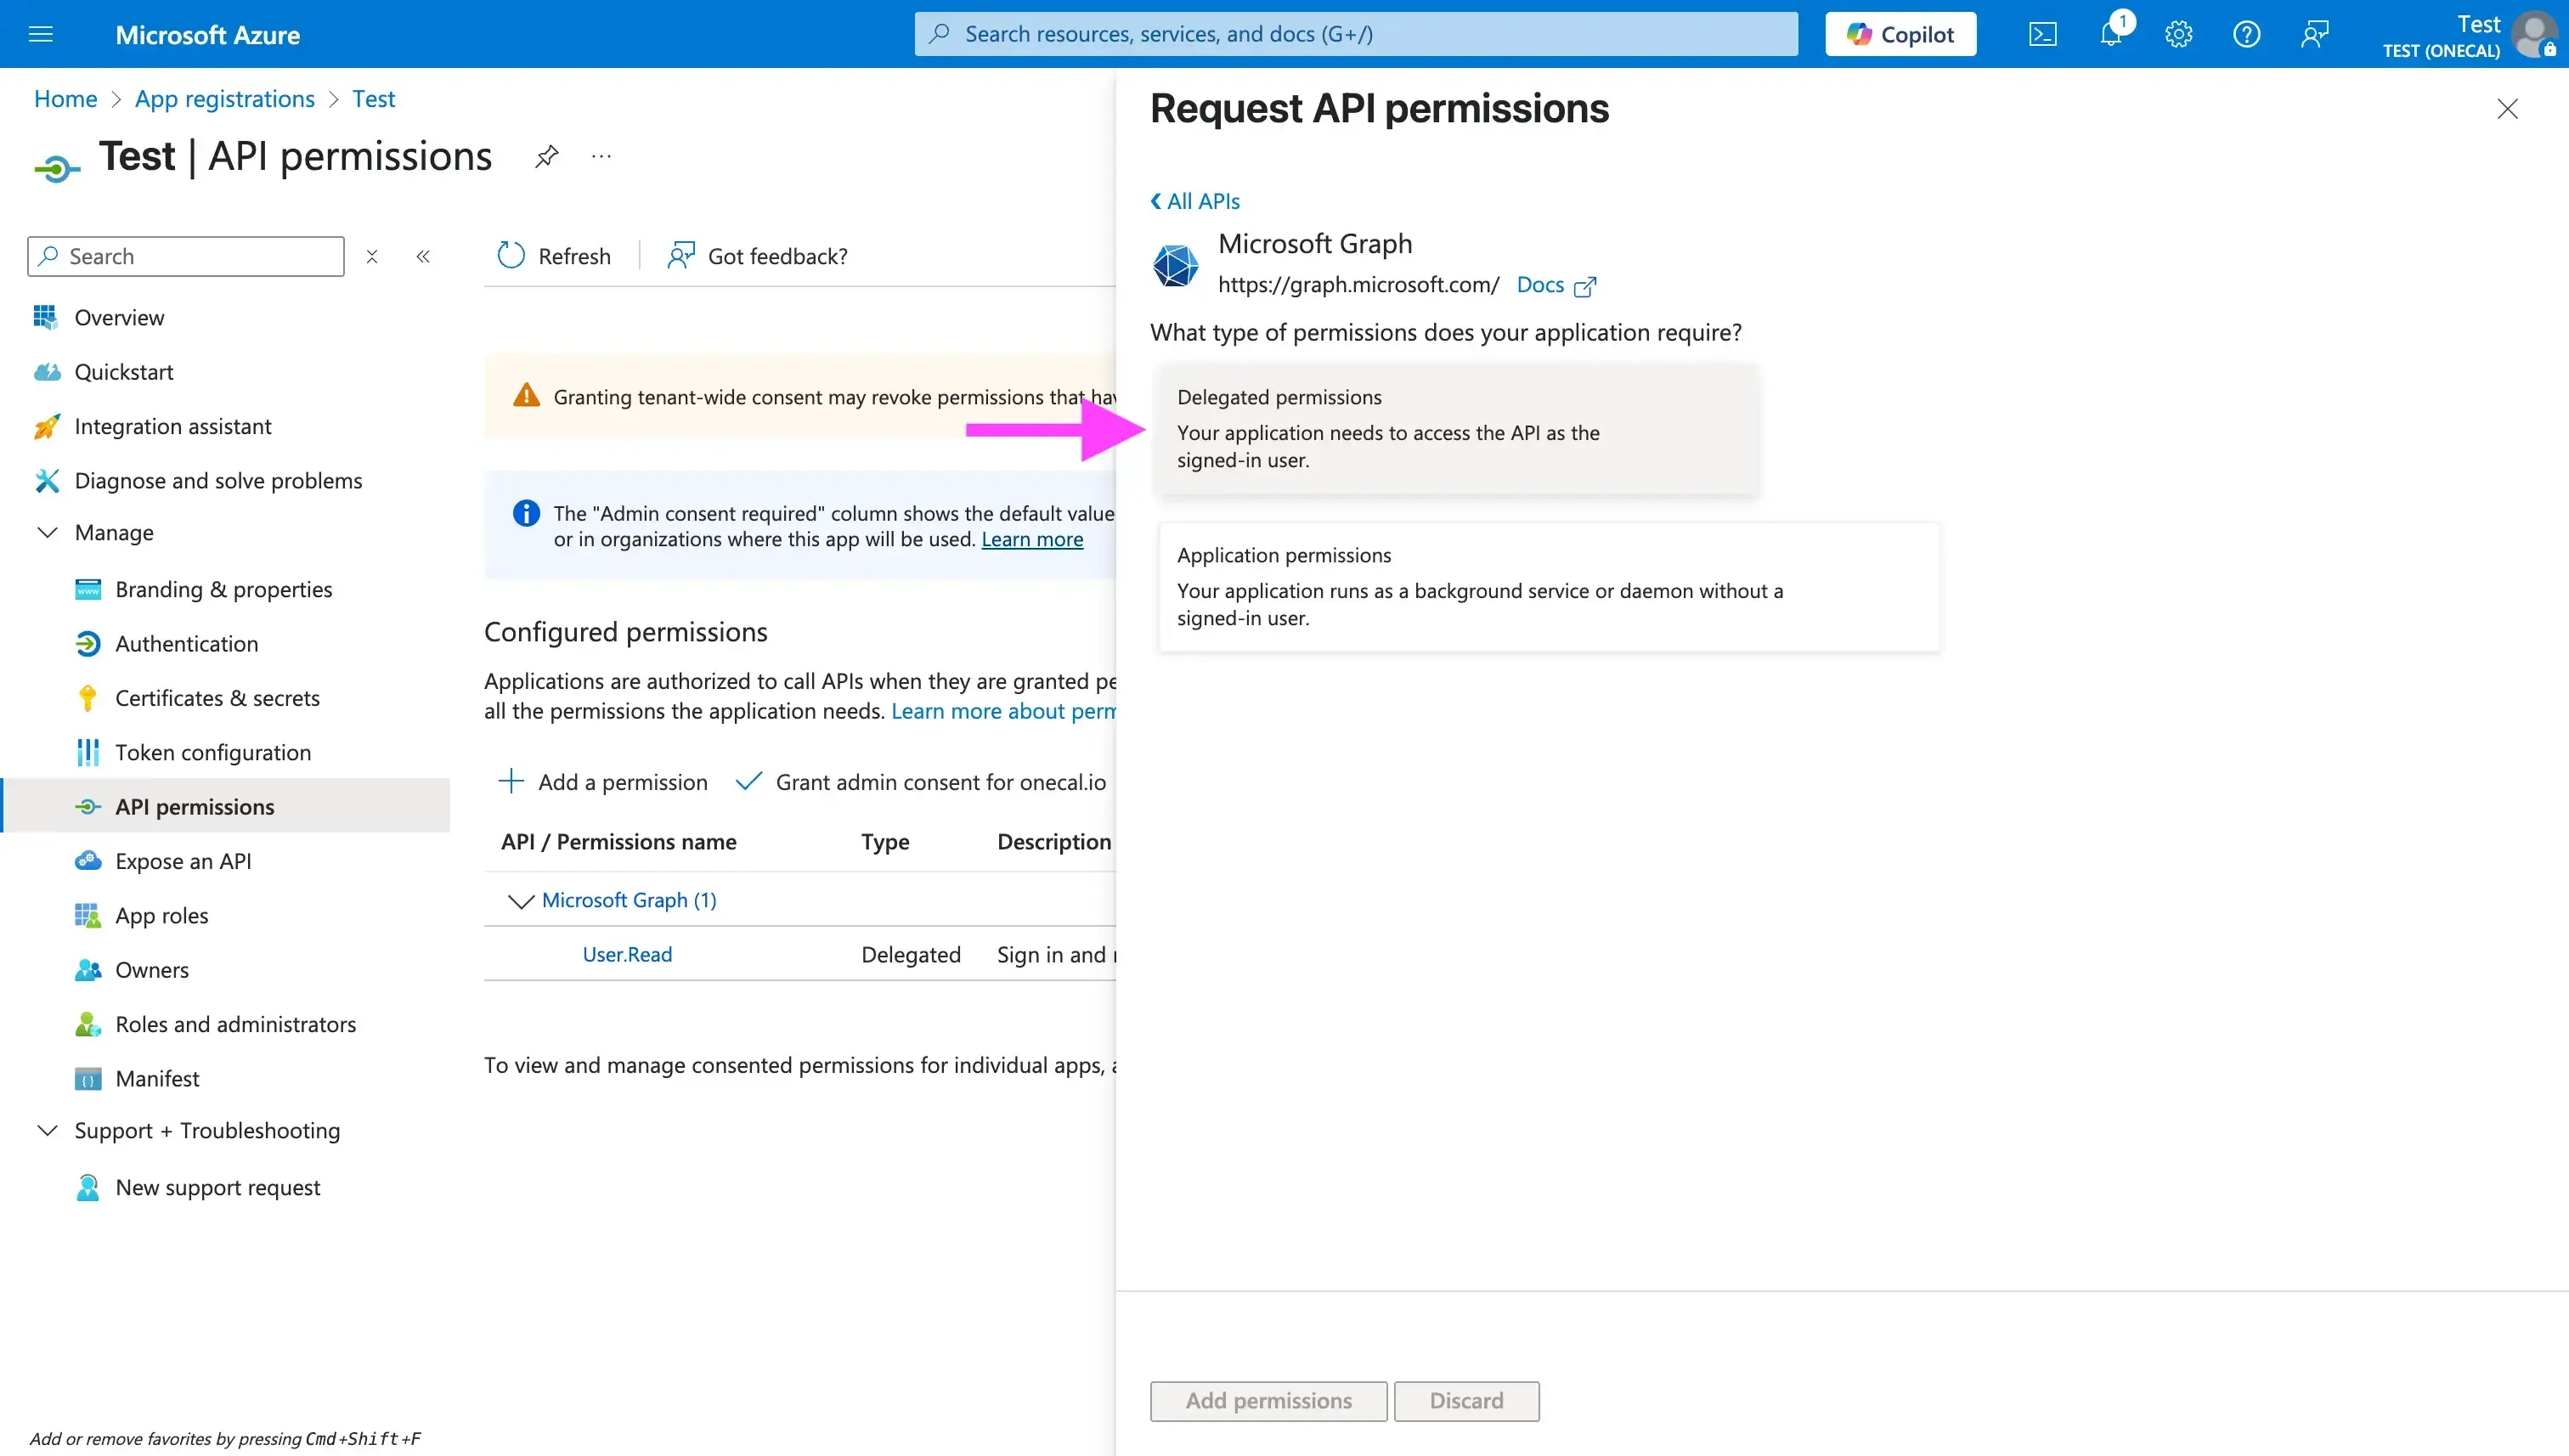
- Click the “+ Add a permission” button.
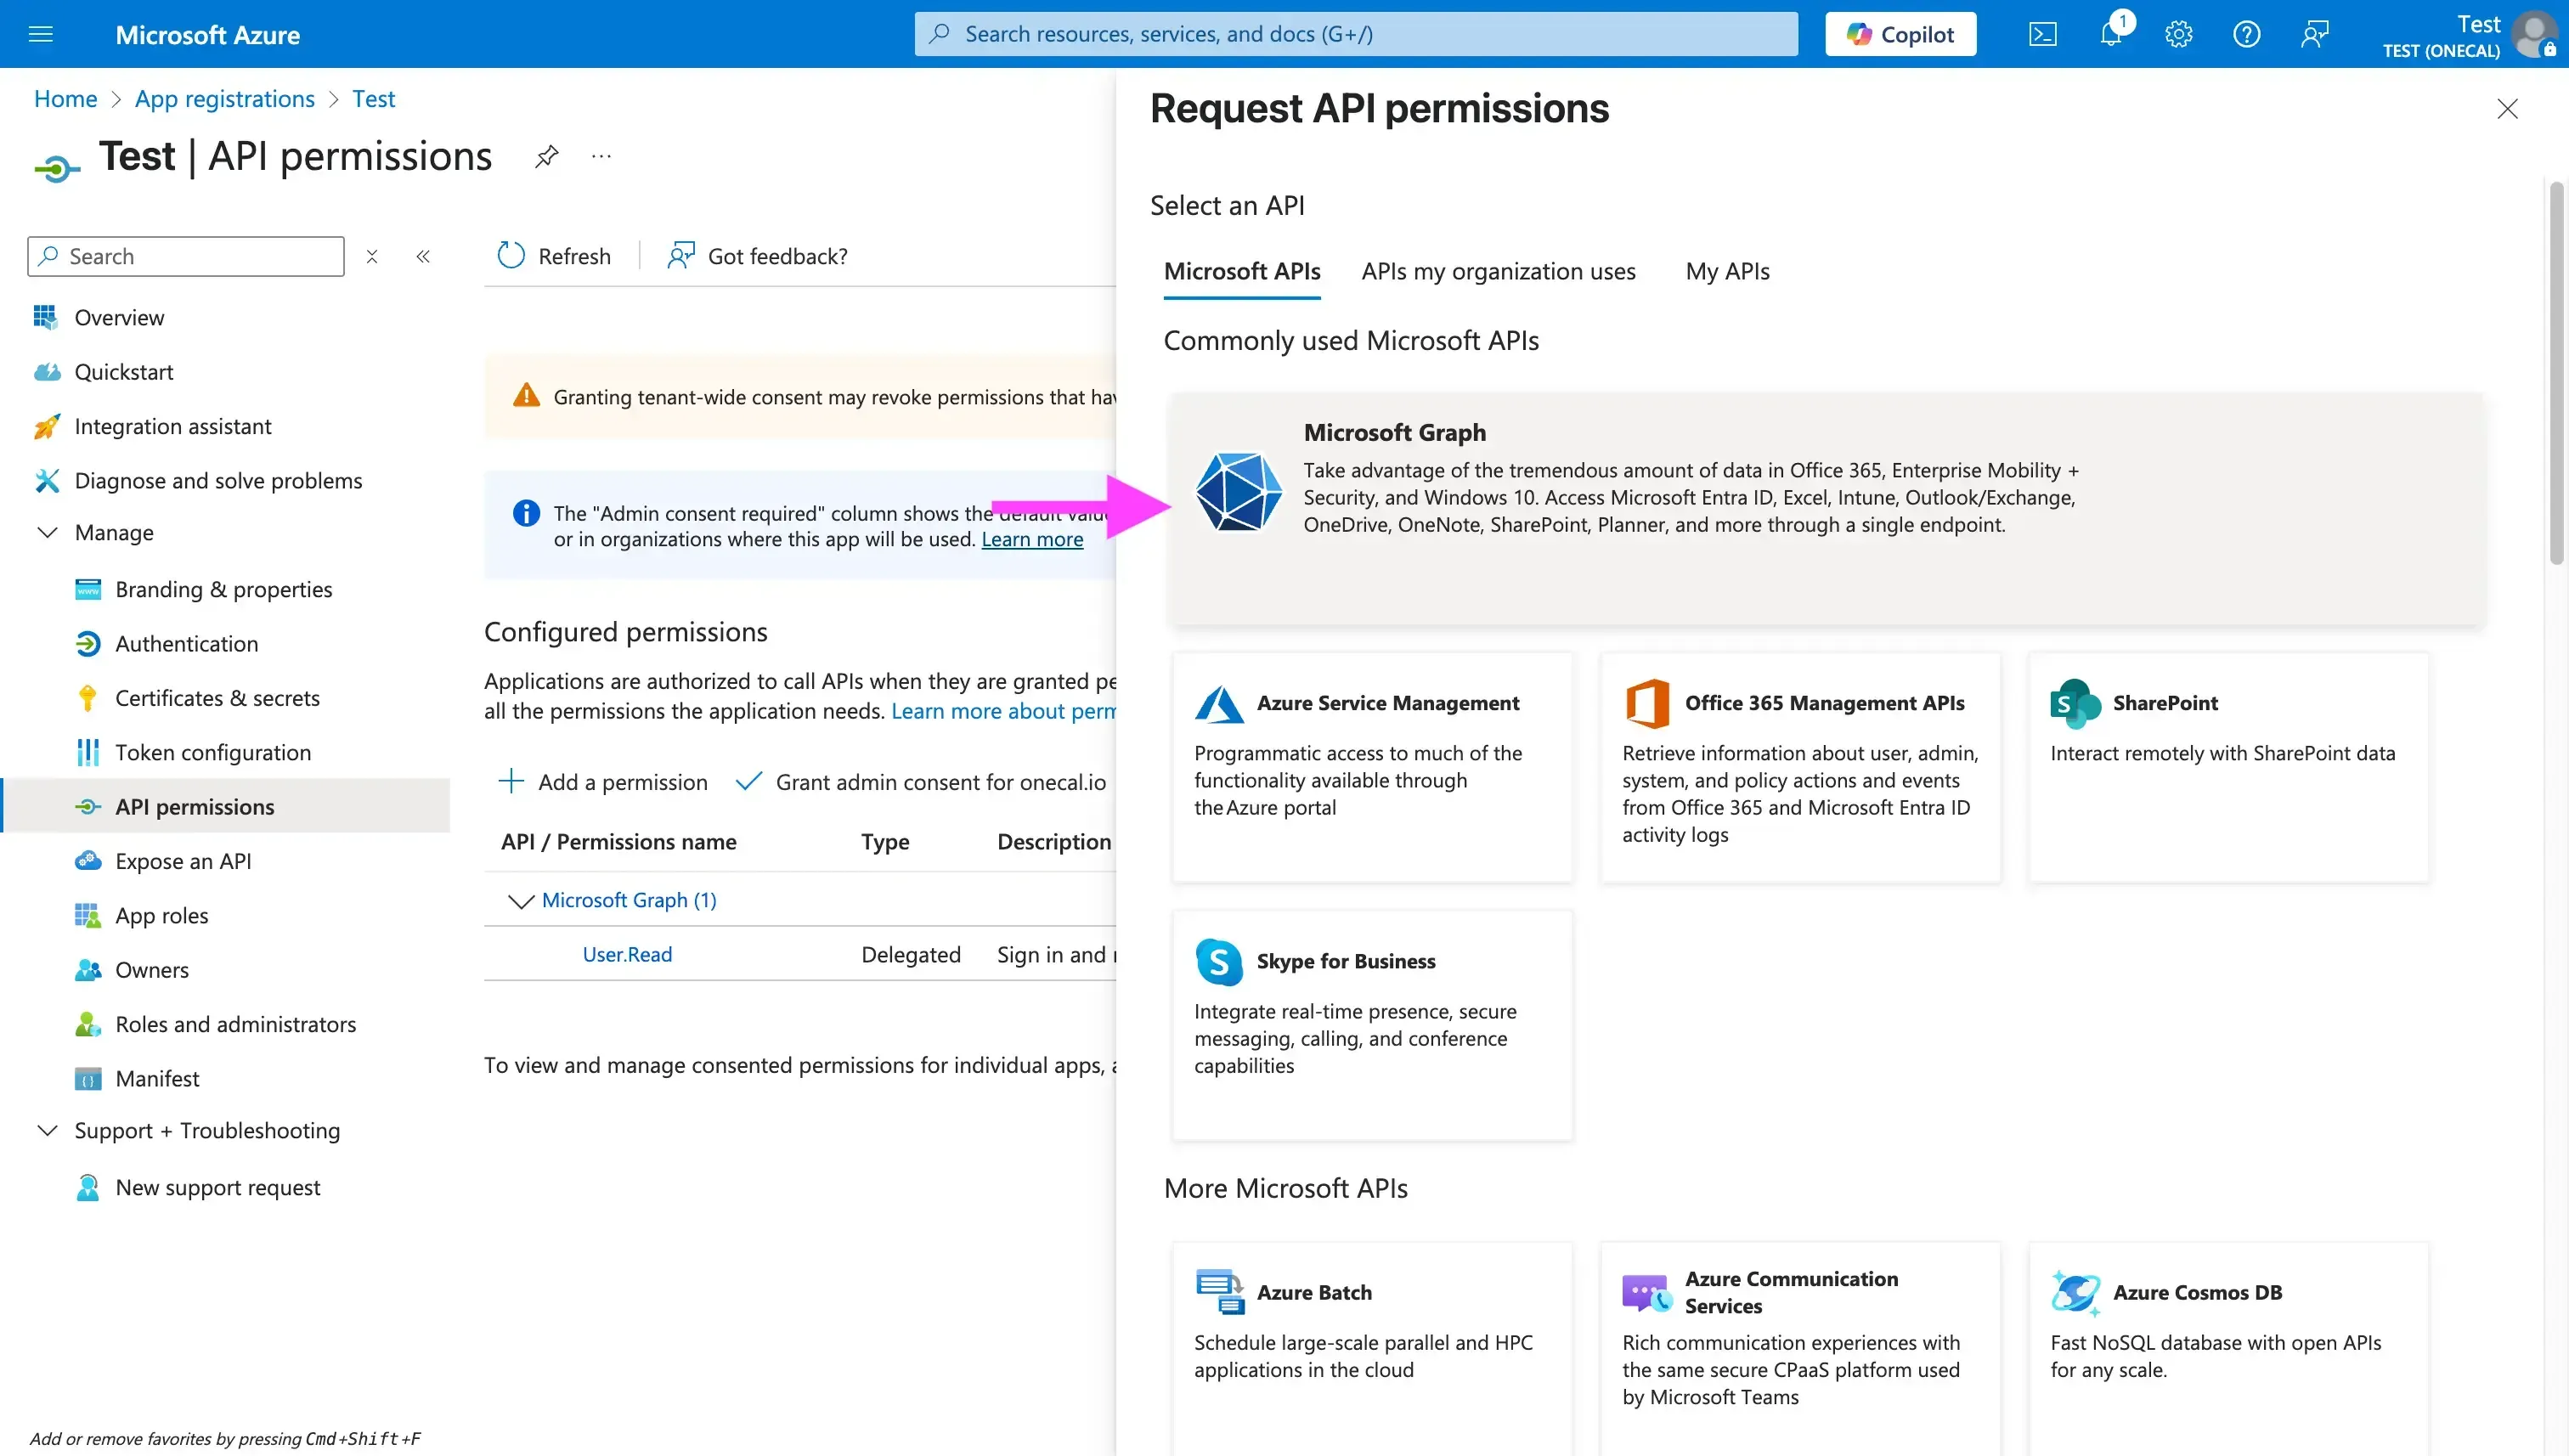
- Find the “Microsoft Graph” card (it’s usually the first card in the drawer that opens on the right after clicking “Add a permission”).
- Choose between “Delegated permissions” and “Application permissions”. Delegated permissions are the right choice when your application calls the API on behalf of the signed-in user. Application permissions, on the other hand, are used when your application runs as a background service without a signed-in user. For this example, I’ll use “Delegated Permissions”.
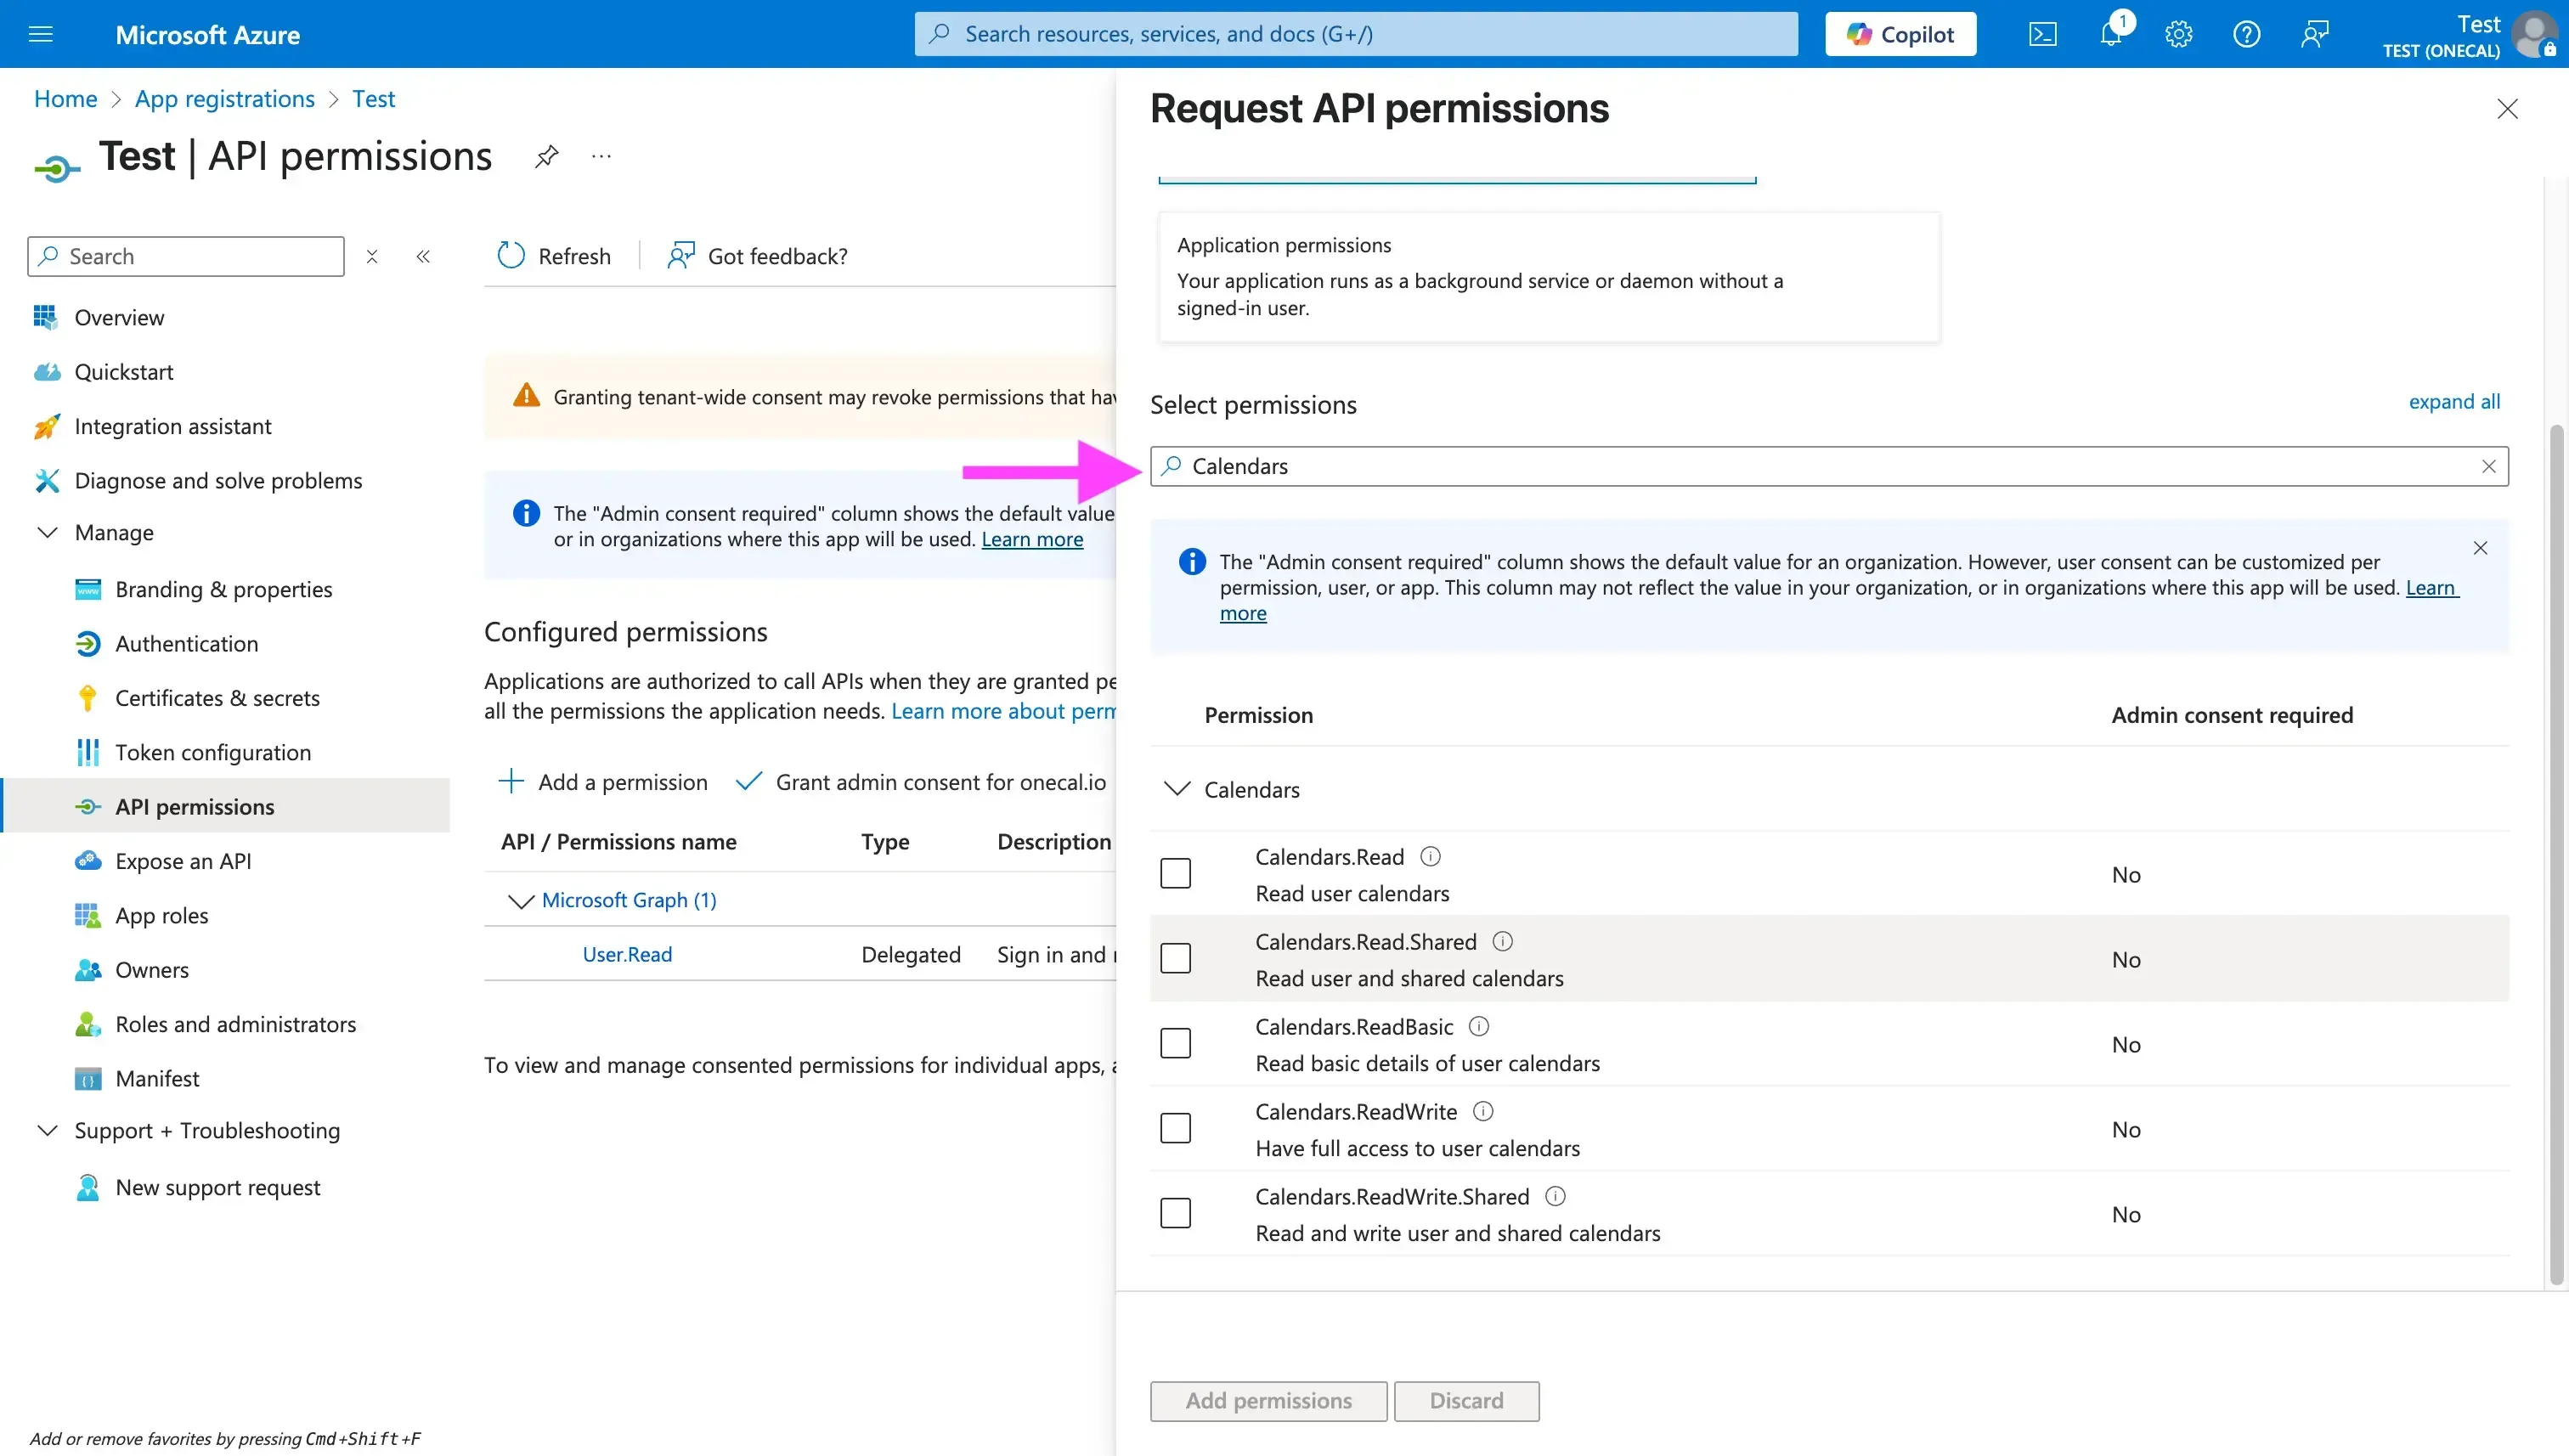
- Search for “Calendars”: The search shows all calendar-related permissions. Pick only the permissions your application needs to work properly. In most cases, you’ll want “Calendars.ReadWrite” and “Calendars.ReadWrite.Shared” (if you need access to shared calendars). The calendar scopes usually don’t require admin consent, because they are user-delegated scopes, but keep in mind that some organizations restrict user consent. If a user from an external tenant is not allowed to consent, an administrator from that tenant has to grant consent for your app (usually through an admin consent prompt or URL).
Step 4: Enable ID tokens
Not every app needs this step, but if you want to access user profile information such as the name, email, or profile picture URL, you need to enable the ID Tokens option under Manage -> Authentication.
With ID tokens, your app can identify the user right after they connect their calendar, without making an extra API call.

Step 5. Generate a Client Secret
We recommend running all calendar operations (reads, writes, updates, and so on) from the server. That’s why you need to generate a client secret.
To generate a Client Secret, follow these steps:
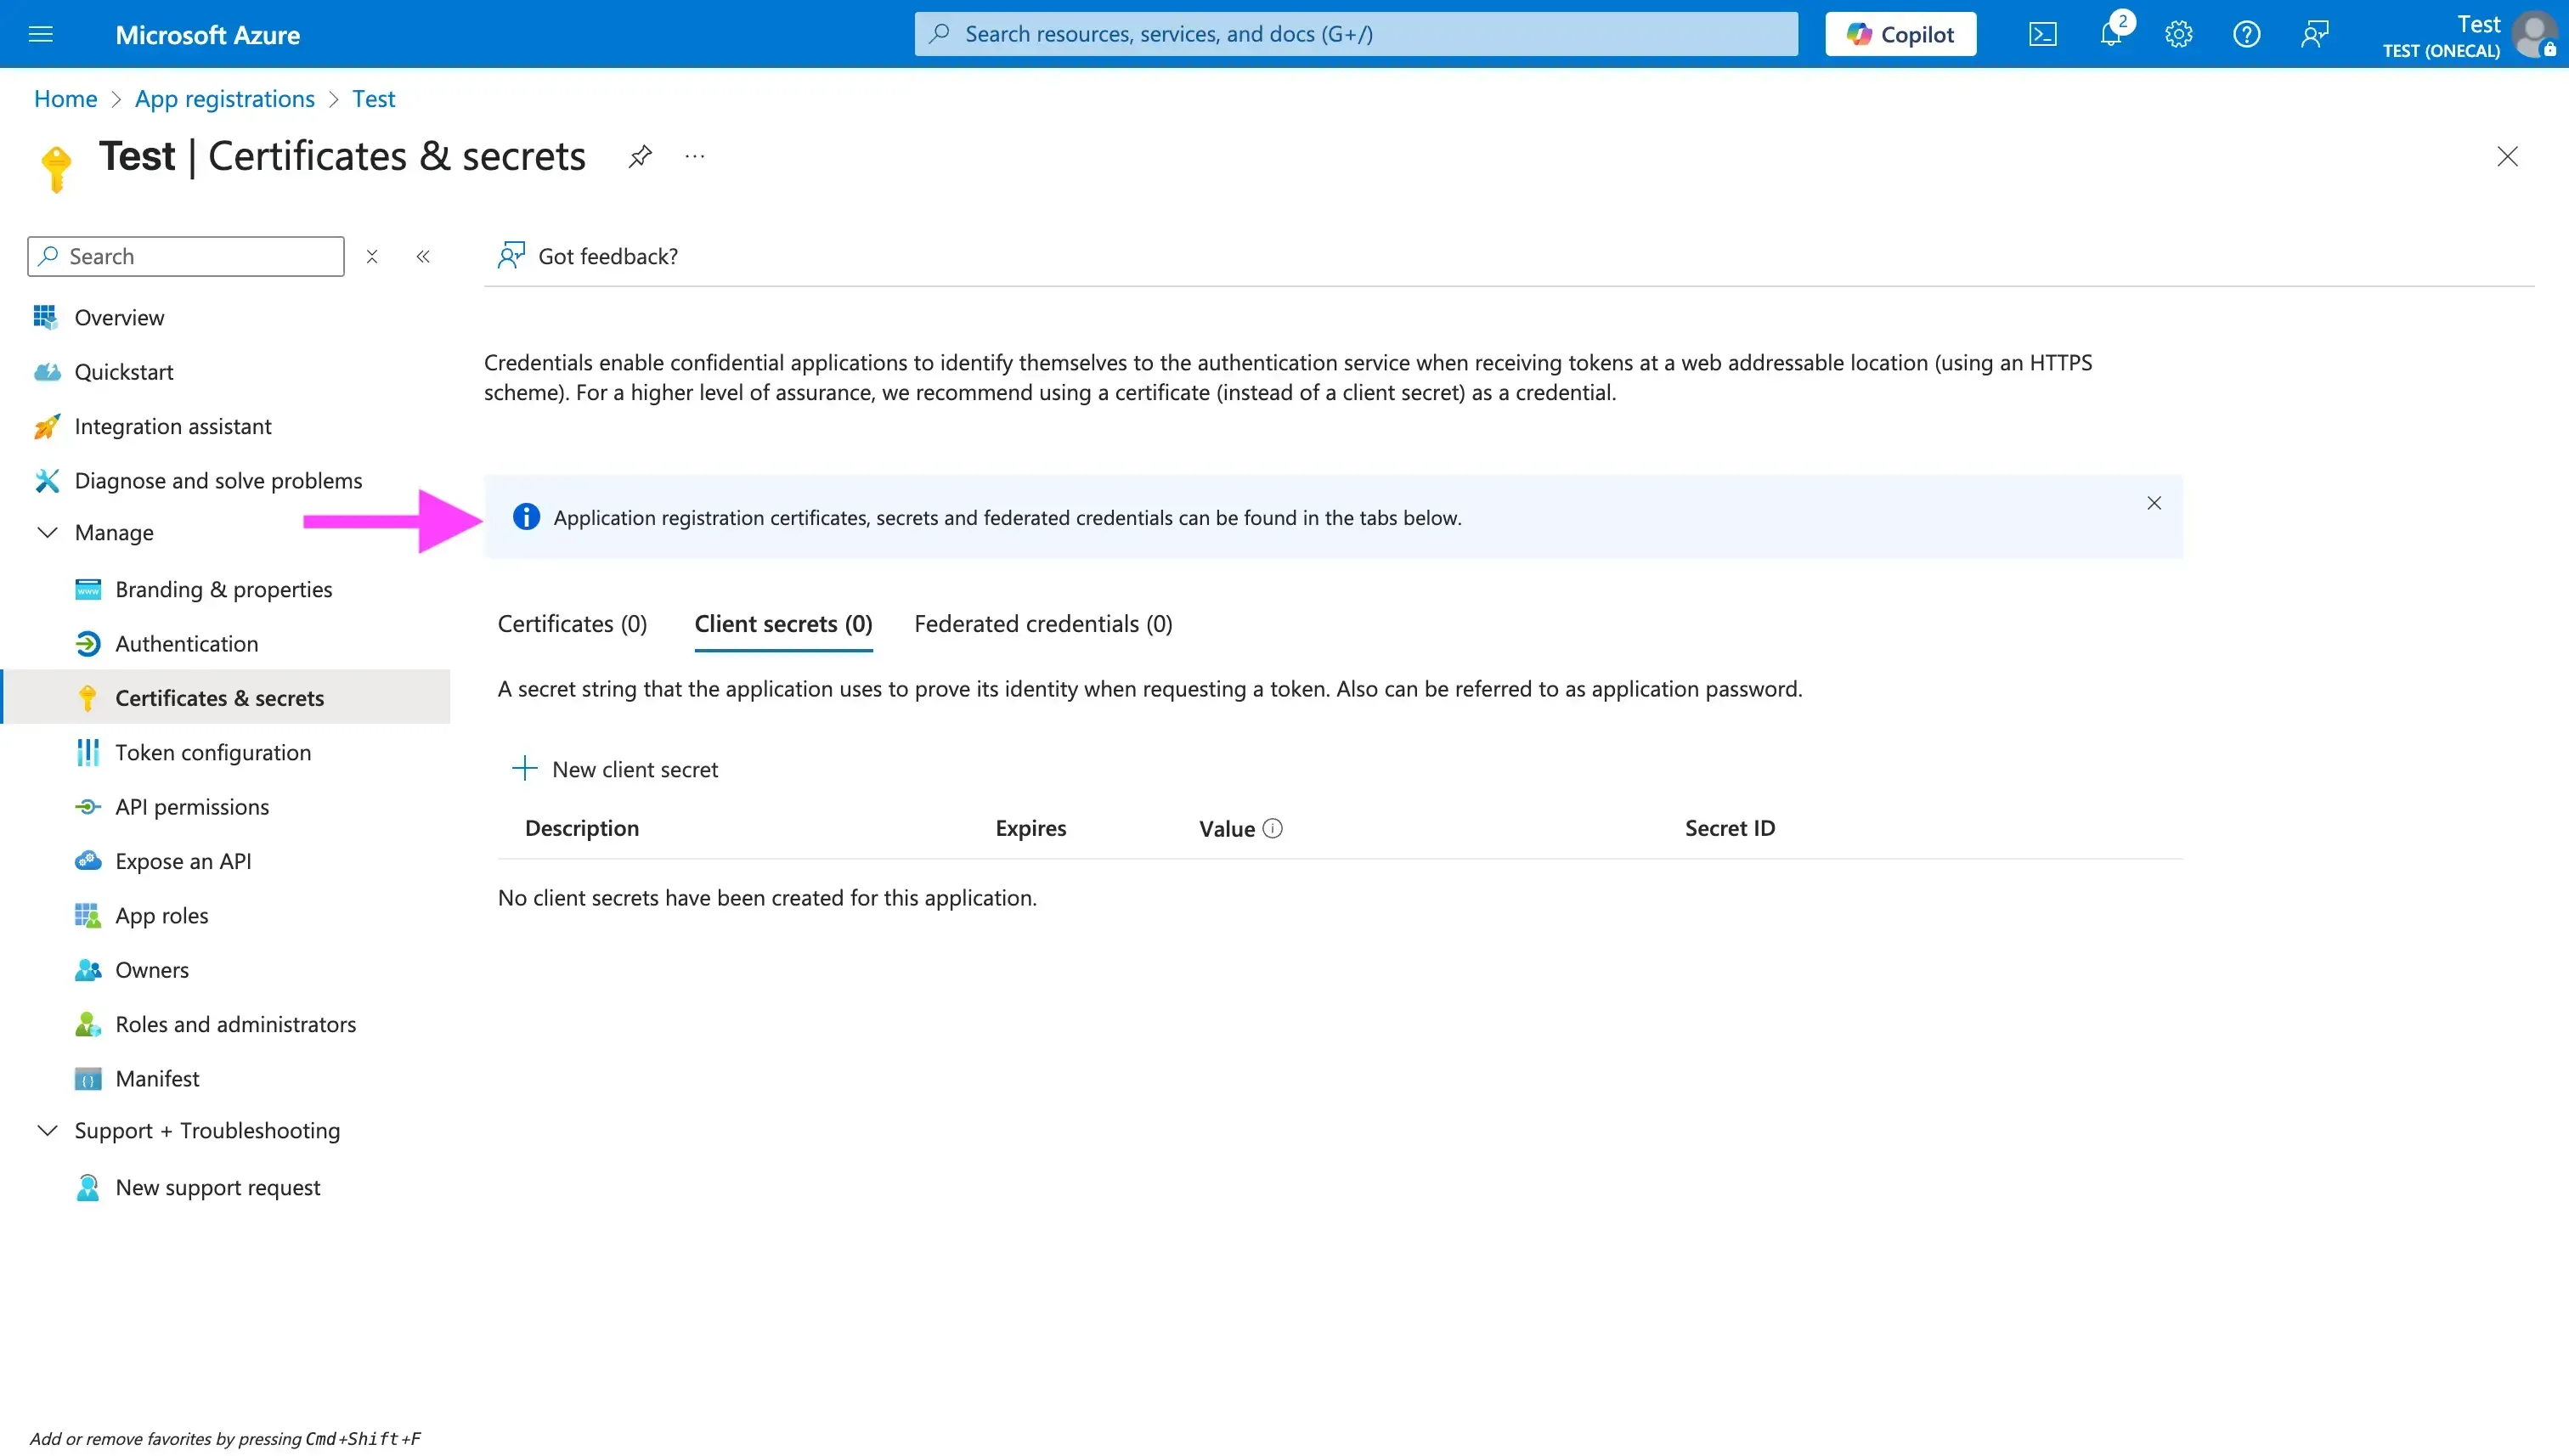
- Click the “Certificates & secrets tab”
- Click “New client secret”
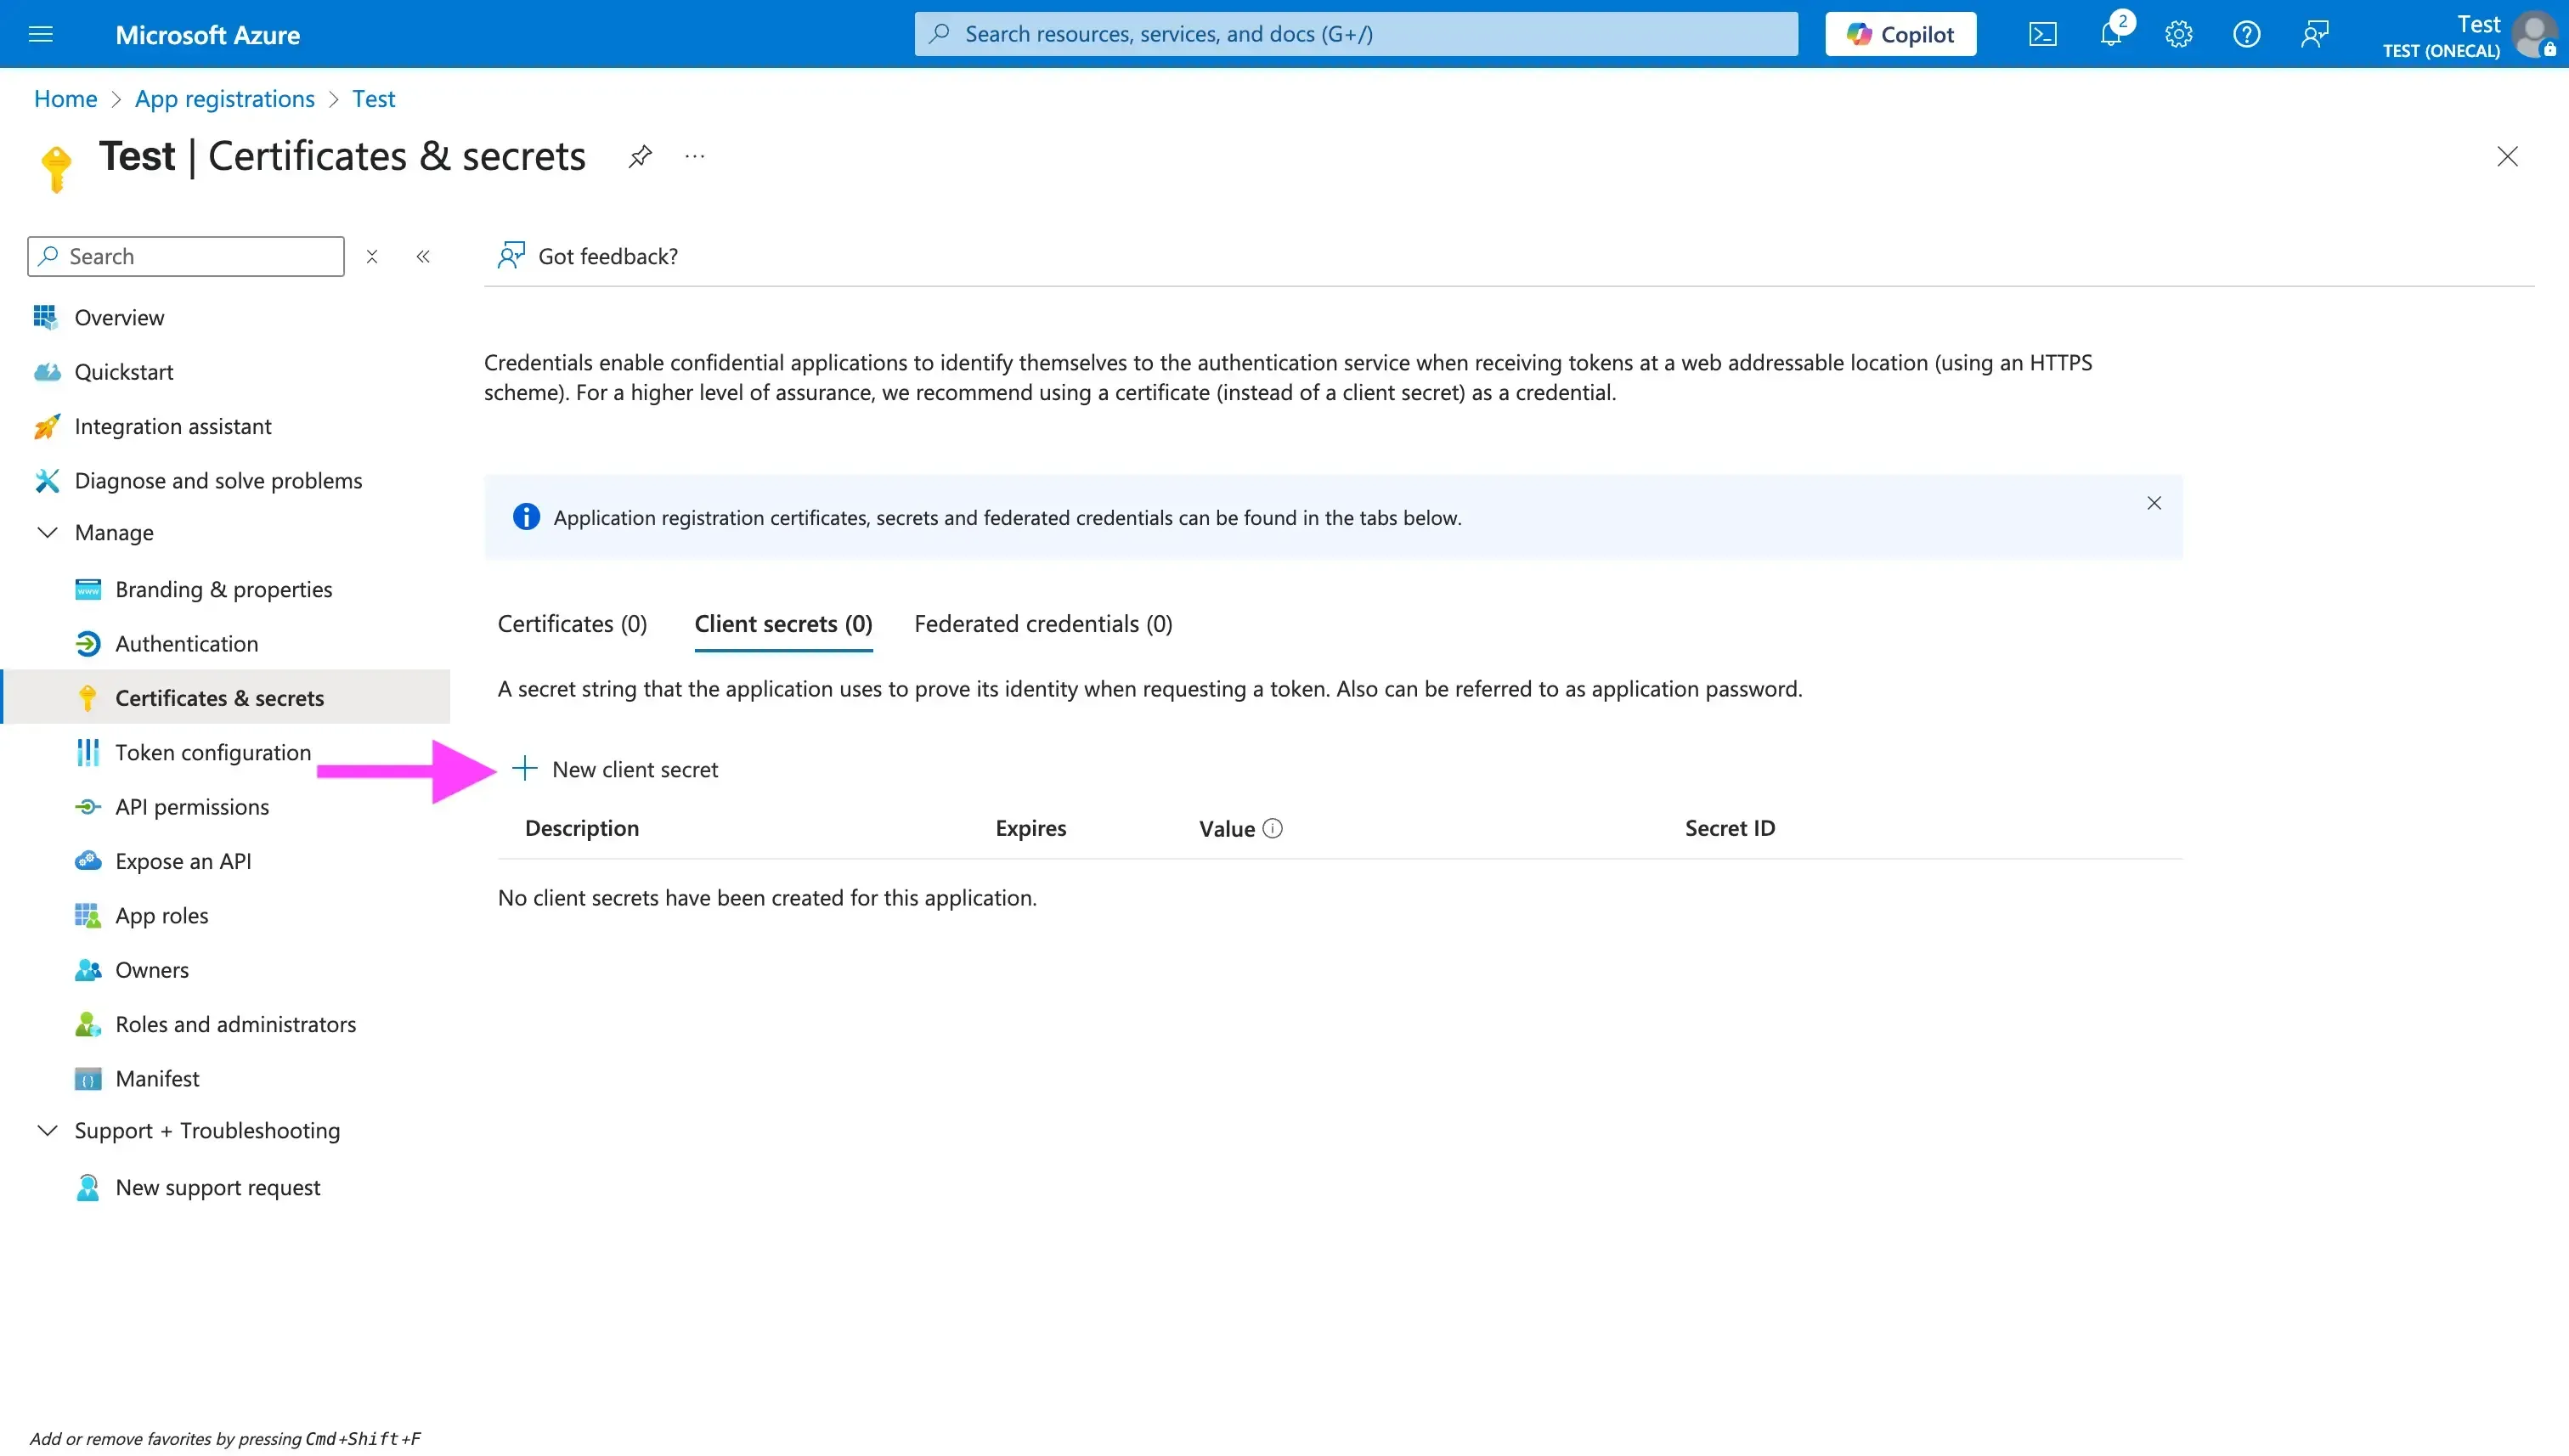
- Enter a description and an expiration date
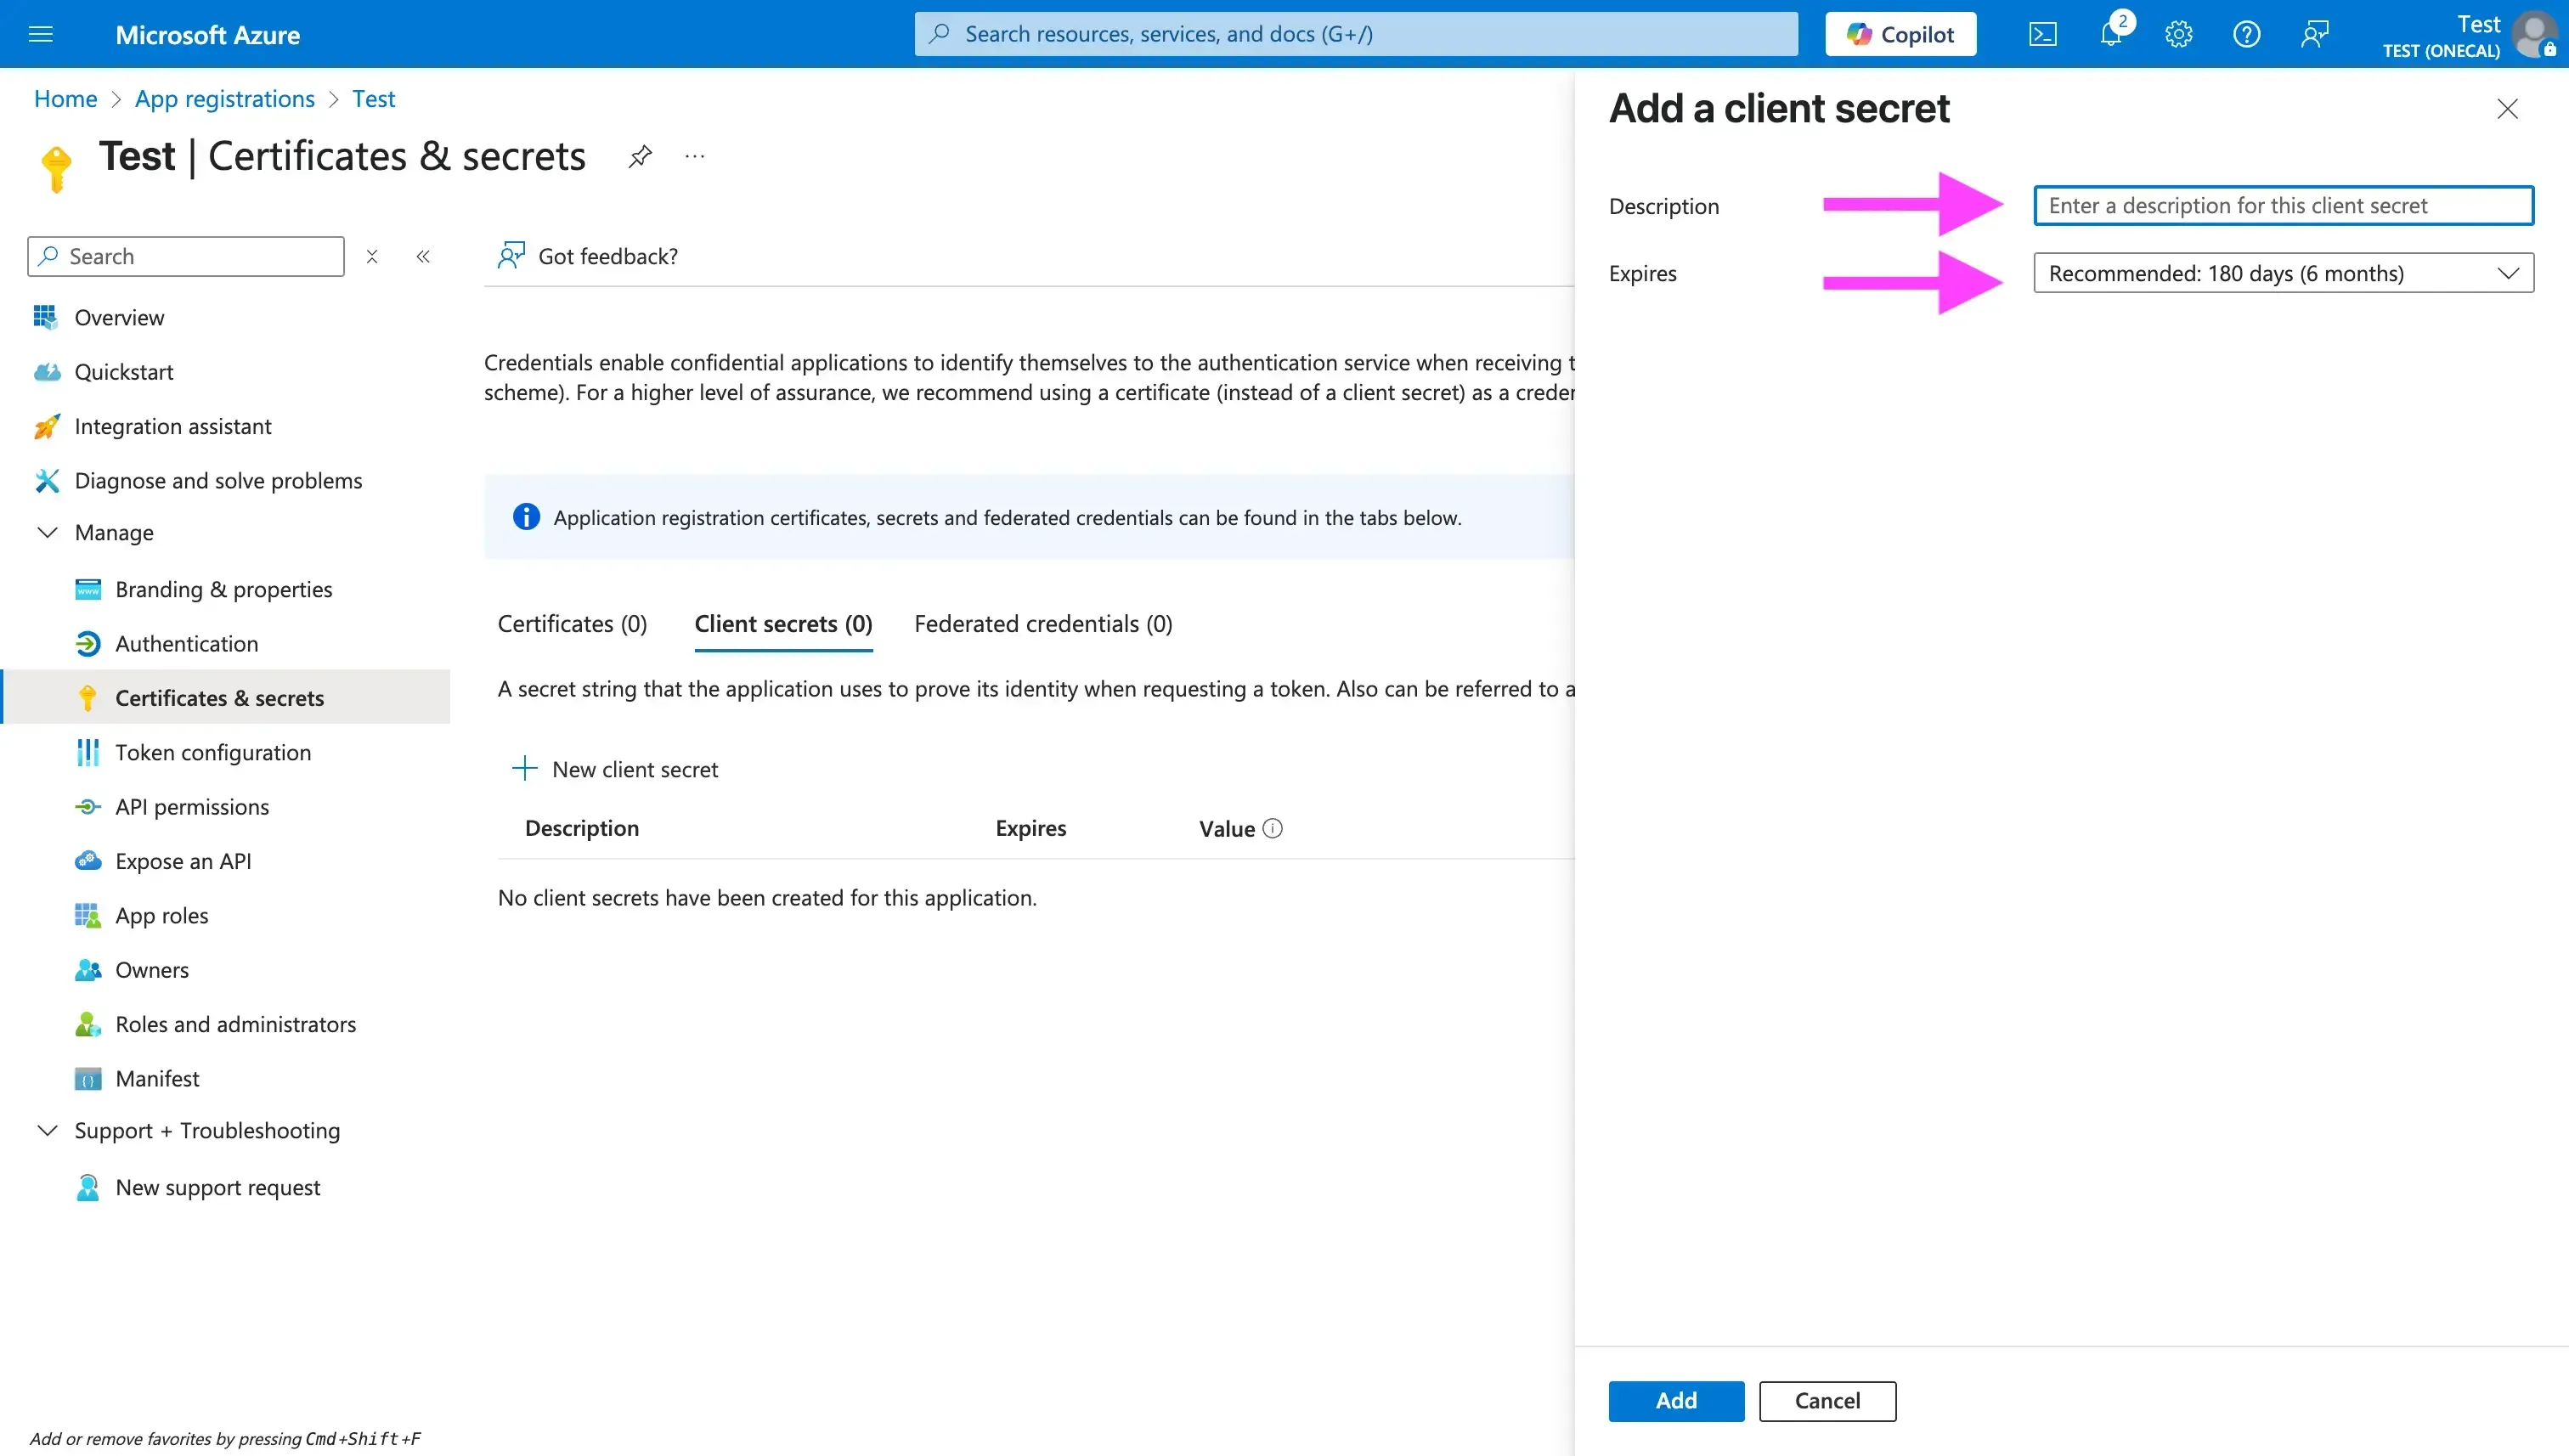
After generating the client secret, copy it right away and store it somewhere safe (usually in your .env file).
Step 6. Branding and Verification
In the Branding & Properties section of the app registration, you can set a logo and other details (app description, terms of service URL, and so on). This is optional, but we recommend it for a polished consent screen. Setting a Publisher Domain (usually your custom domain, verified in Azure AD) is important, because it prevents the app from showing as "unverified" when users consent. For a multi-tenant app, Microsoft now expects apps to be publisher-verified for broad usage. If your app is not publisher verified, users outside your tenant might be blocked from consenting because of security policies introduced in November 2020.

Step 7. Get familiar with the Outlook Graph API
With the application set up, it’s time to explore the Microsoft Calendar Graph API, so you get familiar with the specific endpoints for creating, updating, and deleting events.
Step 8. Consider using a Unified Calendar API service to integrate all calendar providers using a single API
The Microsoft Graph API is fairly well documented, but we still recommend looking at a Unified Calendar API product that lets you integrate all calendar providers through a single API.
With a Unified Calendar API, you implement one API in your application and support every calendar provider, no matter their limitations or API differences.
Another benefit of a single API for all calendars is that you don’t have to maintain several provider integrations, deal with breaking changes, or handle edge cases you never thought of.
The Apiroc Unified Calendar API
Example of an Outlook Calendar authorization flow
The flow chart below shows a simple Outlook Calendar OAuth flow that lets users connect their Outlook Calendar to your app.

See the Microsoft OAuth2 Flow documentation page if you want to learn more about the Microsoft OAuth2 flow.
Client Side (UI)
const microsoftOauthUrl = getMicrosoftOAuthUrl()
<button href="microsoftOauthUrl"   rel="noopener noreferrer"> Connect Outlook Calendar </button>
export const SCOPES = [
  "openid",
  "email",
  "profile",
  "offline_access",
  "Calendars.ReadWrite",
  "User.Read",
];

export interface ClientState {
  session: Session;
  returnUrl?: string;
}

export function stateToB64(session: ClientState): string {
  return encode(JSON.stringify(session));
}

export function getMicrosoftOAuthUrl(
  state: ClientState,
) {
  const nonce = uuid();
  const TENANT_ID = process.env.NEXT_PUBLIC_MICROSOFT_TENANT_ID;
  const params = new URLSearchParams({
    client_id: process.env.MICROSOFT_CLIENT_ID || "",
    redirect_uri: `${getHostName()}/api/connect/microsoft`,
    response_type: "code id_token",
    scope: SCOPES.join(" "),
    prompt: "consent",
    response_mode: "form_post",
    state: stateToB64(state),
    nonce,
  });
  return `https://login.microsoftonline.com/${TENANT_ID}/oauth2/v2.0/authorize?${params}`;
}
- The “prompt” parameter accepts one of four values:
login,none,consent, andselect_account. - The “response_mode” parameter accepts
query,fragment, orform_post. We choseform_postbecause it tells Microsoft to send a POST request to our redirect URI (on the server).
API Side (Backend)
Next, let’s build the API handler. It receives the code and scopes from the Microsoft server and exchanges them for tokens.
In this example, we use zod for validation.
const successSchema = z.object({
  code: z.string(),
  state: z.string(),
  id_token: z.string(),
  session_state: z.string().optional(),
});

const errorSchema = z.object({
  error: z.string(),
  error_description: z.string().optional(),
});
type ErrorParams = z.infer<typeof errorSchema>;

const querySchema = z.union([successSchema, errorSchema]);

function isError(query: Record<string, any>): query is ErrorParams {
  return Boolean(query.error);
}

const microsoftHandler: NextApiHandler = async (req, res) => {
  try {
    const result = querySchema.parse(req.body);
    if (isError(result)) {
      const q = new URLSearchParams({
        error: "ACCESS_DENIED",
        provider: CalendarProvider.MICROSOFT,
      });

      console.error({ result });
      return res.redirect(302, `/?${q}`);
    }

    const { session, returnUrl } = stateFromB64(result.state);
    const { email } = decodeIdToken(result.id_token);
    const { access_token, refresh_token, expires_in, scope } =
      await exchangeCodeForTokens(result.code);

    const connection = await upsertConnection(
      {
        email,
        accessToken: access_token,
        refreshToken: refresh_token,
        expiresInSeconds: expires_in,
        status: ConnectionStatus.ACTIVE,
        provider: CalendarProvider.MICROSOFT,
        scopes: scope,
      },
      session.user
    );

    const q = new URLSearchParams({
      cid: connection.id,
    });
    if (returnUrl) q.append("returnUrl", returnUrl);

    res.redirect(302, returnUrl ? returnUrl : `/calendars/microsoft?${q}`);
  } catch (e: any) {
    let error = JSON.stringify(e);

    const querystr =
      typeof req.query === "string" ? req.query : JSON.stringify(req.query);

    const q = new URLSearchParams({
      error,
      provider: CalendarProvider.MICROSOFT,
    });
    return res.redirect(302, `/?${q}`);
  }
};

export default microsoftHandler;
As on the client side, we recommend keeping small utility functions for exchanging the code for tokens and similar tasks.
const TENANT_ID = process.env.MICROSOFT_TENANT_ID;

export async function exchangeCodeForTokens(code: string) {
  const data = new FormData();
  data.append("client_id", process.env.MICROSOFT_CLIENT_ID || "");
  data.append("scope", SCOPES.join(" "));
  data.append("code", code);
  data.append("redirect_uri", `${getHostName()}/api/connect/microsoft`);
  data.append("grant_type", "authorization_code");
  data.append("client_secret", process.env.MICROSOFT_CLIENT_SECRET || "");

  try {
    const result = await fetch(
      `https://login.microsoftonline.com/${TENANT_ID}/oauth2/v2.0/token`,
      {
        method: "POST",
        body: data,
      }
    );

    const json = await result.json();
    if (json.error) throw json;

    const parsed = responseSchema.parse(json);
    return parsed;
  } catch (e) {
    console.error("Exchange failed");
    throw e;
  }
}
Outlook Calendar API Integration Gotchas
-
Verification can take time and be frustrating at times : Keep in mind that thousands, if not millions, of developers build on Outlook, so Microsoft reviews a large number of application submissions every day. Fill out every detail when you submit for review, and plan for the verification time in your roadmap.
-
Make sure you only request the scopes you absolutely need : The Microsoft team reviews apps thoroughly, so only request what your application really needs for its features. This makes approval easier, and it also helps when users grant access to your application. End users get confused when an app asks for all kinds of scopes that have nothing to do with its actual features.
-
Webhooks expire, make sure you renew them : If you register webhooks to watch for calendar changes, set up a background job that runs every few hours and renews every subscription that is about to expire.
-
Rate limiting and throttling : Microsoft has strict rate limiting and throttling rules. Avoid fetching items one by one and add rate limiting to your own API calls, so you don’t run into the famous “MailboxConcurrency” errors. The table below summarizes the rate limits and throttling limits:
Scope Limit Notes Per mailbox (app ID & mailbox pair) 10,000 requests / 10 min and 4 concurrent requests. The famous “MailboxConcurrency” error. Upload 150 MB total PATCH/POST/PUT per 5 min per mailbox. Can hit you when attaching large ICS files or file attachments. Global Graph 130,000 requests / 10 s per app across all tenants. Rare, but big SaaS back-fills can trigger it. Retry etiquette On 429or503/504look forRetry-Afterheader, back off exponentiallyGraph API will keep throttling if you hammer it every second. -
Time-zone gotchas : In Outlook, a user can manually type their own time zone name (you can see where this is going), so make sure your code handles this case too.
-
Consent & permission hiccups : As mentioned in the scopes section,
Calendars.ReadWriteis user-delegated. Many tenants allow user consent, but some don’t. Be ready for an “admin consent required” error and show a friendly “Ask your admin” flow.
Integrate all calendar providers into your app using the Apiroc Unified Calendar API
Calendar integrations are our bread and butter. Our team has worked with Google Calendar, Outlook and iCloud Calendar for years and has built calendar integrations that handle billions of API calls.
The lessons we learned from working with all the major calendar APIs went into the Apiroc Unified Calendar API. It saves developers hundreds of hours on calendar-related issues, so they can focus on the features that move their product forward.
Sign Up for Apiroc to try the Unified Calendar API and integrate multiple calendar providers through a single API. The free plan does not require a credit card.
FAQ
What account do I need before using the Outlook Calendar API?
A Microsoft Work or Developer account with access to Azure Active Directory is required.
Which permission scopes should I add for full calendar access?
Add Calendars.ReadWrite (and Calendars.ReadWrite.Shared if you need shared calendars) in Microsoft Graph.
Why set a publisher domain and branding?
Publisher verification and a branded consent screen prevent your app from showing as “unverified”, and they are now expected for most multi-tenant apps.
How often must I renew Outlook webhook subscriptions?
Graph calendar webhooks expire after a few hours, so you should schedule a background job that refreshes every subscription that is about to expire.
Does Outlook Calendar API support push notifications?
Yes. Create a Microsoft Graph subscription and you will receive change notifications instead of having to poll.
Is there an easier way to integrate Outlook, Google, and iCloud calendars into my app?
Yes. A Unified Calendar API such as Apiroc wraps all major providers behind one consistent JSON interface. With the Apiroc Unified Calendar API, you don’t need to build and maintain a separate integration for each calendar provider.